11g Grid | Monitoring Management Services and Repository

Posted by Sagar Patil

Management Services and Repository:

Lets you monitor system performance and access diagnostic information for the Oracle Management Services and Management Repository.

You can view:

  • The overall health of Enterprise Manager.
  • The status and performance of the Repository DBMS Jobs that handle Enterprise Manager’s maintenance and monitoring functionality.
  • The health and configuration of all Management Services.
  • Performance errors for the DBMS jobs and Management Service components (Repository Metrics).

Click at Setup ->  “Management Services and Repository” tab

Overview:

The General section shows general statistics about the Management Repository such as Availability or the number of administrators for this Management Repository.

The Management Services : provides you with an overview of the health and configuration of all Management Services, including their status, any errors encountered, the performance (load processing) of the Management Services when loading metric data to the Management Repository, and information on files waiting to be loaded into the Management Repository.

You can easily view how well the Management Services are performing by looking at the Files Pending Load columns.

You can also look at the performance over time by clicking on the metric link and going to the metrics detail page; for example, for the same amount of data processed, a decreasing trend in loader throughput might indicate that resources on the machine are being maxed out and an additional Management Service might need to be added for load balancing.

Click on “Management Services”  -> Name_of_Management_Service  to see detailed statistics on  “Management Service”.

Repository Operations : The Repository Operations page provides you with an overview of the status and performance of the Repository DBMS Jobs that handle part of Enterprise Manager’s maintenance and monitoring functionality. These DBMS jobs run within the Management Repository and require no user input.

Use the Repository Operations page to view the performance of the Repository DBMS jobs and the errors which have occurred to see how Enterprise Manager is performing.

  • If there are any errors shown on the page, see the specific error.
  • If a job is down and there is no error, view the database alert log for more information.
  • If the Processing Time Percent (Last Hour) is running large and the Throughput is low, check for possible errors in the System Errors page, or alerts in the database alert log.
  • If any DBMS job is down, you must determine what the problem is from the generated error messages. You may have to connect to the database as a super administrator and shut down and restart it in order to restart the job.
  • If you want more information, clicking a link brings you to a metrics detail page.

Errors

The Errors page shows you the performance errors for the DBMS jobs and Management Service components. It also shows the number of duplicate targets. If you click the link, it will bring you to the duplicate targets page. To resolve duplicate target errors, the duplicate target must be renamed on the conflicting Oracle Management Agent.


Grid false alert "Agent to OMS communication is broken"

Posted by Sagar Patil

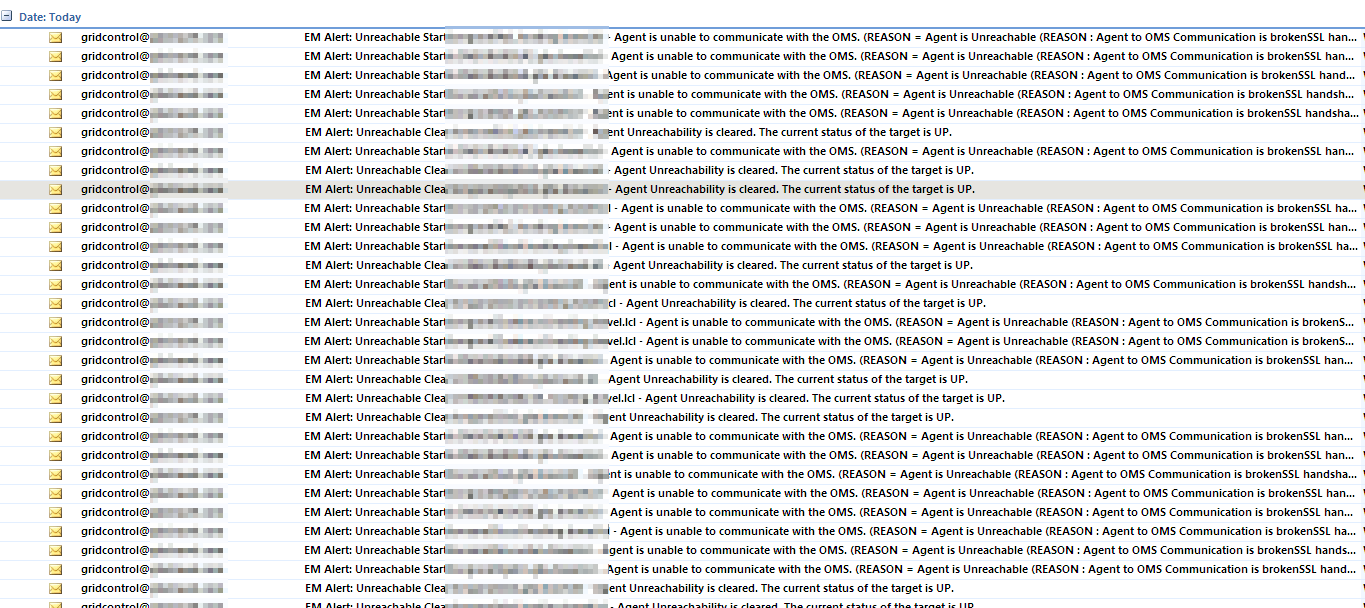
If you are receiving tonnes of alerts from grid as below, here is a simple solution.

DBA_000337

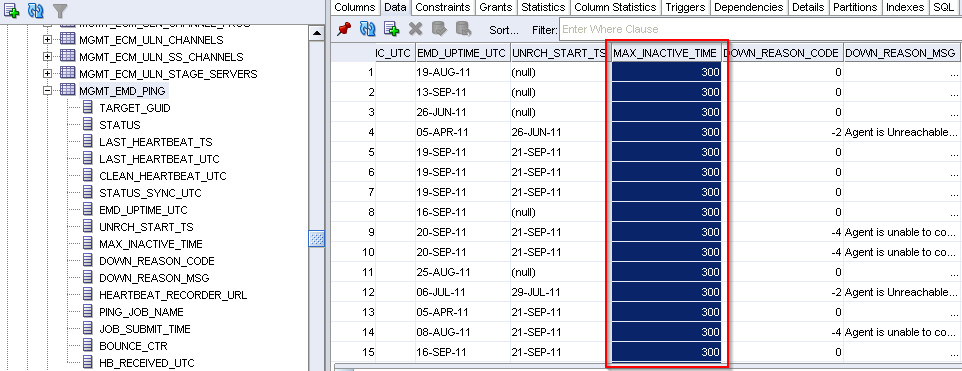
Increase max_inactive_time in table sysman.mgmt_emd_ping, default timeout is 120 secs (2 mins)

DBA_000336

How does this parameter work with Grid & Agent?

Each Management Agent sends a periodic signal to an Oracle Management Service (OMS) indicating that the Management Agent is available.

If the Management Service does not receive a signal from an Management Agent within a specified time interval (default of 120 seconds) then the Management Service performs a reverse ping. A reverse ping is when the Management Service attempts to contact the Management Agent using the Management Agent URL. If the reverse ping succeeds, then the Oracle Management Service knows that the Management Agent and host are both available.

If the Management Service reverse ping fails, then all targets monitored by the Management Agent are considered to be in the “Agent Unreachable” state, and the Oracle Management Service attempts a TCP ping of the host on which the Management Agent resides. Based on the results of the TCP ping, one of two messages will be returned:

  • If the Management Service’s TCP ping to the host succeeds, then the Management Service determines that the Management Agent is down, but the host is still up. The notification alert message will indicate this state.The message is as follows:Agent is Unreachable (REASON = Connection refused) but the host is UP.The REASON will be filled with the error that was received while performing the reverse ping.
  • If the Management Service’s TCP ping to the host fails, then, you may conclude one of the following:
    • There are network problems between the Management Service and Management Agent hosts
    • The host itself is down
    • The host cannot be reached using a ping because a firewall exists between the Management Service and the Management Agent hosts that prevents ICMP traffic from passing, or the Management Agent host does not support ICMP packets

    The notification alert message will indicate the problem. If Management Service’s host ping fails, the message is:

    Agent is Unreachable (REASON = Connection refused). Host is unreachable (REASON = unknown host)

    The REASON for Agent Unreachable will be filled with the error we received while perfoming the reverse ping and the REASON for host unreachability will be filled with the error we received while performing the host ping.


Understanding 11g Grid Directory Structure , Config & Log files

Posted by Sagar Patil

If you can’t see directory structure properly, use this file

$cd /opt/app/oracle/Middleware
[oracle@Middleware]$ tree -L 2
.
|-- WebLogicServer
|   |-- Oracle_WT
|   |-- agent11g
|   |-- domain-registry.xml
|   |-- logs
|   |-- modules
|   |-- oms11g ($OMS_HOME)
|        |-- cfgtoollogs (Install Log)
|            |-- oui
|                |-- installActions2011XXX.log
|                |-- oraInstall2011XXX.log
|        |-- sysman
|            |-- log
|                |-- emrepocminst.log
|            |-- schemamanager
|                |-- emschema.log (Install Log)
|            |--config
|                |-- httpd_em.conf
|                |-- emoms.properties
|   |-- oracle_common
|   |-- patch_wls1032
|   |-- registry.dat
|   |-- registry.xml
|   |-- user_projects
|   |-- utils
|   |-- wlserver_10.3
|        |-- common
|            |-- emnodemanager (Oracle WebLogic Server Logs)
|                |-- nodemanager.log
|                |-- nodemanager.properties
|               
-- gc_inst (EM INSTANCE BASE)
 |-- WebTierIH1
 |   |-- OHS
 |   |-- auditlogs
 |   |-- bin
 |   |-- config
 |   |-- diagnostics
 |       |-- logs
 |           |-- OPMN
 |               |-- opmn  (WebTier logs)
 |                   |-- provision.log
 |                   |-- opmn.out
 |                   |-- debug.log
 |                   |-- opmn.log
 |           |-- OHS
 |               |-- ohs1  (WebTier logs)
 |                   |-- access_log
 |                   |-- mod_wl_ohs.log
 |-- em
 |   |-- EMGC_OMS1 (OMS_NAME)
 |       |-- emgc.properties ( Contains OMS ServerName, OMS PortNumbers)
 |       |-- Sysman
 |           |-- Log
 |               |--    emoms.log : Main log file for the OMS.
 |                 |        Number of files created will be = (log4j.appender.emlogAppender.MaxBackupIndex + 1)
 |                |--    emoms.trc :    Main trace file for the OMS.
 |                |        Number of files created will be = (log4j.appender.emtrcAppender.MaxBackupIndex + 1)
 |                |--    secure.log
 |                |        Contains output from the 'emctl secure oms' commands.
 |                |--    emctl.msg
 |                |        Created / written to by the HealthMonitor thread of the OMS, when it re-starts the OMS due to a critical error.
 |                |--    emctl.log
 |                        Created by the emctl utility, when any commands are executed in the OMS home          
 |-- user_projects
     |-- domains
         |-- GCDomain
             |-- servers
                 |-- EMGC_OMS1 (Oracle WebLogic Server Logs : GRID Logs)
                     |-- logs
                         |-- EMGC_OMS1.log        - JVM Application Log
                         |-- access.log           - Smiilar to http acess_log
                         |-- EMGC_OMS1.out   
                |-- EMGC_ADMINSERVER  (Oracle WebLogic Server Logs : AdminServer Logs)
                         |-- logs
                         |-- EMGC_ADMINSERVER.log       
                         |-- GCDomain.log                  
                         |-- EMGC_ADMINSERVER.out

---------------------------------------------------------------------------------------------------------
Component                                 Location
---------------------------------------------------------------------------------------------------------
Oracle HTTP Server (OHS)       <EM_INSTANCE_BASE>/<webtier_instance_name>/diagnostics/logs/OHS/<ohs_name>
For example,                /u01/app/Oracle/gc_inst/WebTierIH1/diagnostics/logs/OHS/ohs1

OPMN                        <EM_INSTANCE_BASE>/<webtier_instance_name>/diagnostics/logs/OPMN/<opmn_name>
For example,                /u01/app/Oracle/gc_inst/WebTierIH1/diagnostics/logs/OPMN/opmn1

Oracle WebLogic                <EM_INSTANCE_BASE>/user_projects/domains/<domain_name>/servers/<SERVER_NAME>/logs/<SERVER_NAME>.out
For example,                /u01/app/Oracle/gc_inst/user_projects/domains/GCDomain/servers/EMGC_OMS1/logs/EMGC_OMS1.out

Oracle Enterprise Manager to 10g Grid Migration Process

Posted by Sagar Patil

Migrating from previous Oracle Enterprise Manager releases to Grid Control is a two-step process:

1. Deploy the OMA (Agent) to all managed servers.
2. Migrate existing Oracle Enterprise Manager administrator accounts to Grid Control.

1. Deploy the OMA (Agent) to all managed servers.

To simplify and automate Management Agent deployment, a Tcl script is provided that is submitted as a job from an Enterprise Manager Release 2.2, Release 9.0.1, or Release 9.2 Job system. The deployment script (agentIntallJob.tcl) can be found in the Oracle Enterprise Manager 10g home directory at the following location:

%ORACLE_HOME/sysman/agent_download/agentInstallJob.tcl

2. Migrate existing Oracle Enterprise Manager administrator accounts to Grid Control.

Once the Oracle Enterprise Manager 10g Management Agents have been deployed and configured, the next step is to migrate information about users, privileges, groups, and preferred credentials from the original Management Repository to the Oracle Enterprise Manager 10g Management Repository.

Both Enterprise Manager 9i and Oracle Enterprise Manager 10g save and encrypt all administrator accounts and preferred credentials in the repository. In order to migrate all of these accounts over to Enterprise Manager 10g, you must run the Migration Utility from the Enterprise Manager 10g home.

This command line utility can be found in the following directory: %EM_HOME%/bin/repo_mig

The Migration Utility requires the repository user and password for both the original Management Repository database and for the new Oracle Enterprise Manager 10g Management Repository database.

You execute the utility and specify operational parameters using the following format:

$ repo_mig   –migrate  EM_user/password@old_repository_host:port:sid  sysman/password@OMR_host:port:sid

where:
-preview: Generates a preliminary migration report without carrying out the migration.
-migrate: Performs migration of groups, administrators, target privileges, and preferred credentials of hosts, databases, and listeners.
source_user: Source OEM repository user name
source_pwd: Source OEM repository password
source_service: Source OEM repository service. For example, Host:Port:SID
dest_user: Destination OEM repository user name
dest_pwd: Destination OEM repository password
dest_service: Destination OEM repository service. (Host:Port:SID)

Once the migration is complete, the account information is then saved and encrypted. The passwords on all of the accounts will remain the same.

11g Grid | How to manually clear EM Grid Control alerts

Posted by Sagar Patil

List Alerts and number of times they have been raised?

select substr(message_nlsid,1,50),count(*)
 from mgmt_current_severity
 where message_nlsid is not null
 group by message_nlsid
 having count(*) > 10
 order by 2 desc,1 ;

 Message_nlsid                            Count                
-------------------------------------------------------------       
invalid_objects_count_alertmessage               88
service_perf_stat_alertmessage                   37
adrAlertLog_accessViolationErrStack_alertmessage 31
Response_Status_alertmessage                     29
resource_instance_value_alert_message_push       16
adrAlertLog_genericInternalErrStack_alertmessage 15
alert_streams_process_status                     15
TNSERRORS_tnserr_alertmessage                    14

SQL to list all alerts against a given “message_nlsid”

select A.target_name, A.target_type, B.target_guid, B.message
 from mgmt_targets  A, mgmt_current_severity B
 where message_nlsid='invalid_objects_count_alertmessage'
 AND A.target_guid=B.target_guid
 order by TARGET_NAME, TARGET_TYPE;

SQL if you want to list/delete alerts for a known “TARGET”

SELECT A.target_name
, B.target_guid
 , B.metric_guid
 , B.key_value
 FROM mgmt_targets A
 JOIN mgmt_current_severity B
 ON A.target_guid = B.target_guid
 WHERE upper ( A.target_name ) LIKE '%TESTDB%';
DECLARE
CURSOR c1 IS
SELECT A.target_name
, B.target_guid
, B.metric_guid
, B.key_value
FROM mgmt_targets A
JOIN mgmt_current_severity B
ON A.target_guid = B.target_guid
WHERE upper ( A.target_name ) LIKE '%TESTDB%';

BEGIN
FOR r IN c1
LOOP
dbms_output.put_line ( 'R.TARGET_GUID = ' || r.target_guid || '  , r.metric_guid = ' || r.metric_guid || '  , r.key_value = ' || r.key_value );
sysman.em_severity.delete_current_severity ( r.target_guid
, r.metric_guid
, r.key_value );
DELETE from sysman.mgmt_severity
WHERE target_guid = r.target_guid
AND metric_guid = r.metric_guid
AND key_value = r.key_value;
END
LOOP;
COMMIT;
END;

List all alerts with a message “invalid_objects_count_alertmessage”

SELECT A.target_name,B.target_guid,  B.metric_guid,  B.key_value  FROM mgmt_targets A JOIN mgmt_current_severity B  ON A.target_guid = B.target_guid  WHERE message_nlsid='invalid_objects_count_alertmessage';

Delete all alerts for message “invalid_objects_count_alertmessage”

SQL> select severity_code,message
 from mgmt_current_severity
 where message_nlsid='invalid_objects_count_alertmessage'; 
---------------------
88 rows selected

DECLARE
 CURSOR c1 IS
 SELECT B.target_guid,
 B.metric_guid,
 B.key_value
 FROM mgmt_targets A JOIN mgmt_current_severity B
 ON A.target_guid = B.target_guid
 WHERE message_nlsid='invalid_objects_count_alertmessage';
BEGIN
 FOR r IN c1 LOOP
 dbms_output.put_line( 'R.TARGET_GUID = ' ||r.target_guid || '  , r.metric_guid = ' || r.metric_guid || '  , r.key_value = ' || r.key_value);
 sysman.em_severity.delete_current_severity(r.target_guid,r.metric_guid,r.key_value);
 DELETE from sysman.mgmt_severity
 WHERE
 target_guid = r.target_guid AND
 metric_guid = r.metric_guid AND
 key_value = r.key_value;
 END LOOP;
 COMMIT;
END;
SQL > select severity_code,message
 from mgmt_current_severity
 where message_nlsid='invalid_objects_count_alertmessage'; 
no rows selected
If you find it difficult to delete using "message_nlsid" use message flashed at EM console instead.

List Alerts :
SELECT A.target_name,B.target_guid,message,
 B.metric_guid,
 B.key_value
 FROM mgmt_targets A JOIN mgmt_current_severity B
 ON A.target_guid = B.target_guid
 WHERE message like '%An%access%violation%detected%'; 

Delete Alerts :    
DECLARE
 CURSOR c1 IS
 SELECT B.target_guid,
 B.metric_guid,
 B.key_value
 FROM mgmt_targets A JOIN mgmt_current_severity B
 ON A.target_guid = B.target_guid
 WHERE message like '%An%access%violation%detected%';

BEGIN
 FOR r IN c1 LOOP
 dbms_output.put_line( 'R.TARGET_GUID = ' ||r.target_guid || '  , r.metric_guid = ' || r.metric_guid || '  , r.key_value = ' || r.key_value);
 sysman.em_severity.delete_current_severity(r.target_guid,r.metric_guid,r.key_value);
 DELETE from sysman.mgmt_severity
 WHERE
 target_guid = r.target_guid AND
 metric_guid = r.metric_guid AND
 key_value = r.key_value;
 END LOOP;
 COMMIT;
END;

Delete old alerts date/monthwise

select count ( * )
 , to_char ( trunc ( collection_timestamp
 , 'MONTH' )
 , 'MONTH' )
 from mgmt_current_severity
 group by trunc ( collection_timestamp
 , 'MONTH' )
 order by trunc ( collection_timestamp
 , 'MONTH' );
 COUNT(*) TO_CHAR(TRUNC(COLLECTION_TIMESTAMP,'
---------- ------------------------------------
 153 MARCH
 147 APRIL
 120 MAY

DECLARE
 CURSOR c1 IS
 SELECT B.target_guid
 , B.metric_guid
 , B.key_value
 FROM mgmt_targets A
 JOIN mgmt_current_severity B
 ON A.target_guid = B.target_guid
 WHERE to_char ( trunc ( b.collection_timestamp
 , 'MONTH' )
 , 'MONTH' ) like 'MAR%';
 BEGIN
 FOR r IN c1
 LOOP
 dbms_output.put_line ( 'R.TARGET_GUID = ' || r.target_guid || '  , r.metric_guid = ' || r.metric_guid || '  , r.key_value = ' || r.key_value );
 sysman.em_severity.delete_current_severity ( r.target_guid
 , r.metric_guid
 , r.key_value );
 DELETE from sysman.mgmt_severity
 WHERE target_guid = r.target_guid
 AND metric_guid = r.metric_guid
 AND key_value = r.key_value;
 END
 LOOP;
 COMMIT;
 END;
 PL/SQL procedure successfully completed.

COUNT(*) TO_CHAR(TRUNC(COLLECTION_TIMESTAMP,’
———- ————————————
147 APRIL
120 MAY

How Grid Enterprise Manager Determines Host and Management Agent Availability

Posted by Sagar Patil

The availability of the targets you manage is directly affected by the availability of the Management Agents, which gather data about your managed targets, and the host computers on which your targets are installed. As a result, it is important to understand how Enterprise Manager determines host and Management Agent availability.

Each Management Agent sends a periodic signal to an Oracle Management Service (OMS) indicating that the Management Agent is available.

If the Management Service does not receive a signal from an Management Agent within a specified time interval (default of 120 seconds) then the Management Service performs a reverse ping. A reverse ping is when the Management Service attempts to contact the Management Agent using the Management Agent URL. If the reverse ping succeeds, then the Oracle Management Service knows that the Management Agent and host are both available.

If the Management Service reverse ping fails, then all targets monitored by the Management Agent are considered to be in the “Agent Unreachable” state, and the Oracle Management Service attempts a TCP ping of the host on which the Management Agent resides. Based on the results of the TCP ping, one of two messages will be returned:

  • If the Management Service’s TCP ping to the host succeeds, then the Management Service determines that the Management Agent is down, but the host is still up. The notification alert message will indicate this state.The message is as follows:Agent is Unreachable (REASON = Connection refused) but the host is UP.The REASON will be filled with the error that was received while performing the reverse ping.
  • If the Management Service’s TCP ping to the host fails, then, you may conclude one of the following:
    • There are network problems between the Management Service and Management Agent hosts
    • The host itself is down
    • The host cannot be reached using a ping because a firewall exists between the Management Service and the Management Agent hosts that prevents ICMP traffic from passing, or the Management Agent host does not support ICMP packets

    The notification alert message will indicate the problem. If Management Service’s host ping fails, the message is:

    Agent is Unreachable (REASON = Connection refused). Host is unreachable (REASON = unknown host)

    The REASON for Agent Unreachable will be filled with the error we received while perfoming the reverse ping and the REASON for host unreachability will be filled with the error we received while performing the host ping.

11g Grid | Creating and Comparing a Baseline

Posted by Sagar Patil

As a DBA,  one can’t look at entire application performance. But there is an easy way to see if database server load is normal when you hit issues . It’s done by creating and comparing baselines/snapshots under 11g Grid.  This option doesn’t work with 10g so you will need 11g database.

This post will cover-

  • Creating a single Baseline
  • Creating a Repeating Baseline
  • Comparing a Baseline to Another Baseline or Pair of Snapshots

Baseline Interval Type

Element Description
Single You define a single baseline type using a single fixed time period with specific beginning and ending times and dates. Single baseline periods are useful for establishing baselines over user-defined periods of special processing, such as month-end.
Repeating You define a repeating baseline type using a fixed time period with specific beginning and ending times. This time period can be repeated daily or weekly. Repeating baseline periods are useful for observing recurring performance patterns. You can then use these statistics to automatically set metric thresholds for alerting.

The first thing you need to do is locate a normal day and create reference point.

To create a single baseline
From the Database Home page, click Server.The Server page appears.

  1. Under Statistics Management, click AWR Baselines.The AWR Baselines page appears with a list of existing baselines displayed.
  2. Click Create.The Create Baseline: Baseline Interval Type page appears.
  3. Select Single.
  4. Click Continue.The Create Baseline: Single Baseline page appears.
  5. In the Baseline Name field, enter a name for the baseline.
  6. Under Baseline Interval, select whether to use a snapshot range or a time range for the baseline. Do one of the following:
    • To use a range, select Snapshot Range. Complete the following steps:
      • Under Select Time Period, select a start time for the baseline by selecting Period Start Time and the snapshot icon below the Active Sessions chart that corresponds to the desired start time.
      • Select an end time for the baseline by selecting Period End Time and the snapshot icon below the Active Sessions chart that corresponds to the desired end time.
      • Optionally, to view older snapshots that are not displayed below the Active Sessions chart, expand Change Chart Time Period. Enter the desired start date in the Chart Start Date field and the desired end date in the Chart End Date field, and click Go.

    • To use a time range, select Time Range. Complete the following steps:
      • In the Start Time fields, select a start time for the baseline.
      • In the End Time fields, select an end time for the baseline.
  7. Click Finish.


Creating a Repeating Baseline

A repeating baseline is a baseline that repeats during a time interval over a specific period. For example, a repeating baseline may repeat every Monday from 8:00 a.m. to 10:00 a.m. from February 6, 2009 to February 6, 2010.

To create a repeating baseline:

  1. From the Database Home page, click Server.The Server page appears.
  2. Under Statistics Management, click AWR Baselines.The AWR Baselines page appears with a list of existing baselines displayed.
  3. Click Create.The Create Baseline: Baseline Interval Type page appears.
  4. Select Repeating and then click Continue.The Create Baseline: Repeating Baseline Template page appears.
  5. In the Baseline Name Prefix field, enter a name prefix for the baseline.
  6. Under Baseline Time Period, specify the time of the day that you want the baseline to begin collecting AWR data and the duration of the baseline collection.
  7. Under Frequency, do one of the following:
    • Select Daily if you want the baseline to repeat on a daily basis.
    • Select Weekly if you want the baseline to repeat on a weekly basis, and then select the day of the week on which the baseline will repeat.
  8. Under Interval of Baseline Creation, complete the following steps:
    1. In the Start Time fields, select a date and time in the future when the data collection should begin.
    2. In the End Time fields, select a date and time in the future when the data collection should end.
  9. Under Purge Policy, enter the number of days to retain captured baselines.
  10. Click Finish.A baseline template with the same name as the baseline name prefix will be created.
  11. A baseline template is a specification that enables Oracle Database to automatically generate a baseline for a future time period.

Comparing a Baseline to Another Baseline or Pair of Snapshots

When performance degradation occurs over time, you can run the AWR Compare Periods report to compare the degraded performance.

To compare a baseline to another baseline

  1. From Database Home page, click Server.
  2. Under Statistics Management, click Automatic Workload Repository.
  3. Under Manage Snapshots and Baselines, click the link next to Baselines.
  4. Complete the following steps:
    1. Select the baseline to use for the report.At least one existing baseline must be available.
    2. From the Actions list, select Compare Periods and click Go.

    The Compare Periods: Second Period Start page appears. Under First Period, the selected baseline is displayed.

  5. Compare the baseline selected in the first period to another baseline or a pair of snapshots. Do one of the following:
    • To compare to another baseline, select Select a Baseline and the baseline you want to use in the second period, and then click Next.The Compare Periods: Review page appears. Go to Step 7
    • To compare to a pair of snapshots, select Select Beginning Snapshot and the beginning snapshot to use in the second period, and then click Next.The Compare Periods: Second Period End appears. Proceed to the next step.
  6. Select the ending snapshot for the snapshot period that will be included in the report and then click Next.
  7. Review the periods to be included in the report and then click Finish.
  8. Click Report to view the report.
  9. One of first thing I look for is “Service Statistics”

To save the report as an HTML file, click Save to File.

Digging deep in Oracle Grid Repository for Information

Posted by Sagar Patil

How Grid Repository Stores Data?

The agents upload data at MGMT_METRIC_RAW table which is retained for 7 days.
Raw data are aggregated by Grid Control based on a predefined policy into 1-hour records, stored in MGMT_METRIC_1HOUR.
After 31 days or a month, 1-hour records in MGMT_METRIC_1HOUR are subject for further aggregation that rolls into 1-day records.
These 1-day records are stored in MGMT_METRIC_1Day for 365 days or 1 year before purged by Grid Control.

Modify these retention policies by updating the mgmt_parameters table in the OMR.
Table Name                   Retention Parameter                  Retention Days
MGMT_METRICS_RAW             mgmt_raw_keep_window                    7
MGMT_METRICS_1HOUR           mgmt_hour_keep_window                   31
MGMT_METRICS_1DAY            mgmt_day_keep_window                    365

To query data in above tables, we need to know TARGET_GUID and METRIC_GUID.
For easier access using names “target names” or “metric names” we can use 3 views MGMT$METRIC_DETAILS, MGMT$METRIC_HOURLY, and MGMT$METRIC_DAILY.
These views owned by SYSMAN are based on these 3 main tables but having extra columns like ‘target_name’, ‘metric_name’ for easier referrence.

<
Following SQL will return definitions of MGMT$METRIC_DETAILS,METRIC_HOURLY & METRIC_DAILY

select VIEW_NAME
, TEXT_LENGTH
, TEXT
from dba_views
where OWNER = ‘SYSMAN’
and VIEW_NAME in ( ‘MGMT$METRIC_DETAILS’
, ‘MGMT$METRIC_HOURLY’
, ‘MGMT$METRIC_DAILY’ );

Let’s have a look at attributes stored at these views which we could use for reporting.
The common attributes are “Property_name” & “target_type”.

select unique property_name
from mgmt$target_properties
order by 1;

———————————————
CRSHome
CRSSoftwareVersion
CRSVersion
CRSVersionCategory
ClusterName

DBDomain
DBName
DBVersion
InstanceName
SID

DataGuardStatus
DatabaseName
DatabaseType
DatabaseUser
DbBlockSize
OpenMode
OracleHome
StartTime
StatisticsLevel
background_dump_dest
core_dump_dest

ListenAddress
ListenPort
ListenerOraDir
LsnrName

HARDWARE_TYPE
Machine
MachineName
IP_address
CPUCount

OS
OS_patchlevel

RACInstNum
RACOption

select unique target_type
from mgmt$target
order by 1;

———————————————
cluster
composite
host
j2ee_application
metadata_repository
netapp_filer
oracle_csa_collector
oracle_database
oracle_emd
oracle_emrep
oracle_ias_farm
oracle_listener
rac_database
weblogic_domain
weblogic_j2eeserver

Let’s combine these 2 views to locate some interesting facts.

List Targets with TNS Listener ports configured :

SELECT mgmt$target.host_name
 , mgmt$target.target_name
 , mgmt$target.target_type
 , mgmt$target_properties.property_name
 , mgmt$target_properties.property_value
 FROM mgmt$target
 , mgmt$target_properties
 WHERE ( mgmt$target.target_name = mgmt$target_properties.target_name )
 AND ( mgmt$target.target_type = mgmt$target_properties.target_type )
 and ( mgmt$target.target_type = 'oracle_listener' )
 and ( mgmt$target_properties.property_name = 'Port' );

Devora02       LISTENER_ora02                       oracle_listener Port 1529
Devora01       LISTENER_ora01                       oracle_listener Port 1529
Devora04       LISTENER_ora04                       oracle_listener Port 1529

List Machine_Names, CPU Count & Database Verion for Licensing

SELECT mgmt$target.host_name
 , mgmt$target_properties.property_name
 , mgmt$target_properties.property_value
 FROM mgmt$target
 , mgmt$target_properties
 WHERE ( mgmt$target.target_name = mgmt$target_properties.target_name )
 AND ( mgmt$target.target_type = mgmt$target_properties.target_type )
 AND ( mgmt$target_properties.property_name in ( 'CPUCount','DBVersion' ) )
 GROUP BY mgmt$target.host_name
 , mgmt$target_properties.property_name
 , mgmt$target_properties.property_value
 order by mgmt$target.host_name;

List Dataguard Instances mounted in APPLY mode

SELECT mgmt$target.host_name
 , mgmt$target.target_name
 , mgmt$target.target_type
 , mgmt$target_properties.property_name
 , mgmt$target_properties.property_value
 FROM mgmt$target
 , mgmt$target_properties
 WHERE ( mgmt$target.target_name = mgmt$target_properties.target_name )
 AND ( mgmt$target.target_type = mgmt$target_properties.target_type )
 and ( mgmt$target.target_type = 'oracle_database' )
 and ( mgmt$target_properties.property_name = 'OpenMode' )
 and PROPERTY_VALUE like 'READ%ONLY%WITH%APPLY%';

List RAC databases and their Attributes like ClusterName, Dataguard Status.
Change "property_name" attribute per your need

SELECT mgmt$target.host_name
 , mgmt$target.target_name
 , mgmt$target.target_type
 , mgmt$target_properties.property_name
 , mgmt$target_properties.property_value
 FROM mgmt$target
 , mgmt$target_properties
 WHERE ( mgmt$target.target_name = mgmt$target_properties.target_name )
 AND ( mgmt$target.target_type = mgmt$target_properties.target_type )
 and ( mgmt$target.target_type = 'rac_database' )
 and ( mgmt$target_properties.property_name in ( 'RACOption'
 , 'DBName'
 , 'DBDomain'
 , 'DBVersion'
 , 'ClusterName'
 , 'DataGuardStatus'
 , 'MachineName'
 , 'Role'
 , 'SID' ) )
 order by mgmt$target.host_name, mgmt$target.target_name,
mgmt$target_properties.property_name;  

RACNode1        DEV   rac_database ClusterName     crs1                          
RACNode1        DEV   rac_database DBDomain        oracledbasupport.co.uk                
RACNode1        DEV   rac_database DBName          DEV                         
RACNode1        DEV   rac_database DBVersion       10.2.0.3.0                    
RACNode1        DEV   rac_database DataGuardStatus                               
RACNode1        DEV   rac_database MachineName     RAC01-vip
RACNode1        DEV   rac_database RACOption       YES                           
RACNode1        DEV   rac_database Role            NORMAL                        
RACNode1        DEV   rac_database SID             DEV1                        
RACDGNode1       PROD rac_database ClusterName     RACDGNodecrs                        
RACDGNode1       PROD rac_database DBDomain        oracledbasupport.co.uk                      
RACDGNode1       PROD rac_database DBName          PROD                              
RACDGNode1       PROD rac_database DBVersion       11.2.0.2.0                          
RACDGNode1       PROD rac_database DataGuardStatus Physical Standby                    
RACDGNode1       PROD rac_database MachineName     RACDGNode-vip
RACDGNode1       PROD rac_database RACOption       YES                                 
RACDGNode1       PROD rac_database Role            NORMAL                              
RACDGNode1       PROD rac_database SID             PROD2

If you are having performance hit on Grid database, use following SQL to locate most active segemnts.
You can then think of archiving data in grid else moving them on speedy spindles.

select sum ( B.logical_reads_total )
 , sum ( B.physical_reads_total )
 , sum ( B.physical_writes_total )
 , sum ( buffer_busy_waits_total )
 , c.object_name
 , c.owner
 from DBA_HIST_SNAPSHOT A
 , DBA_HIST_SEG_STAT B
 , dba_objects C
 where A.Snap_id = b.snap_id
 and c.object_id = b.obj#
 and A.BEGIN_INTERVAL_TIME >= to_Date ( '17-May-2011 08:00'
 , 'DD-MON-YYYY HH24:MI' )
 and A.END_INTERVAL_TIME <= to_Date ( '17-May-2011 12:00'
 , 'DD-MON-YYYY HH24:MI' )
 group by c.object_name
 , c.owner
 order by 1 desc;

Change order by
1: For most Read Segments
3: For most Writes on a segment
4: For Waits

SQL to report Oracle init parameters for a Target database

  SELECT   target_name,
           target_type,
           name,
           VALUE
    FROM   MGMT$ECM_VISIBLE_SNAPSHOTS A, SYSMAN.MGMT_DB_INIT_PARAMS_ECM B
   WHERE       A.ECM_SNAPSHOT_ID = B.ECM_SNAPSHOT_ID
              AND TARGET_TYPE = 'rac_database'  -- Choose TARGET_TYPE
           AND name LIKE 'remote_listener%'     -- Look for a relevant Parameter
GROUP BY   target_name,
           target_type,
           name,
           VALUE
ORDER BY   Target_name, name ;

Following SQL will report All Database Target details monitored thru grid

select t.host_name
 as     host
 , ip.property_value IP
 , t.target_name
 as     name
 , decode ( t.type_qualifier4
 , ' '
 , 'Normal'
 , t.type_qualifier4 )
 as     type
 , dbv.property_value
 as     version
 , port.property_value port
 , SID.property_value SID
 , logmode.property_value
 as     "Log Mode"
 , oh.property_value
 as     "Oracle Home"
 from mgmt$target t
 , ( select p.target_guid
 , p.property_value
 from mgmt$target_properties p
 where p.property_name = 'DBVersion' ) dbv
 , ( select p.target_guid
 , p.property_value
 from mgmt$target_properties p
 where p.property_name = 'Port' ) port
 , ( select p.target_guid
 , p.property_value
 from mgmt$target_properties p
 where p.property_name = 'SID' ) sid
 , ( select p.target_guid
 , p.property_value
 from mgmt$target_properties p
 where p.property_name = 'log_archive_mode' ) logmode
 , ( select p.target_guid
 , p.property_value
 from mgmt$target_properties p
 where p.property_name = 'OracleHome' ) oh
 , ( select tp.target_name
 as     host_name
 , tp.property_value
 from mgmt$target_properties tp
 where tp.target_type = 'host'
 and tp.property_name = 'IP_address' ) ip
 where t.target_guid = port.target_guid
 and port.target_guid = sid.target_guid
 and sid.target_guid = dbv.target_guid
 and dbv.target_guid = logmode.target_guid
 and logmode.target_guid = oh.target_guid
 and t.host_name = ip.host_name
 order by 1, 3;

GRID 11g| User-Defined SQL Metric alert if a query TOPs CPU Time

Posted by Sagar Patil

It often happens that DBMS statistics  though do  good for most queries can turn a best performing query into worse performing piece of SQL.
Here is a process I used to raise an Grid alert when a good query turns BAD.

You need to locate SQL_ID first before raising an SQL UDM for it. To identify culprit you will have to sample system number of  times to pick up right candidate SQL_ID.

SELECT SQL_ID
 , Round ( elapsed_time )
 FROM ( SELECT sql_id
 , elapsed_time / 60000000 elapsed_time       -- CPU_TIME/EXECUTIONS,
 , disk_reads
 , executions
 , first_load_time
 , last_load_time
 FROM v$sql
 ORDER BY elapsed_time DESC )
 WHERE ROWNUM < 5;

#    SQL_ID    ROUND(ELAPSED_TIME)
1    6hhbs09sb16j2    1006
2    7x3utw1gc9bqn    219
3    9y7yvrq53ju75    113
4    cr988d50t86za    106

Elapsed_Time : Minutes spent
SQL_ID I need to monitor is “6hhbs09sb16j2”

select 'The culprit SQL with SQL_ID 6hhbs09sb16j2 has topped CPU time'
 from ( SELECT SQL_ID
 , Round ( elapsed_time / executions )
 , executions
 FROM ( SELECT sql_id
 , elapsed_time / 1000 elapsed_time
 , disk_reads
 , executions
 , first_load_time
 , last_load_time
 FROM v$sql
 ORDER BY elapsed_time DESC )
 WHERE ROWNUM < 5 )
 where SQL_ID = '6hhbs09sb16j2';

Navigate to Targets -> Databases -> select “Grid Database”

Scroll down at this page and select “User-Defined Metrics” under “Related Links”.  Add entry for UDM  with above SQL.

Alter schedule and Frequency per your need

Click TEST button on right hand corner to test UDM. You shoudl see response as below.

Once SQL UDM is in place you will see an alert when above SQL_ID tops up CPU time.

If you want to be notified when UDM alert raised, don’t forget to add a Notification Rule.


Modifying the Default Login Timeout Value for Grid Control 10g/11g

Posted by Sagar Patil

To prevent unauthorized access to the Grid Control console, Enterprise Manager will automatically log you out of the Grid Control console when there is no activity for a predefined period of time. For example, if you leave your browser open and leave your office, this default behavior prevents unauthorized users from using your Enterprise Manager administrator account.
By default, if the system is inactive for 45 minutes or more, and then you attempt to perform an Enterprise Manager action, you will be asked to log in to the Grid Control console again.

11g :

1. [oracle@EM_BOX config]$ $OMS_HOME/bin/emctl set property -name oracle.sysman.eml.maxInactiveTime -value -1 -sysman_pwd grid_pwd
Oracle Enterprise Manager 11g Release 1 Grid Control
Copyright (c) 1996, 2010 Oracle Corporation.  All rights reserved.
Property oracle.sysman.eml.maxInactiveTime for oms EM_BOX:4889_Management_Service has been set to value -1

#oracle.sysman.eml.maxInactiveTime=time_in_minutes
-1 : Unlimited Duration

2. Restart services to apply changed value

[oracle@EM_BOX config]$ $OMS_HOME/bin/emctl stop oms
[oracle@EM_BOX config]$ $OMS_HOME/bin/emctl start oms

10G :

1. Navigate to the <OMS_HOME>/sysman/config directory
2. Make a backup copy of the emoms.properties file. Go to the bottom of the file and add the line
#oracle.sysman.eml.maxInactiveTime=time_in_minutes
oracle.sysman.eml.maxInactiveTime=60

3. Restart services to apply changed value

[oracle@EM_BOX config]$ $OMS_HOME/bin/emctl stop oms
[oracle@EM_BOX config]$ $OMS_HOME/bin/emctl start oms

11g Grid | Fixing Incident (BEA-101020 [HTTP]) detected in ..Middleware/gc_inst/user_projects

Posted by Sagar Patil

I have tonnes of these errors reported as critical at Grid Control. It is a bug, solved in 11.2 ( not released yet).

This error message is meaningless and can be safety ignored and there is one off patch to suppress this “error” Article ID 1139600.1

Log Details show:

<msg time=’2011-04-20T18:51:48.889+01:00′ org_id=’oracle’ comp_id=’ofm’
msg_id=’719226105′ type=’INCIDENT_ERROR’ level=’1′
host_id=’omsnode.oobm.travel.lcl’ host_addr=’10.241.156.201′ prob_key=’BEA-101020 [HTTP]’
upstream_comp=” downstream_comp=” ecid=’0000Ixo2XQP2RPJ5Ing8yf1Dfim_00000M’
errid=’132′ detail_path=’/opt/app/oracle/Middleware/gc_inst/user_projects/domains/GCDomain/servers/EMGC_OMS1/adr/diag/ofm/GCDomain/EMGC_OMS1/incident/incdir_132′>
<txt>Errors in directory: /opt/app/oracle/Middleware/gc_inst/user_projects/domains/GCDomain/servers/EMGC_OMS1/adr/diag/ofm/GCDomain/EMGC_OMS1/incident/incdir_132  (incident=132):
null
</txt>

The incident doesn’t indicate cause of an error

Description
———–
Incident detected using watch rule “UncheckedException”:
Watch time:             Jan 20, 2011 6:51:48 PM BST
Watch ServerName:       EMGC_OMS1
Watch RuleType:         Log
Watch Rule:             (SEVERITY = ‘Error’) AND ((MSGID = ‘BEA-101020’) OR (MSGID = ‘BEA-101017’) OR (MSGID = ‘BEA-000802’))
Watch DomainName:       GCDomain
Watch Data:
DATE : Jan 20, 2011 6:51:48 PM BST
SERVER : EMGC_OMS1
MESSAGE : [ServletContext@2127000850[app:emgc module:/em path:/em spec-version:2.5]] Servlet failed with Exception
java.lang.IllegalStateException: Response already committed

To fix these issues follow this process : {From Metalink}

1.   Apply Patch 9882856 in the $AGENT_HOME monitoring the target for which the alert was raised.

2.    Create filter expression similar to the database 10g Alert Log Filter expression in Note 949858.1

.*BEA-(101020)\D.* – Any string
.*BEA-(101020)\D.* – Followed by the string â??BEA-â??
.*BEA-(101020)\D.* – Then 101020
.*BEA-(101020)\D.* – Followed by anything other than a digit
.*BEA-(101020)\D.* – Followed by any string

Which translates to the following errors:
BEA-101020
To add this filter expression, edit the AGENT_HOME/sysman/config/emd.properties file, add:
adrAlertLogAsErrorCodeExcludeRegex=.*BEA-(101020)\D.*
Note: There should be no spaces. This will make sure that the WLS incidents that match this regex are filtered.

3.  Restart agent

4. To manually clear the existing or old alerts about [..]EMGC_OMS1/adr/diag/ofm/GCDomain/EMGC_OMS1/alert/log.xml from Enterprise Manager Grid Control User Interface / webpage,
apply Patch 9914120

How to apply Patch 9882856?

[oracle@omsnode 9882856]$ opatch apply
Invoking OPatch 11.1.0.8.0
Oracle Interim Patch Installer version 11.1.0.8.0
Copyright (c) 2009, Oracle Corporation.  All rights reserved.
Oracle Home       : /opt/app/oracle/product/11.2/db_1
Central Inventory : /opt/app/oracle/oraInventory
from           : /etc/oraInst.loc
OPatch version    : 11.1.0.8.0
OUI version       : 11.2.0.1.0
OUI location      : /opt/app/oracle/product/11.2/db_1/oui
Log file location : /opt/app/oracle/product/11.2/db_1/cfgtoollogs/opatch/opatch.log
Patch history file: /opt/app/oracle/product/11.2/db_1/cfgtoollogs/opatch/opatch_history.txt
OPatch detects the Middleware Home as “/opt/app/oracle/Middleware/WebLogicServer”
ApplySession applying interim patch ‘9882856’ to OH ‘/opt/app/oracle/product/11.2/db_1’
Running prerequisite checks…
Prerequisite check “CheckApplicable” failed.
The details are:
Patch 9882856: Required component(s) missing : [ oracle.sysman.top.agent, 11.1.0.1.0 ]
ApplySession failed during prerequisite checks: Prerequisite check “CheckApplicable” failed.
System intact, OPatch will not attempt to restore the system
OPatch failed with error code 74

[oracle@omsnode 9882856]$ which opatch
/opt/app/oracle/Middleware/WebLogicServer/agent11g/OPatch/opatch

Opatch failed as it is looking for ORACLE_HOME set to AGENT_HOME
[oracle@omsnode 9882856]$ export ORACLE_HOME=$AGENT_HOME

[oracle@omsnode 9882856]$ echo $ORACLE_HOME
/opt/app/oracle/Middleware/WebLogicServer/agent11g
[oracle@omsnode 9882856]$ opatch apply
Invoking OPatch 11.1.0.8.0
Oracle Interim Patch Installer version 11.1.0.8.0
Copyright (c) 2009, Oracle Corporation.  All rights reserved.
Oracle Home       : /opt/app/oracle/Middleware/WebLogicServer/agent11g
Central Inventory : /opt/app/oracle/oraInventory
from           : /etc/oraInst.loc
OPatch version    : 11.1.0.8.0
OUI version       : 11.1.0.8.0
OUI location      : /opt/app/oracle/Middleware/WebLogicServer/agent11g/oui
Log file location : /opt/app/oracle/Middleware/WebLogicServer/agent11g/cfgtoollogs/opatch/opatch.log
Patch history file: /opt/app/oracle/Middleware/WebLogicServer/agent11g/cfgtoollogs/opatch/opatch_history.txt
OPatch detects the Middleware Home as “/opt/app/oracle/Middleware/WebLogicServer”
ApplySession applying interim patch ‘9882856’ to OH ‘/opt/app/oracle/Middleware/WebLogicServer/agent11g’
Running prerequisite checks…
OPatch detected non-cluster Oracle Home from the inventory and will patch the local system only.

Please shutdown Oracle instances running out of this ORACLE_HOME on the local system.
(Oracle Home = ‘/opt/app/oracle/Middleware/WebLogicServer/agent11g’)
Is the local system ready for patching? [y|n]
y
User Responded with: Y
Backing up files and inventory (not for auto-rollback) for the Oracle Home
Backing up files affected by the patch ‘9882856’ for restore. This might take a while…
Backing up files affected by the patch ‘9882856’ for rollback. This might take a while…
Patching component oracle.sysman.top.agent, 11.1.0.1.0…
Copying file to “/opt/app/oracle/Middleware/WebLogicServer/agent11g/sysman/admin/scripts/alertlogAdrAs.pl”
ApplySession adding interim patch ‘9882856’ to inventory
Verifying the update…
Inventory check OK: Patch ID 9882856 is registered in Oracle Home inventory with proper meta-data.
Files check OK: Files from Patch ID 9882856 are present in Oracle Home.
The local system has been patched and can be restarted.
OPatch succeeded.

How to apply Patch 9914120?

[oracle@omsnode 9914120]$ opatch apply
Invoking OPatch 11.1.0.8.0
Oracle Interim Patch Installer version 11.1.0.8.0
Copyright (c) 2009, Oracle Corporation.  All rights reserved.
Oracle Home       : /opt/app/oracle/Middleware/WebLogicServer/agent11g
Central Inventory : /opt/app/oracle/oraInventory
from           : /etc/oraInst.loc
OPatch version    : 11.1.0.8.0
OUI version       : 11.1.0.8.0
OUI location      : /opt/app/oracle/Middleware/WebLogicServer/agent11g/oui
Log file location : /opt/app/oracle/Middleware/WebLogicServer/agent11g/cfgtoollogs/opatch/opatch.log
Patch history file: /opt/app/oracle/Middleware/WebLogicServer/agent11g/cfgtoollogs/opatch/opatch_history.txt

OPatch detects the Middleware Home as “/opt/app/oracle/Middleware/WebLogicServer”
ApplySession applying interim patch ‘9914120’ to OH ‘/opt/app/oracle/Middleware/WebLogicServer/agent11g’
Running prerequisite checks…
OPatch detected non-cluster Oracle Home from the inventory and will patch the local system only.
Please shutdown Oracle instances running out of this ORACLE_HOME on the local system.
(Oracle Home = ‘/opt/app/oracle/Middleware/WebLogicServer/agent11g’)
Is the local system ready for patching? [y|n]
y
User Responded with: Y
Backing up files and inventory (not for auto-rollback) for the Oracle Home
Backing up files affected by the patch ‘9914120’ for restore. This might take a while…
Backing up files affected by the patch ‘9914120’ for rollback. This might take a while…
Patching component oracle.sysman.top.agent, 11.1.0.1.0…
Copying file to “/opt/app/oracle/Middleware/WebLogicServer/agent11g/sysman/admin/metadata/weblogic_j2eeserver.xml”
ApplySession adding interim patch ‘9914120’ to inventory
Verifying the update…
Inventory check OK: Patch ID 9914120 is registered in Oracle Home inventory with proper meta-data.
Files check OK: Files from Patch ID 9914120 are present in Oracle Home.
The local system has been patched and can be restarted.
OPatch succeeded.

Oracle 11g Grid| How to add custom shell script to raise user defined alert/notification

Posted by Sagar Patil

Although, I can use grid to carry my RMAN backups  I am not entirely convinced about it’s transparency. As a DBA I like to  have more control to myself and I trust my custom scripts used for years more than anything else. Here is a small process I added to raise alert for failed rman backups.

I wrote 2 scripts though I can possibly combine them in a single script. Please feel free to make changes.

rman_full.sh : Level 0 RMAN bckup script & check_rman_log.sh :  Shell script to check for keywords & raise errors

#!/bin/ksh
# Declare your ORACLE environment variables  (rman_full.sh)

export ORACLE_SID=GRID
export ORACLE_BASE=/opt/app/oracle
export ORACLE_HOME=/opt/app/oracle/product/11.2/db_1
export PATH=$PATH:${ORACLE_HOME}/bin
$ORACLE_HOME/bin/rman target / msglog=/mnt/data/backups/rman/rman_${ORACLE_SID}.log <<eof
run {
allocate channel d1 type disk;
backup incremental level 0 cumulative
skip inaccessible
tag Full_Online_Backup
format ‘/mnt/data/backups/rman/OMS_data_t%t_s%s_p%p’
database;
copy current controlfile to ‘/mnt/data/backups/rman/snap_ctl.ctl’;
sql ‘alter system archive log current’;
backup
format ‘/mnt/data/backups/rman/OMS_archive_t%t_s%s_p%p’
archivelog all
delete input;
DELETE NOPROMPT OBSOLETE;
DELETE NOPROMPT EXPIRED BACKUP;
release channel d1;
}

Following shell script (check_rman_log.sh) will look for error codes & messages at rman log file and will return string value of  “Backup Completed  Successfully” else “Backup Failed” to grid control

#!/bin/bash
#author: Sagar PATIL  (check_rman_log.sh)

#!/bin/bash
#author: Sagar PATIL

# Exit codes
STATE_OK=”em_result=Backup Completed  Successfully”
STATE_CRITICAL=”em_result=Backup Failed”

#I’m just declaring the logfile variable
# logfile=/mnt/data/backups/rman/rman_GRID01DB.log

#this is the minimum size that the file should have (bytes)
minimumLogSize=1000

#I need to get current date
curDate=$(date “+%d-%b-%y” | tr ‘a-z’ ‘A-Z’)

#debug (1 = ON)
DEBUG=0

#this array will contain the words that should be found into the log
#keywordsOK[0]=”Finished backup at $curDate”
keywordsOK[1]=”Finished Control File and SPFILE Autobackup at $curDate”

#this array will contain the words that shouldn’t be found in the log.
#if they are found the script will exit with STATE_CRITICAL code (2)
keywordsBad[0]=”ORA-”
keywordsBad[1]=”ERR-”
keywordsBad[2]=”err-”
keywordsBad[3]=”Ora-”
keywordsBad[4]=”user interrupt received”

#this function checks the log file creation date. if the
#creation date is different that the current date, the
#script will exit with $STATE_CRITICAL state (error code 2)
checkCreationDate() {
#this is the date of creation of the log file (I’m using ctime UNIX stuff)
fileDate=$(stat $logfile | grep Access | tail -n 1 | awk ‘{print $2}’)
currentDate=$(date “+%Y-%m-%d”)
#compare dates
if [[ “$fileDate” != “$currentDate” ]]; then
#in this case, the dates don’t match so the script
#will print an error msg and then exit
#        echo “Error checking date: today is $currentDate and the file creation is $fileDate”
echo $STATE_CRITICAL “| Error checking date: today is $currentDate and the file creation is $fileDate”
else
#show a message if the log file creation date is OK
if [ $DEBUG -eq 1 ]; then
echo “Date checked. All OK”
fi
fi
}

#this function will first check for the words that shouldnt be
#in the log file (the ones in the keywordsBad array); if they are
#found the script will exit with STATE_CRITICAL code (2). On the
#other hand, if the ‘bad’ keywords are not found, then it will
#loop through the array that contains the words that shoud be
#found; if those keywords are not found the script will exit with
#STATE_CRITICAL code (2).
checkKeywords() {
#loop through the undesirable keywords
for i in “${keywordsBad[@]}”; do
#look for the keyword in the file
if tac $logfile | grep -w -i -m1 “$i” > /dev/null
then
#show error msg and exit
#            echo “Errors in the log ($i)”
echo $STATE_CRITICAL “|Errors in the log ($i)”
else
echo > /dev/null
fi
done

#status: 1 = OK, 0 = fail
status=1
#since the keywords that shouldnt be found in the script
#were NOT found… check for the ones that should
for i in “${keywordsOK[@]}”; do
#look for the keyword backwards in the file
if tac $logfile | grep -i -m1 “$i” > /dev/null
then
echo > /dev/null
else
#if there were found a keyword the status
#will be set to 0 indicating something wrong is happening
status=0
fi
done

#if all is OK
if [[ $status -eq 1 ]]; then
if [ $DEBUG -eq 1 ]; then
echo “The ‘good’ keywords were found :)”
fi
else #if the script couldnt find one of the keywords
#show error msg and exit
#        echo “Couldnt find the Good  keywords in the file”
echo $STATE_CRITICAL “|Couldnt find the Good  keywords in the file”
fi
}
#this function checks the log size. if it’s greater than
#1KB we consider the log file is OK; otherwise the script
#will exit with error code
checkFileSize() {
#get the file size
fileSize=$(ls -l $logfile | awk ‘{print $5}’)
#compare the log size
if [[ $fileSize -gt $minimumLogSize ]]; then
if [ $DEBUG -eq 1 ]; then
echo “Log file size is OK ($fileSize)”
fi
else
#        echo “Log file size is not OK ($fileSize)”
echo $STATE_CRITICAL “| Log file size is not OK ($fileSize)”
fi
}
#loop through the script parameters (each parameter is a path with
#logfile name example /u07/backup/RMAN/).
#Then, for each parameter run the functions.

while [ $# -ne 0 ]; do
logfile=”$1″
if [ $DEBUG -eq 1 ]; then
echo “————————————-”
echo “Checking the log file: $logfile”
fi
#check if file exists or not
if [ -e “$logfile” ]; then
#check the log file creation date
checkCreationDate
#check the file size (it uses the $minimumLogSize var)
checkFileSize
#search keywords in the file
checkKeywords
else
#        echo “The file ‘$logfile’ doesn’t exist”
echo $STATE_CRITICAL  “| The file ‘$logfile’ doesn’t exist”
fi
shift
echo
done

#At end of the program move logfile to preseve history of 30 days
#mv $logfile $logfile_curDate
#find /u07/backup/RMAN/ -name rman_*.log -mtime +30 -exec rm {} \;

#if the script was not killed in the checking part,
#then it’s probably that all is OK

  • Click at Targets from Top menu and select required  “Host” machine
  • Scroll down and you will see a link for “User-Defined Metrics” , at next screen select “create”

  • Enter details like Metric Name, Metric Type, Command Line, Operating System Credentials, Thresholds as below

  • select required Schedule and click OK.

  • If you have selected “Start Immediately after creation” radio button, in minutes you will see an alert if there is a failed backup

  • Click on message for details

Oracle 11g Grid| How to add a custom SQL UDM (User Defined Metric)

Posted by Sagar Patil

I have number of systems on grid and I want to keep grid working as smoothly as I can.
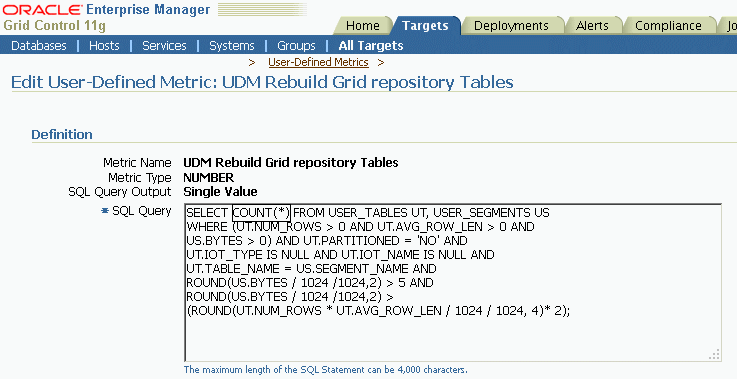
Since there are many alerts/notificatins raised & inserts/deletes happening  every single minute, often repository tables will need rebuild to gain EM performance.
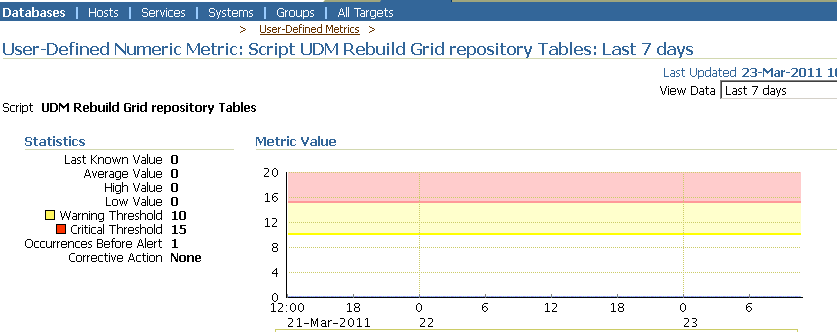
I have SQL script to track tables in need of a rebuild.

SELECT COUNT ( * )
 FROM USER_TABLES UT
 , USER_SEGMENTS US
 WHERE ( UT.NUM_ROWS > 0 AND UT.AVG_ROW_LEN > 0 AND US.BYTES > 0 )
 AND UT.PARTITIONED = 'NO'
 AND UT.IOT_TYPE IS NULL
 AND UT.IOT_NAME IS NULL
 AND UT.TABLE_NAME = US.SEGMENT_NAME
 AND ROUND ( US.BYTES / 1024 / 1024
 , 2 ) > 5
 AND ROUND ( US.BYTES / 1024 / 1024
 , 2 ) > ( ROUND ( UT.NUM_ROWS * UT.AVG_ROW_LEN / 1024 / 1024
 , 4 ) * 2 );

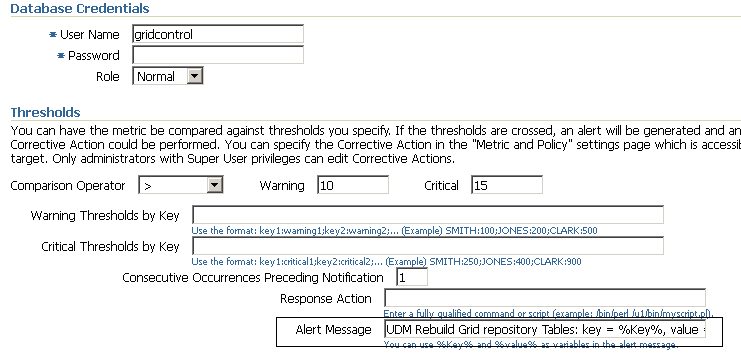
Navigate to Targets -> Databases -> select “Grid Database”

Scroll down at this page and select “User-Defined Metrics” under “Related Links”

Oracle 11g Grid | Remove failed EM Agent

Posted by Sagar Patil

Often you will come across a failed Agent installation or old agent to be removed before installing new one. Here is a porocess ..

[oracle@RACNode01 bin]$ pwd
/opt/app/oracle/product/10.2/agent11g/agent11g/oui/bin
[oracle@RACNode01 bin]$ pwd
/opt/app/oracle/product/10.2/agent11g/agent11g/oui/bin
[oracle@RACNode01 bin]$ cd ../../bin/
[oracle@RACNode01 bin]$ ./emctl stop agent
Oracle Enterprise Manager 11g Release 1 Grid Control 11.1.0.1.0
Copyright (c) 1996, 2010 Oracle Corporation.  All rights reserved.
Stopping agent … stopped.

[oracle@RACNode01 bin]$ /opt/app/oracle/product/10.2/agent11g/agent11g/oui/bin/runInstaller.sh -silent “REMOVE_HOMES={/opt/app/oracle/product/10.2/agent11g/agent11g}” -deinstall -waitForCompletion -removeallfiles -local

Starting Oracle Universal Installer…
Checking swap space: must be greater than 500 MB.   Actual 1983 MB    Passed
Preparing to launch Oracle Universal Installer from /tmp/OraInstall2011-03-04_01-38-02PM. Please wait …Oracle Universal Installer, Version 11.1.0.8.0 Productio                                                                            n
Copyright (C) 1999, 2010, Oracle. All rights reserved.

Starting deinstall
Deinstall in progress (Friday, 4 Dec 2010 13:38:09 o’clock GMT)
Configuration assistant “Agent Deinstall Assistant” succeeded
Configuration assistant “Oracle Configuration Manager Deinstall” succeeded
……………………………………………………… 100% Done.
Deinstall successful
End of install phases.(Friday, 4 Dec 2010 13:38:56 o’clock GMT)
End of deinstallations
Please check ‘/opt/app/oracle/oraInventory/logs/silentInstall2011-03-04_01-38-02PM.log’ for more details.

In this way you can remove failed EMAgent in Oracle 11g Grid.

Oracle 11g Grid : Using EMCLI to run Remote OS Commands

Posted by Sagar Patil

Here , I wish to locate disk space acquired by a Remote target Host using df command

Please read post Using EMCLI , A command line Grid Control Interface to understand how EMCLI is used

C:\EMCLI>emcli execute_hostcmd -cmd=”df -k”  -targets=”sagar-pc:host”
Error : Preferred Credentials do not exist for some targets.

The error indicates preferred user credentials are not set at Grid cntrol for this host.

Navigate to Grid -> Preferences -> Preferred Credentials -> Host ( I selected host as my target to run above command and not database)

One can set Default Credentials applied to all hosts or specific details for each individual Host

Test entered credentials by using “test button” and run  failed command again.

C:\EMCLI>emcli execute_hostcmd -cmd=”df -k”  -targets=”sagar-pc:host”
*******************************************************************************
* Target: Sagar-PC
* Execution Status: Succeeded
*******************************************************************************
Filesystem           1K-blocks      Used Available Use% Mounted on
/dev/mapper/System-Root
10063176   3090500   6461496  33% /
/dev/cciss/c0d0p1       194442     23285    161118  13% /boot
none                  16471340         0  16471340   0% /dev/shm
/dev/mapper/System-Home
2483488   2042464    314868  87% /home
/dev/mapper/System-Opt
4999260   4299264    446044  91% /opt
/dev/mapper/System-Tmp
2483488     36608   2320724   2% /tmp
*******************************************************************************
* Execution Summary
*     Targets Succeeded: 1
*     Targets Failed: 0
*******************************************************************************

Oracle 11g Grid: Using EMCLI , A command line Grid Control Interface

Posted by Sagar Patil

The Enterprise Manager Command Line Interface (EM CLI) enables you to access Enterprise Manager Grid Control functionality from text-based consoles (shells and command windows) for a variety of operating systems. You can call Enterprise Manager functionality using custom scripts, such as SQL*Plus, OS shell, Perl, or Tcl, thus easily integrating Enterprise Manager functionality with a company’s business process.

1. Requirements : Before installing EM CLI, you will need the following:
Java version 1.6.0 or greater
Workstation running Solaris, Linux, HPUX, Tru64, AIX, or Windows with NTFS (client installation)


2. Download the EM CLI Kit to your workstation.
If you have Grid control in place use URL http://%Gridcontrol%HOST%/em/console/emcli/download

3. Install EM CLI Client.

You can install client portion of EM CLI in any directory either on the same machine as the OMS or on any machine on your network (download the emclikit.jar to that machine).
Run “java -jar emclikit.jar client -install_dir=<emcli client dir>”

4. The CLI must be set up and connected to an OMS

Execute “emcli help setup” from the EM CLI Client for instructions on how to use the “setup” verb to configure client for a particular OMS. Setup emcli to work with the EM Management Server (OMS) specified by the -url argument. Issuing the “emcli setup” command with no arguments will show current OMS connection details.

C:\EMCLI>emcli setup -url=http://gridcontrol/em -username=sysman -dir=C:\EMCLI
Oracle Enterprise Manager 11g Release 11.1.0.1.0.
Enter password
Emcli setup successful

C:\EMCLI>emcli setup < Will flash Current Configuration>
Oracle Enterprise Manager 11g Release 11.1.0.1.0.
Copyright (c) 1996, 2010 Oracle Corporation and/or its affiliates. All rights re
served.
CONFIG DIRECTORY : C:\EMCLI\.emcli
OMS              : http://gridcontrol/em
EM USER          : sysman
TRUST ALL        : false

C:\EMCLI>emcli help setup

-url=”http[s]://host:port/em/”
[-username=<EM Console Username]>
[-ssousername=<EM SSO Username>]
[-ssopassword=<EM SSO Password>]
[-password=<EM Console Password>]
[-ssologinurl=<sso final login url>]
[-ssousernameparamname=<username text field name>]
[-ssopasswordparamname=<password text field name>]]
[-licans=YES|NO]
[-dir=<local emcli configuration directory>]
[-trustall]
[-novalidate]
[-noautologin]
[-custom_attrib_file=<Custom attribute file path>]
[-nocertvalidate]

C:\EMCLI>emcli create_group -name=”TEST_EMCLI_GROUP”
Group “TEST_EMCLI_GROUP:group” created successfully

C:\EMCLI>emcli get_targets -targets=”oracle_database”
Status  Status   Target Type      Target Name
ID
0       Down     oracle_database  spdtsta.gta.travel.lcl
1       Up       oracle_database  DEV2
1       Up       oracle_database  DEVDB
1       Up       oracle_database  DEV1
1       Up       oracle_database  GRIDB

The following example shows all targets. Critical and Warning columns are not included.
emcli get_targets

The following example shows all targets. Critical and Warning columns are shown.
emcli get_targets -alerts

The following example shows all oracle_database targets.
emcli get_targets -targets=”oracle_database”

The following example shows all targets whose type contains the string oracle.
emcli get_targets -targets=”%oracle%”

The following example shows all targets registered at OMS repository

emcli get_targets
Status  Statu  Target Type      Target Name
-9      n/a    group            RAC DataGuard Group
-9      n/a    metadata_reposi  /secFarm_GCDomain/GCDomain/EMGC_ADMINSERVER/mdstory             -sysman_mds
-9      n/a    oracle_ias_farm  secFarm_GCDomain
-9      n/a    weblogic_domain  /secFarm_GCDomain/GCDomain
0       Down   weblogic_j2eese  /secFarm_GCDomain/GCDomain/EMGC_OMS1
1       Up     j2ee_applicatio  /secFarm_GCDomain/GCDomain/EMGC_OMS1/OCMRepeaten
1       Up     netapp_filer
1       Up     oracle_database
1       Up     oracle_emd
1       Up     oracle_listener  LISTENER_
1       Up     rac_database
1       Up     host

Users and Credentials :

Create a new USER :

emcli create_user -name=CLI_TEST -desc=”This is a new superuser” -privilege=”SUPER_USER” -expire=”true” -password=”manager”

How to Delete User? : emcli delete_user -name=CLI_TEST

Creating BlackOuts :

Consider you don’t have access to GRID GUI or you want to embed creating blackout on fly as part of a shell script

emcli create_blackout -name=”Agent Install” -add_targets=”%TARGETNAME%:oracle_database” -reason=”Agent Install” -description=”Agent required for Monitoring” -schedule=”duration::30″

For all emcli command reference please see Oracle Documentation

Oracle 11g Grid | How to stop and start OMS Services

Posted by Sagar Patil

Stop OMS Services

[oracle@OMS_HOST bin]$ $OMS_HOME/bin/emctl stop oms
Oracle Enterprise Manager 11g Release 1 Grid Control
Copyright (c) 1996, 2010 Oracle Corporation.  All rights reserved.
Stopping WebTier…
WebTier Successfully Stopped
Stopping Oracle Management Server…
Oracle Management Server Successfully Stopped
Oracle Management Server is Down

From the AGENT_HOME directory run the following to stop the Agent.

[oracle@OMS_HOST bin]$ $AGENT_HOME/bin/emctl stop agent
Oracle Enterprise Manager 11g Release 1 Grid Control 11.1.0.1.0
Copyright (c) 1996, 2010 Oracle Corporation.  All rights reserved.
Stopping agent … stopped.

Stop Database

[oracle@OMS_HOST bin]$ sqlplus / as sysdba
SQL*Plus: Release 11.2.0.1.0 Production on Thu Mar 10 14:38:49 2011
Copyright (c) 1982, 2009, Oracle.  All rights reserved.
Connected to:
Oracle Database 11g Enterprise Edition Release 11.2.0.1.0 – 64bit Production
With the Partitioning, OLAP, Data Mining and Real Application Testing options
SQL> shutdown immediate;
Database closed.
Database dismounted.
ORACLE instance shut down.

Locate name of Listener and stop it

[oracle@OMS_HOST bin]$ ps -ef | grep tns
oracle    1958 18839  0 14:39 pts/1    00:00:00 grep tns
oracle   24736     1  0 Feb10 ?        00:01:28 /opt/app/oracle/product/11.2/db_1/bin/tnslsnr LISTENER -inherit

[oracle@OMS_HOST bin]$ lsnrctl stop LISTENER
LSNRCTL for Linux: Version 11.2.0.1.0 – Production on 10-MAR-2011 14:40:00
Copyright (c) 1991, 2009, Oracle.  All rights reserved.
Connecting to (DESCRIPTION=(ADDRESS=(PROTOCOL=TCP)(HOST=OMS_HOST)(PORT=1529)))
The command completed successfully

StartOMS Services

[oracle@OMS_HOST bin]$ lsnrctl start LISTENER

[oracle@OMS_HOST]$ sqlplus / as sysdba
SQL*Plus: Release 11.2.0.1.0 Production on Thu Mar 10 14:42:43 2011
Copyright (c) 1982, 2009, Oracle.  All rights reserved.
Connected to an idle instance.
SQL> startup;
ORACLE instance started.

[oracle@OMS_HOST]$ $OMS_HOME/bin/emctl start oms
Oracle Enterprise Manager 11g Release 1 Grid Control
Copyright (c) 1996, 2010 Oracle Corporation.  All rights reserved.
Starting WebTier…
WebTier Successfully Started
Starting Oracle Management Server…
Oracle Management Server Successfully Started
Oracle Management Server is Up

[oracle@OMS_HOST]$ cd $AGENT_HOME
[oracle@OMS_HOSTagent11g]$ cd bin/
[oracle@OMS_HOST]$ ./emctl start agent
Oracle Enterprise Manager 11g Release 1 Grid Control 11.1.0.1.0
Copyright (c) 1996, 2010 Oracle Corporation.  All rights reserved.
Starting agent …….. started.

You may come across times when OMS doens’t go down very well. Have a look at Log files for error & kill oms processess. It worked for me

[oracle]$ $OMS_HOME/bin/emctl stop oms
Oracle Enterprise Manager 11g Release 1 Grid Control
Copyright (c) 1996, 2010 Oracle Corporation.  All rights reserved.
Stopping WebTier…
WebTier Successfully Stopped
Stopping Oracle Management Server…
Error Occurred: Error during stop oms. Please check error and log files

[oracle]$ ps -ef | grep oms | cut -d: -f1
oracle   31007     1  0 15
oracle   31893 31847 30 15

[oracle]$ kill -9 31007  31893

[oracle]$ $OMS_HOME/bin/emctl start oms
Oracle Enterprise Manager 11g Release 1 Grid Control
Copyright (c) 1996, 2010 Oracle Corporation.  All rights reserved.
Starting WebTier…
WebTier Successfully Started
Starting Oracle Management Server…
Oracle Management Server Successfully Started
Oracle Management Server is Up


Understanding the 11g Grid Directory Structure , Config & Log files 

$cd /opt/app/oracle/Middleware
[oracle@Middleware]$ tree -L 2
.
|-- WebLogicServer
|   |-- Oracle_WT
|   |-- agent11g
|   |-- domain-registry.xml
|   |-- logs
|   |-- modules
|   |-- oms11g ($OMS_HOME)
|		|-- cfgtoollogs (Install Log)
|			|-- oui
|				|-- installActions2011XXX.log
|				|-- oraInstall2011XXX.log
|		|-- sysman
|			|-- log
|				|-- emrepocminst.log
|			|-- schemamanager
|				|-- emschema.log (Install Log)
|   |-- oracle_common
|   |-- patch_wls1032
|   |-- registry.dat
|   |-- registry.xml
|   |-- user_projects
|   |-- utils
|   |-- wlserver_10.3
|		|-- common
|			|-- emnodemanager (Oracle WebLogic Server Logs)
|				|-- nodemanager.log
|				|-- nodemanager.properties
|
-- gc_inst (EM INSTANCE BASE)
    |-- WebTierIH1
    |   |-- OHS
    |   |-- auditlogs
    |   |-- bin
    |   |-- config
    |   |-- diagnostics
    |       |-- logs
    |           |-- OPMN
    |               |-- opmn  (WebTier logs)
    |               	|-- provision.log
    |               	|-- opmn.out
    |               	|-- debug.log
    |               	|-- opmn.log
    |           |-- OHS
    |               |-- ohs1  (WebTier logs)
    |               	|-- access_log
    |               	|-- mod_wl_ohs.log
    |-- em
    |   |-- EMGC_OMS1 (OMS_NAME)
    |       |-- Sysman
    |           |-- Log
    |               |--	emoms.log : Main log file for the OMS.
	| 				|		Number of files created will be = (log4j.appender.emlogAppender.MaxBackupIndex + 1)
	|				|--	emoms.trc :	Main trace file for the OMS.
	|				|		Number of files created will be = (log4j.appender.emtrcAppender.MaxBackupIndex + 1)
	|				|--	secure.log
	|				|		Contains output from the 'emctl secure oms' commands.
	|				|--	emctl.msg
	|				|		Created / written to by the HealthMonitor thread of the OMS, when it re-starts the OMS due to a critical error.
	|				|--	emctl.log
	|						Created by the emctl utility, when any commands are executed in the OMS home
    |-- user_projects
        |-- domains
			|-- GCDomain
				|-- servers
					|-- EMGC_OMS1 (Oracle WebLogic Server Logs : GRID Logs)
						|-- logs
							|-- EMGC_OMS1.log		- JVM Application Log
							|-- access.log   		- Smiilar to http acess_log
							|-- EMGC_OMS1.out
					|-- EMGC_ADMINSERVER  (Oracle WebLogic Server Logs : AdminServer Logs)
						|-- logs
							|-- EMGC_ADMINSERVER.log
							|-- GCDomain.log
							|-- EMGC_ADMINSERVER.out

---------------------------------------------------------------------------------------------------------
Component 								Location
---------------------------------------------------------------------------------------------------------
Oracle HTTP Server (OHS)   	<EM_INSTANCE_BASE>/<webtier_instance_name>/diagnostics/logs/OHS/<ohs_name>
For example,				/u01/app/Oracle/gc_inst/WebTierIH1/diagnostics/logs/OHS/ohs1

OPMN						<EM_INSTANCE_BASE>/<webtier_instance_name>/diagnostics/logs/OPMN/<opmn_name>
For example,				/u01/app/Oracle/gc_inst/WebTierIH1/diagnostics/logs/OPMN/opmn1

Oracle WebLogic				<EM_INSTANCE_BASE>/user_projects/domains/<domain_name>/servers/<SERVER_NAME>/logs/<SERVER_NAME>.out
For example,				/u01/app/Oracle/gc_inst/user_projects/domains/GCDomain/servers/EMGC_OMS1/logs/EMGC_OMS1.out

Oracle 11g Grid | Setting Preferred Credentials to avoid Priv Warnings

Posted by Sagar Patil

Generally we use grid for performance and availability monitoring . I have a NON- DBA user configured at a grid preferred credential.   Sometimes I have to use grid to carry DBA tasks and here is a way to switch database preferred credentials & become a DBA

select “Preferences” and click on Preferred Credentials

Since I wish to change credentials for my Database Instance running streams I will choose “Database”

select required Target and alter username/password fields. Click on “Test” to verify credentils.


I have logged out

When I logged in again, I don’t see same privilege error

This issue could be entirely resolved by creating different user for each Grid user and adding separate database preferred credentials.

11g Grid | Where to Locate AWR reports

Posted by Sagar Patil

Navigate to TARGETs  -> Select Databases  you wish to run AWR reports at ->  Server TAB

Read more…

Oracle Grid | Tracking OS procsses using User Defined Matrix (UDM)Shell Script

Posted by Sagar Patil

Oracle grid can display number of processes for a host.  But I have a odd requirement where I need to keep track of oracle/java processes on the server.

This reminds me about other issues I had in past where I had to keep track of java/application procsses on the box.  On a odd day, I have seen them spawning at speed exhausting server resources (memory) in no time.

I wrote a small shell script to get count of oracle processes. This could be altered for absolutely anything as far as it returns number which grid can plot as a chart.

numprocesses.sh
echo “em_result=`ps -ef | grep oracle | wc -l`”

Copy above shell script at $HOST/$Directory.

Goto Grid -> targets -> Host , now select HOST where you wish to run this script.

Create UDM for shell script we wrote earlier. Add complete path at “Command Line” on AGENT BOX.

Schedule it for execution and define how frequently you want to execute this script.

Wait for next day or so to see graph as below.

You can later change your threshold level for generating an Alert/Email notification.

Oracle 11g Grid | Installing Grid Agent using "agentDownload" method

Posted by Sagar Patil

To get AGENT working with OMS Grid , you will need ports 3872,4889/4900 accessible between machines.

If you wish to delete host from OMS Grid then delete Targets/Host at grid control first. Now use following SQL script to make sure it’s not exisitng at OMS repository . It will save you lot of frustration.

SQL> select distinct target_name,target_type  from SYSMAN.MGMT$TARGET where target_name like ‘AGENT_HOST%’;
TARGET_NAME
——————————————————————————–
AGENT_HOST:3872
oracle_emd

If Agent is listed , use following SQL to remove it from OMS repository.

SQL> exec sysman.mgmt_admin.cleanup_agent(‘AGENT_HOST:3872’);
PL/SQL procedure successfully completed.

SQL> select distinct target_name,target_type  from SYSMAN.MGMT$TARGET where target_name like ‘AGENT_HOST%’;
no rows selected

Login at OMS and locate  “agentDownload” shell script

For my RHEL -11g OMS setup it’s under “$OMS_HOME/sysman/agent_download/11.1.0.1.0/linux_x64”

Copy this script at Destination AGENT_HOST location

I used “scp agentDownload.linux_x64 oracle@AGENT_HOST:/opt/app/oracle/product”

Now go to Agent host & run  script

[oracle@agent_host]$ ./agentDownload.linux_x64
agentDownload.linux_x64 invoked on Thu Mar 17 15:26:37 GMT 2011 with Arguments “”
agentDownload.linux_x64: Invalid Invocation
Usage: agentDownload.linux_x64 -b[cdhimnoprtuvxyNR]
b – Base installation location for Agent Oracle home
d – Do NOT initiate automatic target discovery
h – Usage (this message)
i – Inventory pointer location file
l – To specify as local host (pass -local to runInstaller)
m – Management Service host name for downloading the Management Agent software
n – Cluster name
o – Old Oracle Home location during Upgrade
p – Static port list file
r – Port for connecting to the Management Service host
t – Do NOT start the Agent
u – Upgrade
v – Inventory directory location
x – Debug output
c – CLUSTER_NODES
N – Do NOT prompt for Agent Registration Password
R – To use virtual hostname(ORACLE_HOSTNAME) for this installation. If this is being used along with more than one cluster nodes through -c option, then -l option also needs to be passed.

For RAC Install

Run $agentDownload.linux_x64 -b /opt/app/oracle/product -v /opt/app/oracle/oraInventory -n oct_prd_crs -c Sever1,Server2 -y
-b : Agent install Directory
-v : OraInventory Location

agentDownload.linux_x64 invoked on Thu Mar 17 15:48:27 GMT 2011 with Arguments “-b /opt/app/oracle/product -v /opt/app/oracle/product -n oct_prd_crs -y”
LogFile for this Download can be found at: “/opt/app/oracle/product/agentDownload11.1.0.1.0Oui/agentDownload.linux_x64031711154827.log”
Running on Selected Platform: Linux.x86_64
Installer location: /opt/app/oracle/product/agentDownload11.1.0.1.0Oui
Downloading Agent install response file …
using the url http://OMS_HOST:4900/agent_download/11.1.0.1.0/ to access OMS
Could not download through url . Trying secure download..
using the url https://OMS_HOST:4900/agent_download/11.1.0.1.0/ to access OMS
Downloading Oracle Installer …
using the url https://OMS_HOST:4900/agent_download/11.1.0.1.0/ to access OMS
Downloaded Oracle Installer with status=0
Downloading  Unzip Utility …
using the url https://OMS_HOST:4900/agent_download/11.1.0.1.0/ to access OMS
Downloaded UnzipUtility with status=0
Verifying Installer jar …
Verified InstallerJar with status=0
Unjarring Oracle Installer …
Archive:  /opt/app/oracle/product/agentDownload11.1.0.1.0Oui/oui_linux_x64.jar
inflating: Disk1/stage/products.xml
inflating: Disk1/stage/Queries/netQueries/10.2.0.2.0/1/netQueries.jar

—————————————————————
Agent Version     : 11.1.0.1.0
OMS Version       : 11.1.0.1.0
Protocol Version  : 11.1.0.0.0
Agent Home        : /opt/app/oracle/product/agent11g
Agent binaries    : /opt/app/oracle/product/agent11g
Agent Process ID  : 3003
Parent Process ID : 2967
Agent URL         : https://AGENT_HOST:3872/emd/main/
Repository URL    : https://OMS_HOST:4900/em/upload
Started at        : 2011-03-17 15:51:53
Started by user   : oracle
Last Reload       : 2011-03-17 15:51:53
Last successful upload                       : (none)
Last attempted upload                        : (none)
Total Megabytes of XML files uploaded so far :     0.00
Number of XML files pending upload           :       15
Size of XML files pending upload(MB)         :    20.31
Available disk space on upload filesystem    :    31.82%
Last attempted heartbeat to OMS              : 2011-03-17 15:51:58
Last successful heartbeat to OMS             : unknown
—————————————————————
Agent is Running and Ready
Querying Agent status: Agent is running
Removing the copied stuff…..
Removed: /opt/app/oracle/product/agentDownload11.1.0.1.0Oui/oui_linux_x64.jar
Removed: /opt/app/oracle/product/agentDownload11.1.0.1.0Oui/agent_download.rsp
Removed:/opt/app/oracle/product/agentDownload11.1.0.1.0Oui/Disk1
Log name of installation can be found at: “/opt/app/oracle/product/agentDownload.linux_x64031711154827.log”
/opt/app/oracle/product/agent11g/root.sh needs to be executed by root to complete this installation.

For Standalone (NON-RAC) Installs  use

agentDownload.linux_x64 -b /opt/app/oracle/product -v /opt/app/oracle/oraInventory  -y

Finally start agent using  $AGENT_HOME/emctl start agent”  command

EM GRID: How to Change DB Console Http Port

Posted by Sagar Patil

I fixed a failed 11g dbconsole installation using http://www.oracledbasupport.co.uk/standalone-11g-dbconsole-configuration But Dbconsole picked up port 5500 instead of our usual EM port 1159.

How can we change dbconsole port from 5500 to 1159?

Before proceeding take backup of these 3 files

–     /u01/app/oracle/product/11.2.0/dbhome_1/$HOST_NAME%SID%/sysman/config/emoms.properties
–    /u01/app/oracle/product/11.2.0/dbhome_1/$HOST_NAME%SID%/sysman/config/emd.properties
–    /u01/app/oracle/product/11.2.0/dbhome_1/oc4j/j2ee/OC4J_DBConsole_$HOST_NAME/config/server.xml

-bash-3.2$ emca -reconfig ports -DBCONTROL_HTTP_PORT 1159  -SID TEST
STARTED EMCA at 27-Aug-2010 11:02:03
EM Configuration Assistant, Version 11.2.0.0.2 Production
Copyright (c) 2003, 2005, Oracle.  All rights reserved.

Enter the following information:

Do you wish to continue? [yes(Y)/no(N)]: y
27-Aug-2010 11:02:10 oracle.sysman.emcp.EMConfig perform
INFO: This operation is being logged at /u01/app/oracle/cfgtoollogs/emca/TEST/emca_2010_08_27_11_02_03.log.
27-Aug-2010 11:02:10 oracle.sysman.emcp.util.DBControlUtil stopOMS
INFO: Stopping Database Control (this may take a while) …
27-Aug-2010 11:02:33 oracle.sysman.emcp.util.DBControlUtil startOMS
INFO: Starting Database Control (this may take a while) …
27-Aug-2010 11:02:58 oracle.sysman.emcp.EMDBPostConfig performReconfiguration
INFO: Database Control started successfully
27-Aug-2010 11:02:58 oracle.sysman.emcp.EMDBPostConfig performReconfiguration
INFO: >>>>>>>>>>> The Database Control URL is https://dbserver1.dbdmz.net:1159/em <<<<<<<<<<<
Enterprise Manager configuration completed successfully
FINISHED EMCA at 27-Aug-2010 11:02:58

$ emca –help

-config dbcontrol db [-repos (create | recreate)] [-cluster] [-silent] [-backup] [parameters]: configure Database Control for a database
-config centralAgent (db | asm) [-cluster] [-silent] [parameters]: configure central agent management
-config all db [-repos (create | recreate)] [-cluster] [-silent] [-backup] [parameters]: configure both Database Control and central agent management

-deconfig dbcontrol db [-repos drop] [-cluster] [-silent] [parameters]: de-configure Database Control
-deconfig centralAgent (db | asm) [-cluster] [ -silent] [parameters]: de-configure central agent management
-deconfig all db [-repos drop] [-cluster] [-silent] [parameters]: de-configure both Database Control and central agent management

-addNode (db | asm) [-silent] [parameters]: configure EM for a newly added node for a database

-deleteNode (db | asm) [-silent] [parameters]: de-configure EM for for a database on node getting deleted

-addInst (db | asm) [-silent] [parameters]: configure EM for a new RAC instance
-deleteInst (db | asm) [-silent] [parameters]: de-configure EM for a specified RAC instance

-reconfig ports [-cluster] [parameters]: explicitly reassign Database Control ports
-reconfig dbcontrol -cluster [-silent] [parameters]: reconfigures RAC Database Control deployment

-displayConfig dbcontrol -cluster [-silent] [parameters]: displays information about the RAC Database Control configuration

-migrate -from dbcontrol -to centralAgent  [-repos drop] [-cluster] [-silent] [parameters]: migrates EM configuration from Database Control to central agent

-upgrade (db | asm | db_asm) [-cluster] [-silent] [parameters]: upgrades an earlier version of the EM configuration to the current version

-updateTargets crs [-silent] [parameters]: updates new crs home for all dbcontrol and central agents on crs upgrade

-restore (db | asm | db_asm) [-cluster] [-silent] [parameters]: restores the current version of the EM configuration to an earlier version

Parameters and Options:
[parameters]: [ -respFile fileName ] [ -paramName paramValue ]*
db: perform configuration operation for a database (including databases that use ASM)
asm: perform configuration operation for an ASM-only instance
db_asm: perform upgrade/restore operation for a database and an ASM instance
-repos create: create a new Database Control repository
-repos drop: drop the current Database Control repository
-repos recreate: drop the current Database Control repository and recreate a new one
-cluster: perform configuration operation for a RAC database
-silent: perform configuration operation without prompting for parameters
-backup: configure automatic backup for a database

Parameters for single instance databases
ORACLE_HOSTNAME: Local hostname
SID: Database SID
PORT: Listener port number
ORACLE_HOME: Database ORACLE_HOME
LISTENER_OH: Listener ORACLE_HOME
HOST_USER: Host username for automatic backup
HOST_USER_PWD: Host user password for automatic backup
BACKUP_SCHEDULE: Automatic backup schedule (HH:MM)
EMAIL_ADDRESS: Email address for notifications
MAIL_SERVER_NAME: Outgoing Mail (SMTP) server for notifications
ASM_OH: ASM ORACLE_HOME
ASM_SID: ASM SID
ASM_PORT: ASM port
ASM_USER_ROLE: ASM user role
ASM_USER_NAME: ASM username
ASM_USER_PWD: ASM user password
SRC_OH: ORACLE_HOME for the database to be upgraded
DBSNMP_PWD: Password for DBSNMP user
SYSMAN_PWD: Password for SYSMAN user
SYS_PWD: Password for SYS user
DBCONTROL_HTTP_PORT: Database Control HTTP port
AGENT_PORT: EM agent port
RMI_PORT: RMI port for Database Control
JMS_PORT: JMS port for Database Control
EM_SWLIB_STAGE_LOC:  Software library location
PORTS_FILE: Path to a static file specifying the ports to use (Default value : ${ORACLE_HOME}/install/staticports.ini).

Additional Parameters for cluster databases
CLUSTER_NAME: Cluster name
DB_UNIQUE_NAME: Database unique name
SERVICE_NAME: Service name
EM_NODE: Database Control node name
EM_NODE_LIST: Agent Node list [comma separated]

Note: For Desktop Class Install always pass parameter ORACLE_HOSTNAME
as “localhost” to any emca command

Standalone 11g dbconsole Configuration

Posted by Sagar Patil

I installed Oracle 11g today on RHEL 5.4 but dbconsole failed to startup. Here is a process to fix this issue.

Create   emca.rsp response file with following entries

ORACLE_HOSTNAME=dbserver1.dbdmz.oracledbasupport.net
SID=%TEST%
PORT=1521
ORACLE_HOME=/u01/app/oracle/product/11.2.0/dbhome_1
LISTENER_OH=/u01/app/oracle/product/11.2.0/dbhome_1
DBSNMP_PWD=manager
SYSMAN_PWD=manager
SYS_PWD=manager

Now run emca with following options

-bash-3.2$ ./emca -config dbcontrol db -silent -respfile emca.rsp

STARTED EMCA at 27-Aug-2010 09:34:29
EM Configuration Assistant, Version 11.2.0.0.2 Production
Copyright (c) 2003, 2005, Oracle.  All rights reserved.

27-Aug-2010 09:34:30 oracle.sysman.emcp.EMConfig perform
INFO: This operation is being logged at /u01/app/oracle/cfgtoollogs/emca/PRMUDST/emca_2010_08_27_09_34_29.log.
27-Aug-2010 09:34:33 oracle.sysman.emcp.EMReposConfig uploadConfigDataToRepository
INFO: Uploading configuration data to EM repository (this may take a while) …
27-Aug-2010 09:35:47 oracle.sysman.emcp.EMReposConfig invoke
INFO: Uploaded configuration data successfully
27-Aug-2010 09:35:51 oracle.sysman.emcp.util.DBControlUtil configureSoftwareLib
INFO: Software library configured successfully.
27-Aug-2010 09:35:51 oracle.sysman.emcp.EMDBPostConfig configureSoftwareLibrary
INFO: Deploying Provisioning archives …
27-Aug-2010 09:36:44 oracle.sysman.emcp.EMDBPostConfig configureSoftwareLibrary
INFO: Provisioning archives deployed successfully.
27-Aug-2010 09:36:44 oracle.sysman.emcp.util.DBControlUtil secureDBConsole
INFO: Securing Database Control (this may take a while) …
27-Aug-2010 09:37:09 oracle.sysman.emcp.util.DBControlUtil secureDBConsole
INFO: Database Control secured successfully.
27-Aug-2010 09:37:09 oracle.sysman.emcp.util.DBControlUtil startOMS
INFO: Starting Database Control (this may take a while) …
27-Aug-2010 09:37:39 oracle.sysman.emcp.EMDBPostConfig performConfiguration
INFO: Database Control started successfully
27-Aug-2010 09:37:39 oracle.sysman.emcp.EMDBPostConfig performConfiguration
INFO: >>>>>>>>>>> The Database Control URL is https://dbserver1.dbdmz.oracledbasupport.net:5500/em <<<<<<<<<<<
27-Aug-2010 09:37:45 oracle.sysman.emcp.EMDBPostConfig invoke
WARNING:
************************  WARNING  ************************

Management Repository has been placed in secure mode wherein Enterprise Manager data will be encrypted.  The encryption key has been placed in the file: /u01/app/oracle/product/11.2.0/dbhome_1/dbserver1.dbdmz.oracledbasupport.net_PRMUDST/sysman/config/emkey.ora.   Please ensure this file is backed up as the encrypted data will become unusable if this file is lost.

***********************************************************
Enterprise Manager configuration completed successfully
FINISHED EMCA at 27-Aug-2010 09:37:45

See if EM is responding

-bash-3.2$ wget https://dbserver1.dbdmz.oracledbasupport.net:5500/em
–2010-08-27 09:39:09–  https://dbserver1.dbdmz.oracledbasupport.net:5500/em
Resolving dbserver1.dbdmz.oracledbasupport.net… 172.30.10.39
Connecting to dbserver1.dbdmz.oracledbasupport.net|172.30.10.39|:5500… connected.
ERROR: cannot verify dbserver1.dbdmz.oracledbasupport.net’s certificate, issued by `/DC=com/C=US/ST=CA/L=EnterpriseManager on dbserver1.dbdmz.oracledbasupport.net/O=EnterpriseManager on dbserver1.dbdmz.oracledbasupport.net/OU=EnterpriseManager on dbserver1.dbdmz.oracledbasupport.net/CN=dbserver1.dbdmz.oracledbasupport.net/emailAddress=EnterpriseManager@dbserver1.dbdmz.oracledbasupport.net’:
Self-signed certificate encountered.
To connect to dbserver1.dbdmz.oracledbasupport.net insecurely, use `–no-check-certificate’.
Unable to establish SSL connection.

EMD upload error: uploadXMLFiles skipped :: OMS version not checked yet..

Posted by Sagar Patil

EMD upload error: uploadXMLFiles skipped :: OMS version not checked yet..

Maks sure AGENT_HOME is set and EMCTL is not running from ORACLE_DATABASE_HOME than AGENT_HOME

[oracle@NODE1 bin]$ ./emctl upload agent
Oracle Enterprise Manager 11g Release 1 Grid Control 11.1.0.1.0
Copyright (c) 1996, 2010 Oracle Corporation.  All rights reserved.
—————————————————————
EMD upload error: uploadXMLFiles skipped :: OMS version not checked yet. If this issue persists check trace files for ping to OMS related errors.

[oracle@NODE1 bin]$ ./emctl stop agent
Oracle Enterprise Manager 11g Release 1 Grid Control 11.1.0.1.0
Copyright (c) 1996, 2010 Oracle Corporation.  All rights reserved.
Stopping agent … stopped.

[oracle@NODE1 bin]$ ./emctl unsecure agent
Oracle Enterprise Manager 11g Release 1 Grid Control 11.1.0.1.0
Copyright (c) 1996, 2010 Oracle Corporation.  All rights reserved.
Checking Agent for HTTP…   Done.
Agent is already stopped…   Done.
Unsecuring agent…   Started.
Agent is now unsecured…   Done.
Unsecuring agent…   Ended.

[oracle@NODE1 bin]$ ./emctl secure agent
Oracle Enterprise Manager 11g Release 1 Grid Control 11.1.0.1.0
Copyright (c) 1996, 2010 Oracle Corporation.  All rights reserved.
Agent is already stopped…   Done.
Securing agent…   Started.
Enter Agent Registration Password :
Securing agent…   Successful.

[oracle@NODE1 bin]$ ./emctl clearstate agent

[oracle@NODE1 bin]$ ./emctl start agent
Oracle Enterprise Manager 11g Release 1 Grid Control 11.1.0.1.0
Copyright (c) 1996, 2010 Oracle Corporation.  All rights reserved.
Starting agent …….. started.

[oracle@NODE1 bin]$ ./emctl upload agent
Oracle Enterprise Manager 11g Release 1 Grid Control 11.1.0.1.0
Copyright (c) 1996, 2010 Oracle Corporation.  All rights reserved.
—————————————————————
EMD upload completed successfully

How to Configure Notifications at Grid

Posted by Sagar Patil

1. Configure “Notification Methods” to receive alerts.

Login at OMS Console and click on “Setup” at top right hand corner.Click on “Notification Methods” at Left hand side.

Enter Email server details like Outgoing Mail (SMTP) Server, Username, Password  & click on “Test Email Servers” link to verify settings.

2. Configure target Email address for Alerts.

Click on “Preferences” at top right hand side and click on Left Hand “General” Tab option

3. Setting Up Preferred Credentials to run scripts at targets (databases,hosts)

Select relevant option and click on “Set Credentials” icon. I am picking up “Host” here to add ssh login details at following screen.

3. Notification Schedule

We can setup time of the day and respective email addresses for notifications here. This way we can divert alrts to daytime email during working hours and to mobile email address at evenings/night.

4. Notification Rules

We now know when and who should be notified when an event occurs, let’s setup WHAT we want to be notified of.

Navigate to “Preferences” at right hand top corner , now select “Rules” from Left hand menu and click on

That will pop up following screen.

By default OEM will show “Target Type“ as “Database Instance”. You could  alter as your needs and select any of the options as below 

You will also notice as per the target type selected option  would change.

Click on   and select list of hosts which should fall under your rule. You can filter your selection at the pop up “Search and Select: Targets“ screen.

After selecting target, click on “availability” and select options you like.

I have selected notifications if “Database Instance goes down, OMA is unreachable and if any metric errors detected. At next screen we will select Metric values we want to monitor.

Add metric screen should show you about 129+ options like “Archive Area Used (%),Archiver Hung Alert Log Error,Blocking Session Count, Dump Area Used ,Generic Alert Log Error,Tablespace Free Space (MB), Tablespace Space Used (%)”

Top of Page

Top menu