11g RAC | Using Duplicate target database 11g Active Database option

Posted by Sagar Patil

I have a 2 Node RAC Standby database (STDBY) . I need to replicate it as a Load TEST database (LDTEST) in a read/write mode.

I will run thru following steps:
1. Preparing the Auxiliary Instance
2. Starting and Configuring RMAN Before Duplication
3. Duplicating a Database

1. Preparing the Auxiliary Instance

Step 1: Create an Oracle Password File for the Auxiliary Instance

When using FROM ACTIVE DATABASE option the source database instance which is the database instance to which RMAN is connected as TARGET connects directly to the auxiliary database instance.  This connection requires a password file with the same SYSDBA password.

[oracle@Node3]$ pwd
/mnt/data/oradata/LDTEST   — The password file placed at Clustered storage.
[oracle@Node3]$ cp orapwSTDBY ../LDTEST
[oracle@Node3]$ cd ../LDTEST
[oracle@Node3]$ ls -lrt
total 4
-rw-r—– 1 oracle oinstall 1536 May 3 12:57 orapwSTDBY

[oracle@Node3]$ mv orapwSTDBY orapwLDTTEST
[oracle@Node3]$ ls -lrt
total 4
-rw-r—– 1 oracle oinstall 1536 May 3 12:57 orapwLDTTEST

Step 2: Establish Oracle Net Connectivity to the Auxiliary Instance

When duplicating from an active database, you must first have connected as SYSDBA to the auxiliary instance by means of a net service name.
Add new database instance details $ORACLE_HOME/netaork/admin/listener.ora

(SID_LIST =
(SID_DESC =
(GLOBAL_DBNAME = LDTEST) # Replicated DB
(ORACLE_HOME = /opt/app/oracle/product/11.2/db_1)
(SID_NAME =LDTTEST1)
)

[oracle@Node3 admin]$ lsnrctl reload
[oracle@Node3 admin]$ lsnrctl status
Service “LDTEST” has 1 instance(s).
Instance “LDTTEST1”, status UNKNOWN, has 1 handler(s) for this service…
Service “STDBY_DGMGRL” has 1 instance(s).
Instance “STDBY1”, status UNKNOWN, has 1 handler(s) for this service…
The command completed successfully

Add following dedicated entry at /opt/app/oracle/product/11.2/db_1/network/admin

LDTTEST1=
(DESCRIPTION =
(ADDRESS = (PROTOCOL = TCP)(HOST = Node3scan)(PORT = 1529))
(CONNECT_DATA =
(SERVER = DEDICATED)
(SERVICE_NAME = LDTEST)
)
)

[oracle@Node3 admin]$ tnsping LDTTEST1
TNS Ping Utility for Linux: Version 11.2.0.2.0 – Production on 03-MAY-2011
Attempting to contact (DESCRIPTION = (ADDRESS = (PROTOCOL = TCP)(HOST = Node3scan)(PORT = 1529)) (CONNECT_DATA = (SERVER = DEDICATED) (SERVICE_NAME = LDTEST)))
OK (10 msec)

Step 3: Create an Initialization Parameter File for An Auxiliary Instance

Change directories at pfile to point to new database directory structure
** : set *.cluster_database=false
Let’s create dump directories needed. The easiest way is to copy structure of directory tree from existing instance.

[oracle@Node3 STDBY]$ pwd
/opt/app/oracle/diag/rdbms/STDBY
find . -type d -exec mkdir /opt/app/oracle/diag/rdbms/LDTEST/{} \;
“du -a” showed right directory structure created
84 ./LDTTEST1/trace
4 ./LDTTEST1/sweep
4 ./LDTTEST1/metadata
4 ./LDTTEST1/alert
4 ./LDTTEST1/stage
4 ./LDTTEST1/hm
4 ./LDTTEST1/incident
136 ./LDTTEST1

SQL> create pfile=’$ORACLE_HOME/dbs/initLDTTEST1.ora’ from spfile;

Edit pfile and make directory location changes required for new Database.

Step 4: Start Auxiliary Instance with SQL*Plus

SQL> startup nomount;
ORA-32004: obsolete or deprecated parameter(s) specified for RDBMS instance
ORACLE instance started.
Total System Global Area 9152860160 bytes
Fixed Size 2234056 bytes
Variable Size 6945769784 bytes
Database Buffers 2181038080 bytes
Redo Buffers 23818240 bytes
SQL> show parameter db_name
NAME TYPE VALUE
———————————— ———– ——————————
db_name string LDTTEST1

2. Starting and Configuring RMAN Before Duplication
Step 1: Start RMAN and Connect to the Database Instances
Step 2: Mount or Open the Source Database
Step 1: Start RMAN and Connect to the Database Instances

RMAN> connect target sys/sysgsadm@STDBY
connected to target database: PROD (DBID=4020163110)
RMAN> CONNECT AUXILIARY SYS/sysgsadm@LDTTEST1
connected to auxiliary database: LDTTEST1 (not mounted)

Step 2: Mount or Open the Source Database

Before beginning RMAN duplication, mount or open the source database it if it is not already mounted or open.

3. Duplicating a Database

Run following RMAN command

RMAN> DUPLICATE TARGET DATABASE TO LDTEST
FROM ACTIVE DATABASE
DB_FILE_NAME_CONVERT ‘/PROD’,’/LDTEST’
PFILE=’/opt/app/oracle/product/11.2/db_1/dbs/initLDTTEST1.ora’;

Starting Duplicate Db at 03-MAY-11
using target database control file instead of recovery catalog
allocated channel: ORA_AUX_DISK_1
channel ORA_AUX_DISK_1: SID=392 device type=DISK
allocated channel: ORA_AUX_DISK_2
channel ORA_AUX_DISK_2: SID=490 device type=DISK
allocated channel: ORA_AUX_DISK_3
channel ORA_AUX_DISK_3: SID=586 device type=DISK
contents of Memory Script:
{
sql clone “create spfile from memory”;
}
executing Memory Script
sql statement: create spfile from memory
contents of Memory Script:
{
shutdown clone immediate;
startup clone nomount;
}
executing Memory Script
Oracle instance shut down
connected to auxiliary database (not started)
Oracle instance started
Total System Global Area 9152860160 bytes
Fixed Size 2234056 bytes
Variable Size 6979324216 bytes
Database Buffers 2147483648 bytes
Redo Buffers 23818240 bytes
contents of Memory Script:
{
sql clone “alter system set db_name =
”PROD” comment=
”Modified by RMAN duplicate” scope=spfile”;
sql clone “alter system set db_unique_name =
”LDTEST” comment=
”Modified by RMAN duplicate” scope=spfile”;
shutdown clone immediate;
startup clone force nomount
backup as copy current controlfile auxiliary format ‘/mnt/data/oradata/LDTEST/control01.ctl’;
restore clone controlfile to ‘/mnt/data/oradata/LDTEST/control02.ctl’ from
‘/mnt/data/oradata/LDTEST/control01.ctl’;
alter clone database mount;
}
executing Memory Script
sql statement: alter system set db_name = ”PROD” comment= ”Modified by RMAN duplicate” scope=spfile
sql statement: alter system set db_unique_name = ”LDTEST” comment= ”Modified by RMAN duplicate” scope=spfile
Oracle instance shut down
Oracle instance started
Total System Global Area 9152860160 bytes
Fixed Size 2234056 bytes
Variable Size 6979324216 bytes
Database Buffers 2147483648 bytes
Redo Buffers 23818240 bytes
Starting backup at 03-MAY-11
allocated channel: ORA_DISK_1
channel ORA_DISK_1: SID=300 instance=STDBY1 device type=DISK
allocated channel: ORA_DISK_2
channel ORA_DISK_2: SID=396 instance=STDBY1 device type=DISK
allocated channel: ORA_DISK_3
channel ORA_DISK_3: SID=495 instance=STDBY1 device type=DISK
channel ORA_DISK_1: starting datafile copy
copying current control file
output file name=/opt/app/oracle/product/11.2/db_1/dbs/snapcf_STDBY1.f tag=TAG20110503T162228 RECID=13 STAMP=750183751
channel ORA_DISK_1: datafile copy complete, elapsed time: 00:00:07
Finished backup at 03-MAY-11
Starting restore at 03-MAY-11
allocated channel: ORA_AUX_DISK_1
channel ORA_AUX_DISK_1: SID=392 device type=DISK
allocated channel: ORA_AUX_DISK_2
channel ORA_AUX_DISK_2: SID=490 device type=DISK
allocated channel: ORA_AUX_DISK_3
channel ORA_AUX_DISK_3: SID=586 device type=DISK
channel ORA_AUX_DISK_2: skipped, AUTOBACKUP already found
channel ORA_AUX_DISK_3: skipped, AUTOBACKUP already found
channel ORA_AUX_DISK_1: copied control file copy
Finished restore at 03-MAY-11
database mounted
contents of Memory Script:
{
set newname for datafile 1 to
“/mnt/data/oradata/LDTEST/system01.dbf”;
set newname for datafile 2 to
“/mnt/data/oradata/LDTEST/sysaux01.dbf”;
set newname for datafile 3 to
“/mnt/data/oradata/LDTEST/undotbs01.dbf”;
set newname for datafile 4 to
“/mnt/data/oradata/LDTEST/users01.dbf”;
set newname for datafile 5 to
“/mnt/data/oradata/LDTEST/undotbs02.dbf”;
backup as copy reuse
datafile 1 auxiliary format
“/mnt/data/oradata/LDTEST/system01.dbf” datafile
2 auxiliary format
“/mnt/data/oradata/LDTEST/sysaux01.dbf” datafile
3 auxiliary format
“/mnt/data/oradata/LDTEST/undotbs01.dbf” datafile
4 auxiliary format
“/mnt/data/oradata/LDTEST/users01.dbf” datafile
5 auxiliary format
“/mnt/data/oradata/LDTEST/undotbs02.dbf” datafile
}
executing Memory Script
Starting backup at 03-MAY-11
using channel ORA_DISK_1
using channel ORA_DISK_2
using channel ORA_DISK_3
channel ORA_DISK_1: starting datafile copy
input datafile file number=00002 name=/mnt/data/oradata/PROD/sysaux01.dbf
channel ORA_DISK_2: starting datafile copy
input datafile file number=00001 name=/mnt/data/oradata/PROD/system01.dbf
output file name=/mnt/data/oradata/LDTEST/system01.dbf tag=TAG20110503T162300
channel ORA_DISK_3: datafile copy complete, elapsed time: 00:04:05
channel ORA_DISK_3: starting datafile copy
input datafile file number=00005 name=/mnt/data/oradata/PROD/undotbs02.dbf
output file name=/mnt/data/oradata/LDTEST/sysaux01.dbf tag=TAG20110503T162300
channel ORA_DISK_1: datafile copy complete, elapsed time: 00:06:50
channel ORA_DISK_1: starting datafile copy
input datafile file number=00003 name=/mnt/data/oradata/PROD/undotbs01.dbf
output file name=/mnt/data/oradata/LDTEST/cdc_data01.dbf tag=TAG20110503T162300
channel ORA_DISK_2: datafile copy complete, elapsed time: 00:02:15
channel ORA_DISK_2: starting datafile copy
input datafile file number=00004 name=/mnt/data/oradata/PROD/users01.dbf
output file name=/mnt/data/oradata/LDTEST/undotbs01.dbf tag=TAG20110503T162300
Finished backup at 03-MAY-11
sql statement: alter system archive log current
contents of Memory Script:
{
backup as copy reuse
archivelog like “/mnt/logs/oradata/PROD/arch/2_753_747681489.arc” auxiliary format
“/mnt/logs/oradata/LDTEST/arch/2_753_747681489.arc” archivelog like
“/mnt/logs/oradata/PROD/arch/1_664_747681489.arc” auxiliary format
“/mnt/logs/oradata/LDTEST/arch/1_664_747681489.arc” archivelog like
“/mnt/logs/oradata/PROD/arch/2_754_747681489.arc” auxiliary format
“/mnt/logs/oradata/LDTEST/arch/2_754_747681489.arc” ;
catalog clone archivelog “/mnt/logs/oradata/LDTEST/arch/2_753_747681489.arc”;
catalog clone archivelog “/mnt/logs/oradata/LDTEST/arch/1_664_747681489.arc”;
catalog clone archivelog “/mnt/logs/oradata/LDTEST/arch/2_754_747681489.arc”;
switch clone datafile all;
}
executing Memory Script
Starting backup at 03-MAY-11
using channel ORA_DISK_1
using channel ORA_DISK_2
using channel ORA_DISK_3
channel ORA_DISK_1: starting archived log copy
input archived log thread=2 sequence=753 RECID=782 STAMP=750183649
channel ORA_DISK_2: starting archived log copy
input archived log thread=1 sequence=664 RECID=784 STAMP=750184270
channel ORA_DISK_3: starting archived log copy
input archived log thread=2 sequence=754 RECID=786 STAMP=750184271
output file name=/mnt/logs/oradata/LDTEST/arch/2_753_747681489.arc RECID=0 STAMP=0
channel ORA_DISK_1: archived log copy complete, elapsed time: 00:00:02
output file name=/mnt/logs/oradata/LDTEST/arch/1_664_747681489.arc RECID=0 STAMP=0
channel ORA_DISK_2: archived log copy complete, elapsed time: 00:00:01
output file name=/mnt/logs/oradata/LDTEST/arch/2_754_747681489.arc RECID=0 STAMP=0
channel ORA_DISK_3: archived log copy complete, elapsed time: 00:00:01
Finished backup at 03-MAY-11
cataloged archived log
archived log file name=/mnt/logs/oradata/LDTEST/arch/2_753_747681489.arc RECID=783 STAMP=750184304
cataloged archived log
archived log file name=/mnt/logs/oradata/LDTEST/arch/1_664_747681489.arc RECID=784 STAMP=750184304
cataloged archived log
archived log file name=/mnt/logs/oradata/LDTEST/arch/2_754_747681489.arc RECID=785 STAMP=750184305
datafile 1 switched to datafile copy
input datafile copy RECID=13 STAMP=750184307 file name=/mnt/data/oradata/LDTEST/system01.dbf
datafile 2 switched to datafile copy
input datafile copy RECID=14 STAMP=750184308 file name=/mnt/data/oradata/LDTEST/sysaux01.dbf
datafile 3 switched to datafile copy
input datafile copy RECID=15 STAMP=750184309 file name=/mnt/data/oradata/LDTEST/undotbs01.dbf
datafile 4 switched to datafile copy
input datafile copy RECID=16 STAMP=750184309 file name=/mnt/data/oradata/LDTEST/users01.dbf
datafile 5 switched to datafile copy
input datafile copy RECID=17 STAMP=750184310 file name=/mnt/data/oradata/LDTEST/undotbs02.dbf
contents of Memory Script:
{
set until scn 263980944;
recover
clone database
delete archivelog
;
}
executing Memory Script
executing command: SET until clause
Starting recover at 03-MAY-11
using channel ORA_AUX_DISK_1
using channel ORA_AUX_DISK_2
using channel ORA_AUX_DISK_3
starting media recovery
archived log for thread 1 with sequence 664 is already on disk as file /mnt/logs/oradata/LDTEST/arch/1_664_747681489.arc
archived log for thread 2 with sequence 754 is already on disk as file /mnt/logs/oradata/LDTEST/arch/2_754_747681489.arc
archived log file name=/mnt/logs/oradata/LDTEST/arch/1_664_747681489.arc thread=1 sequence=664
archived log file name=/mnt/logs/oradata/LDTEST/arch/2_754_747681489.arc thread=2 sequence=754
media recovery complete, elapsed time: 00:00:03
Finished recover at 03-MAY-11
Oracle instance started
Total System Global Area 9152860160 bytes
Fixed Size 2234056 bytes
Variable Size 6945769784 bytes
Database Buffers 2181038080 bytes
Redo Buffers 23818240 bytes
sql statement: CREATE CONTROLFILE REUSE SET DATABASE “LDTEST” RESETLOGS ARCHIVELOG
MAXLOGFILES 192
MAXLOGMEMBERS 3
MAXDATAFILES 2048
MAXINSTANCES 32
MAXLOGHISTORY 1168
LOGFILE
GROUP 1 SIZE 50 M ,
GROUP 2 SIZE 50 M
DATAFILE
‘/mnt/data/oradata/LDTEST/system01.dbf’
CHARACTER SET AL32UTF8
sql statement: ALTER DATABASE ADD LOGFILE
INSTANCE ‘i2’
GROUP 3 SIZE 50 M ,
GROUP 4 SIZE 50 M
contents of Memory Script:
{
set newname for tempfile 1 to
“/mnt/data/oradata/LDTEST/temp01.dbf”;
switch clone tempfile all;
catalog clone datafilecopy “/mnt/data/oradata/LDTEST/sysaux01.dbf”,
“/mnt/data/oradata/LDTEST/undotbs01.dbf”,
“/mnt/data/oradata/LDTEST/users01.dbf”,
“/mnt/data/oradata/LDTEST/undotbs02.dbf”,
switch clone datafile all;
}
executing Memory Script
executing command: SET NEWNAME
renamed tempfile 1 to /mnt/data/oradata/LDTEST/temp01.dbf in control file
cataloged datafile copy
datafile copy file name=/mnt/data/oradata/LDTEST/sysaux01.dbf RECID=1 STAMP=750184356
cataloged datafile copy
datafile copy file name=/mnt/data/oradata/LDTEST/undotbs01.dbf RECID=2 STAMP=750184356
cataloged datafile copy
datafile copy file name=/mnt/data/oradata/LDTEST/users01.dbf RECID=3 STAMP=750184356
cataloged datafile copy
datafile copy file name=/mnt/data/oradata/LDTEST/undotbs02.dbf RECID=4 STAMP=750184357
cataloged datafile copy
datafile 2 switched to datafile copy
input datafile copy RECID=1 STAMP=750184356 file name=/mnt/data/oradata/LDTEST/sysaux01.dbf
datafile 3 switched to datafile copy
input datafile copy RECID=2 STAMP=750184356 file name=/mnt/data/oradata/LDTEST/undotbs01.dbf
datafile 4 switched to datafile copy
input datafile copy RECID=3 STAMP=750184356 file name=/mnt/data/oradata/LDTEST/users01.dbf
datafile 5 switched to datafile copy
input datafile copy RECID=4 STAMP=750184357 file name=/mnt/data/oradata/LDTEST/undotbs02.dbf
Reenabling controlfile options for auxiliary database
Executing: alter database add supplemental log data(PRIMARY KEY, UNIQUE) columns
Executing: alter database force logging
contents of Memory Script:
{
Alter clone database open resetlogs;
}
executing Memory Script
database opened
Finished Duplicate Db at 03-MAY-11

The database is now working fine on One Node1, I will have to convert it into a 2 node RAC database.

Create shared spfile for both instances , set CLUSTER_DATABASE to TRUE at spfile/pfile

SQL> alter system set cluster_database=TRUE scope=spfile;
System altered.
SQL> shutdown abort;
ORACLE instance shut down.
[oracle@Node3 dbs]$ cat initLDTTEST1.ora
SPFILE=’/mnt/data/oradata/LDTEST/spfileLDTTEST.ora'[oracle@Node4 dbs]$ cat initLDTTEST2.ora
SPFILE=’/mnt/data/oradata/LDTEST/spfileLDTTEST.ora’

Move password file to clustered shared storage and create soft links from both nodes Node3, Node4 to orapwLDTTEST

[oracle@Node3 dbs]$ ln -s /mnt/data/oradata/LDTEST/orapwLDTTEST orapwLDTTEST2
[oracle@Node3 dbs]$ ln -s /mnt/data/oradata/LDTEST/orapwLDTTEST orapwLDTTEST1
[oracle@Node3 dbs]$ scp initLDTTEST1.ora oracle@Node4:/opt/app/oracle/product/11.2/db_1/dbs
SQL> startup;
ORACLE instance started.
Total System Global Area 9152860160 bytes
Fixed Size 2234056 bytes
Variable Size 6945769784 bytes
Database Buffers 2181038080 bytes
Redo Buffers 23818240 bytes
Database mounted.
Database opened.

Make changes at Listener.ora,tnsnames.ora files on Second Node RAC – Node4

RACNode3> show parameter instance_name
instance_name string LDTTEST1
RACNode3> select count(*) from tab;
4865
RACNode3> show parameter cluster_database
cluster_database boolean TRUE

RACNode4> show parameter instance_name
instance_name string LDTTEST2
RACNode4> select count(*) from tab;
4865
RACNode4> show parameter cluster_database
cluster_database boolean TRUE

Lets make the database Cluster services aware.

[oracle@Node3 dbs]$ srvctl add database -d LDTEST -o /opt/app/oracle/product/11.2/db_1 -p /mnt/data/oradata/LDTEST/spfileLDTTEST.ora
[oracle@Node3 dbs]$ srvctl add instance -d LDTEST -i LDTTEST1 -n Node3
[oracle@Node3 dbs]$ srvctl add instance -d LDTEST -i LDTTEST2 -n Node4
[oracle@Node3 arch]$ /home/oracle/Scripts/crsstat.sh | grep LDTEST
ora.LDTEST.db OFFLINE OFFLINE

Finally  stop/start RAC Databases using srvctl commands

[oracle@Node3 dbs]$ srvctl start database -d LDTEST
[oracle@Node3 dbs]$ $HOME/Scripts/crsstat.sh | grep prod
ora.prod.db ONLINE ONLINE on Node3
[oracle@Node3 dbs]$ srvctl status database -d LDTEST
Instance LDTTEST1 is running on node Node3
Instance LDTTEST2 is running on node Node4

Have a look at alrtlog for any issues reported.

Replicating RAC database using RMAN at Remote Server

Posted by Sagar Patil

Here I am duplicating 11g RAC database from one RHEL Server to Another by old 10g method.
I could have used 11g “DUPLICATE TARGET DATABASE TO TARGET_DB FROM ACTIVE DATABASE” which doesn’t need previous rman backup at source. But it may not be a good option for large databases or at places with narrow network bandwidth.

Assumptions Made:

– RAC Clusterware and Database binaries are installed at Destination Nodes
– Clusterware services “crsctl check crs” reported active

PRIMARY site Tasks (Ora01a1,Ora01a2):

  • Create FULL RMAN Backup
  • Copy backup files from PRIMARY server to New server
  • Create pfile from spfile at source RAC
  • Copy init.ora from $Primary_Server:ORACLE_HOME/dbs to $New_Server:ORACLE_HOME/dbs
  • Copy $Primary_Server:ORACLE_HOME/dbs/password file to $New_Server:ORACLE_HOME/dbs

[oracle@Ora01a1 RAC1]$ scp Ora01a1BKUP.tgz oracle@Node1:/mnt/data
Warning: Permanently added (RSA) to the list of known hosts.
Ora01a1BKUP.tgz                                                          100%  274MB  11.4MB/s   00:24

SQL> show parameter pfile
NAME                                 TYPE        VALUE
———————————— ———– ——————————
spfile                               string      /mnt/data/oradata/primary/spfileRAC.ora

SQL> show parameter spfile
NAME                                 TYPE        VALUE
———————————— ———– ——————————
spfile                               string      /mnt/data/oradata/primary/spfileRAC.ora

SQL> create pfile=’/mnt/data/oradata/primary/init.ora’ from spfile;
File created

[oracle@Ora01a1 RAC]$ scp init.ora oracle@Node1:/mnt/data/rman_backups/bkup/init.ora 100% 1612     1.6KB/s   00:00
[oracle@Ora01a1 dbs]$ scp /mnt/data/oradata/primary/orapwRAC oracle@Node1:/mnt/data/rman_backups/bkup   orapwRAC 100% 1536     1.5KB/s   00:00

Destination Site Tasks (Node1,Node2)
Create required directories for bdump,adump as well as database mount volumes.

[oracle@Node1]$ grep /mnt initRAC.ora
*.control_files=’/mnt/data/oradata/primary/control01.ctl’,’/mnt/data/oradata/primary/control02.ctl’
*.db_recovery_file_dest=’/mnt/logs/oradata/primary/fast_recovery_area’
*.log_archive_dest_1=’LOCATION=/mnt/logs/oradata/primary/arch’

[oracle@Node1]$ mkdir -p /mnt/data/oradata/primary/
[oracle@Node1]$ mkdir -p /mnt/logs/oradata/primary/fast_recovery_area
[oracle@Node1]$ mkdir -p /mnt/logs/oradata/primary/arch

“opt” is a local volume for each instance so create directories on both RAC nodes
[oracle@Node1]$ grep /opt initRAC.ora
*.audit_file_dest=’/opt/app/oracle/admin/primary/adump’
*.diagnostic_dest=’/opt/app/oracle’

[oracle@Node1]$ mkdir -p /opt/app/oracle/admin/primary/adump
[oracle@Node1]$ mkdir -p /opt/app/oracle

[oracle@Node2]$ mkdir -p /opt/app/oracle/admin/primary/adump
[oracle@Node3]$ mkdir -p /opt/app/oracle

Under 11g background trace will be maintained at “$ORACLE_BASE/diag/rdbms”, if required create necessary directories there.

Modify init.ora file ($ORACLE_HOME/dbs/init.ora) and amend/change parameters. I had to comment out “remote_listener” parameter as the serversnames at destination are different.

Copy init.ora at both nodes “Node1,Node2″@$ORACLE_HOME/dbs

[oracle@Node1 dbs]$ cp initRAC.ora initRAC1.ora

[oracle@Node1 dbs]$ echo $ORACLE_SID
RAC1
SQL> startup nomount;
ORACLE instance started.
Total System Global Area 9152860160 bytes
Fixed Size                  2234056 bytes
Variable Size            6945769784 bytes
Database Buffers         2181038080 bytes
Redo Buffers               23818240 bytes

[oracle@Node1 dbs]$ rman target / nocatalog
connected to target database: RAC (not mounted)
using target database control file instead of recovery catalog
RMAN> restore controlfile from ‘/mnt/data/rman_backups/bkup/c-4020163152-20110405-01’;
allocated channel: ORA_DISK_1
channel ORA_DISK_1: SID=588 instance=RAC1 device type=DISK
channel ORA_DISK_1: restoring control file
channel ORA_DISK_1: restore complete, elapsed time: 00:00:03
output file name=/mnt/data/oradata/primary/control01.ctl
output file name=/mnt/data/oradata/primary/control02.ctl
.

………
Finished restore at 05-APR-11

Verify controlfiles are copied at right location

[oracle@Node2 RAC]$ pwd
/mnt/data/oradata/RAC

[oracle@Node2 RAC]$ ls -lrt
-rw-r—–  1 oracle oinstall 22986752 Apr  5 16:35 control01.ctl
-rw-r—–  1 oracle oinstall 22986752 Apr  5 16:35 control02.ctl

RMAN> alter database mount;
database mounted
RMAN> RESTORE DATABASE;
Starting restore at 05-APR-11
Starting implicit crosscheck backup at 05-APR-11
allocated channel: ORA_DISK_1
allocated channel: ORA_DISK_2
******* This returned errors
RMAN-00571: ===========================================================
RMAN-00569: =============== ERROR MESSAGE STACK FOLLOWS ===============
RMAN-00571: ===========================================================
RMAN-03002: failure of restore command at 04/05/2011 16:36:54
RMAN-06026: some targets not found – aborting restore
RMAN-06023: no backup or copy of datafile 3 found to restore

RMAN was not able to locate backup since backupset was not registered with rman inventory & copied at different location. Let’s catalog backup pieces that were shipped from Primary database.

I have multiple copies of backup files so I used
RMAN> CATALOG START WITH ‘/mnt/data/rman_backups/bkup/’ NOPROMPT;
List of Cataloged Files
=======================
File Name: /mnt/data/rman_backups/bkup/c-4020163152-20110405-04
File Name: /mnt/data/rman_backups/bkup/c-4020163152-20110405-05
File Name: /mnt/data/rman_backups/bkup/db_bk_ub8m91cg7_s3432_p1_t747680263.bkp
File Name: /mnt/data/rman_backups/bkup/db_bk_ub9m91cg8_s3433_p1_t747680264.bkp
File Name: /mnt/data/rman_backups/bkup/db_bk_ubam91cg9_s3434_p1_t747680265.bkp
File Name: /mnt/data/rman_backups/bkup/db_bk_ubcm91cgi_s3436_p1_t747680274.bkp
File Name: /mnt/data/rman_backups/bkup/db_bk_ubdm91cgi_s3437_p1_t747680274.bkp
File Name: /mnt/data/rman_backups/bkup/db_bk_ubbm91cgi_s3435_p1_t747680274.bkp
File Name: /mnt/data/rman_backups/bkup/db_bk_ubem91ck0_s3438_p1_t747680384.bkp
File Name: /mnt/data/rman_backups/bkup/db_bk_ubfm91ck0_s3439_p1_t747680384.bkp
File Name: /mnt/data/rman_backups/bkup/ctl_bk_ubhm91ck3_s3441_p1_t747680387.bkp

RMAN> RESTORE DATABASE;
channel ORA_DISK_1: starting datafile backup set restore
channel ORA_DISK_1: specifying datafile(s) to restore from backup set
channel ORA_DISK_1: restoring datafile 00001 to /mnt/data/oradata/primary/system01.dbf
channel ORA_DISK_1: restoring datafile 00005 to /mnt/data/oradata/primary/undotbs02.dbf
channel ORA_DISK_1: reading from backup piece /mnt/data/rman_backups/bkup/db_bk_ubdm91cgi_s3437_p1_t747680274.bkp
.
..
channel ORA_DISK_1: piece handle=/mnt/data/rman_backups/bkup/db_bk_ubdm91cgi_s3437_p1_t747680274.bkp tag=TAG20110405T165753
channel ORA_DISK_1: restored backup piece 1
channel ORA_DISK_1: restore complete, elapsed time: 00:01:26
channel ORA_DISK_2: piece handle=/mnt/data/rman_backups/bkup/db_bk_ubcm91cgi_s3436_p1_t747680274.bkp tag=TAG20110405T165753
channel ORA_DISK_2: restored backup piece 1
channel ORA_DISK_2: restore complete, elapsed time: 00:01:26
channel ORA_DISK_3: piece handle=/mnt/data/rman_backups/bkup/db_bk_ubbm91cgi_s3435_p1_t747680274.bkp tag=TAG20110405T165753
channel ORA_DISK_3: restored backup piece 1
channel ORA_DISK_3: restore complete, elapsed time: 00:01:56
Finished restore at 05-APR-11

RMAN> recover database;
channel ORA_DISK_1: starting archived log restore to default destination
channel ORA_DISK_1: restoring archived log
archived log thread=1 sequence=3289
channel ORA_DISK_1: reading from backup piece /mnt/data/rman_backups/bkup/db_bk_ubem91ck0_s3438_p1_t747680384.bkp
channel ORA_DISK_2: starting archived log restore to default destination
channel ORA_DISK_2: restoring archived log
archived log thread=2 sequence=3484
RMAN-00571: ===========================================================
RMAN-00569: =============== ERROR MESSAGE STACK FOLLOWS ===============
RMAN-00571: ===========================================================
RMAN-03002: failure of recover command at 04/05/2011 17:17:46
RMAN-06054: media recovery requesting unknown archived log for thread 1 with sequence 3290 and starting SCN of 246447604

RMAN> ALTER DATABASE OPEN RESETLOGS;
database opened

Shutdown and restart database RAC1

SQL> shutdown abort;
ORACLE instance shut down.

set sqlprompt ‘&_CONNECT_IDENTIFIER > ‘
RAC1> startup;
ORACLE instance started.
Total System Global Area 9152860160 bytes
Fixed Size                  2234056 bytes
Variable Size            6945769784 bytes
Database Buffers         2181038080 bytes
Redo Buffers               23818240 bytes
Database mounted.
Database opened.

RAC1> set linesize 200;
RAC1> set pagesize 20;
RAC1> select inst_id,substr(member,1,35) from gv$logfile;
INST_ID SUBSTR(MEMBER,1,35)
———- ——————————————————————————————————————————————–
1 /mnt/data/oradata/primary/redo02.log
1 /mnt/data/oradata/primary/redo01.log
1 /mnt/data/oradata/primary/redo03.log
1 /mnt/data/oradata/primary/redo04.log

I can see , INSTANCE 2 REDO log files are not listed so startup RAC2 instance at Node2

[oracle@Node2 dbs]$ echo $ORACLE_SID
RAC2
SQL> set sqlprompt ‘&_CONNECT_IDENTIFIER > ‘
RAC2> startup;
ORACLE instance started.
Total System Global Area 9152860160 bytes
Fixed Size                  2234056 bytes
Variable Size            6610225464 bytes
Database Buffers         2516582400 bytes
Redo Buffers               23818240 bytes
Database mounted.
Database opened.

I can now locate REDO files for Instance 1 as well as 2

select inst_id,substr(member,1,35) from gv$logfile;
INST_ID SUBSTR(MEMBER,1,35)
———- ——————————————————————————————————————————————–
2 /mnt/data/oradata/primary/redo02.log
2 /mnt/data/oradata/primary/redo01.log
2 /mnt/data/oradata/primary/redo03.log
2 /mnt/data/oradata/primary/redo04.log
1 /mnt/data/oradata/primary/redo02.log
1 /mnt/data/oradata/primary/redo01.log
1 /mnt/data/oradata/primary/redo03.log
1 /mnt/data/oradata/primary/redo04.log
8 rows selected.

I will carry log switchs to see ARCHIVE files create at Archive Destination “/mnt/logs/oradata/primary/arch”

RAC1 > alter system switch logfile;
System altered.
RAC1 > /
System altered.
RAC2 > alter system switch logfile;
System altered.
RAC2 > /
System altered.
[oracle@Node2 arch]$ pwd
/mnt/logs/oradata/primary/arch
[oracle@Node2 arch]$ ls -lrt
total 5348
-rw-r—–  1 oracle oinstall  777216 Apr  6 10:00 1_10_747681489.arc
-rw-r—–  1 oracle oinstall    4096 Apr  6 10:00 1_11_747681489.arc
-rw-r—–  1 oracle oinstall 4667392 Apr  6 10:00 2_11_747681489.arc
-rw-r—–  1 oracle oinstall   56832 Apr  6 10:01 2_12_747681489.arc

We have some background jobs in this database. I will set them to sleep at both databases for some time

RAC1 > alter system set job_queue_processes=0;
System altered.

RAC2 > alter system set job_queue_processes=0;
System altered.

See if there are any alrtlog errors reported at nodes node1/node2 before Registering  database with CRS

RAC1> create spfile from pfile;
File created.

[oracle@Node1 dbs]$ pwd
/opt/app/oracle/product/11.2/db_1/dbs
-rw-r—–  1 oracle oinstall     3584 Apr  6 10:20 spfileRAC1.ora

Move spfile at a shared clustered location accessible to both Nodes/Instances RAC1/RAC2.

cp spfileRAC1.ora /mnt/data/oradata/primary/spfileRAC.ora

[oracle@(RAC1 or RAC2 ) ]$ df -k
/dev/mapper/System-Opt 20314748  14636172   4630208  76% /opt   — Local Storage
NETAPP_Server:/vol/prod_data 52428800  33919456  18509344  65% /mnt/data — Clustered Storage

[oracle@RAC1 PROD]$ ls -l /mnt/data/oradata/primary/spfile*
-rw-r—– 1 oracle oinstall 7680 May 10 15:18 spfileRAC.ora

Link individual init files on nodes RAC1/RAC2 to spfile

[oracle@RAC1]$ cd $ORACLE_HOME/dbs

[oracle@RAC1 dbs]$ cat initRAC1.ora
SPFILE=’/mnt/data/oradata/primary/spfileRAC.ora’

[oracle@RAC2 dbs]$ cat initRAC2.ora
SPFILE=’/mnt/data/oradata/primary/spfileRAC.ora’

Registering  database with CRS

[oracle@Node1 dbs]$ srvctl add database -d RAC -o /opt/app/oracle/product/11.2/db_1 -p  /mnt/data/oradata/primary/spfileRAC.ora
[oracle@Node1 dbs]$ srvctl add instance -d RAC -i RAC1 -n Node1
[oracle@Node1 dbs]$ srvctl add instance -d RAC -i RAC2 -n Node2
[oracle@Node2 arch]$ crsstat.sh  | grep RAC
ora.RAC.db                                 OFFLINE    OFFLINE

Before using services, we must check the cluster configuration is correct

[oracle@Node1 dbs]$ srvctl config database -d RAC
Database unique name: RAC
Database name:
Oracle home: /opt/app/oracle/product/11.2/db_1
Oracle user: oracle
Spfile: /mnt/data/oradata/primary/spfileRAC.ora
Domain:
Start options: open
Stop options: immediate
Database role: PRIMARY
Management policy: AUTOMATIC
Server pools: RAC
Database instances: RAC1,RAC2
Disk Groups:
Mount point paths:
Services:
Type: RAC
Database is administrator managed

[oracle@Node1 dbs]$ srvctl start database -d RAC
PRCR-1079 : Failed to start resource ora.RAC.db
CRS-5017: The resource action “ora.RAC.db start” encountered the following error:
ORA-29760: instance_number parameter not specified

Solution of the Problem
srvctl is case sensitive. So we need to ensure that instance and database definitions set in spfile/pfile are same case as those in the OCR and as are used in the srvctl commands. I made a mistake here and added “GDPROD1/2” in lowercase “RAC1/RAC2” while creating services.
Before going into solution be sure that ORACLE_SID reflects correct case so that instance can be accessed using SQL*Plus

I will have to remove services created earlier and add them with “UPPERCASE” instance name

[oracle@Node1 dbs]$ srvctl remove database -d RAC

Remove the database RAC? (y/[n]) y
[oracle@Node1 dbs]$ srvctl remove instance -d RAC -i RAC1
PRCD-1120 : The resource for database RAC could not be found.
PRCR-1001 : Resource ora.RAC.db does not exist
[oracle@Node1 dbs]$ srvctl remove instance -d RAC -i RAC2
PRCD-1120 : The resource for database RAC could not be found.

[oracle@Node1 dbs]$ srvctl add database -d RAC -o /opt/app/oracle/product/11.2/db_1 -p /mnt/data/oradata/primary/spfileRAC.ora
[oracle@Node1 dbs]$ srvctl add instance -d RAC -i RAC1 -n Node1
[oracle@Node1 dbs]$ srvctl add instance -d RAC -i RAC2 -n Node2
[oracle@Node2 arch]$ crsstat.sh  | grep RAC
ora.RAC.db                                 OFFLINE OFFLINE

Moment of TRUTH , start the Database

[oracle@Node1 dbs]$ srvctl start database -d RAC
[oracle@Node1 dbs]$ crsstat.sh  | grep RAC
ora.RAC.db                                 ONLINE ONLINE on Node1

[oracle@Node1 ~]$ export ORACLE_SID=RAC1
SQL> set sqlprompt ‘&_CONNECT_IDENTIFIER > ‘
RAC1 > archive log list;
Database log mode              Archive Mode
Automatic archival             Enabled
Archive destination            /mnt/logs/oradata/primary/arch
Oldest online log sequence     18
Next log sequence to archive   19
Current log sequence           19

SQL>  set sqlprompt ‘&_CONNECT_IDENTIFIER > ‘
RAC2 > archive log list;
Database log mode              Archive Mode
Automatic archival             Enabled
Archive destination            /mnt/logs/oradata/primary/arch
Oldest online log sequence     20
Next log sequence to archive   21
Current log sequence           21

Finally have a look at alrtlog for any issues reported

To test session failover , I will create SQLPLUS connection and see if  it gets migrated to other node when instance goes down.

SQL> select machine from v$session where rownum <5;
MACHINE
—————————————————————-
Node1
Node1
Node1
Node1

Node1 RAC1> shutdown abort;
ORACLE instance shut down.

SQL> select machine from v$session where rownum <5;
MACHINE
—————————————————————-
Node2
Node2
Node2
Node2

Remove Failed Clusterware

Posted by Sagar Patil

If you have already uninstalled Oracle Clusterware using the Oracle Universal Installer – Please download attached file cleanup.zip that contains a copy of the logpartformat.exe and the guioracleobjmanage.exe (plus necessary dll).

In case you have Clusterware installed – (You need to carry these steps only from one node)

Remove the partitions that have been initialized for ocrcfg and votedsk

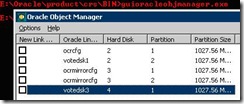
1. You can view these using the Oracle provided tool: guioracleobjmanager.exe
Invoke the Oracle tool GuiOracleObjManager.exe to see the link names that have been assigned to your partitions:

clip_image002

2. Use Services on Windows to stop the following services on each cluster node and set them to Manual. Please stop all oracle services.

clip_image004

clip_image006

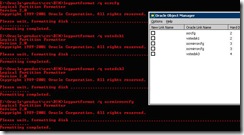
3. Remove the formatting on these partitions using the Oracle provided tool: logpartformat.exe. Invoke the Oracle tool logpatformat to reinitialize the headers of the disks you have specified for use as votedsk1 and ocrcfg

For RAW partitions:

run logpartformat /q <link name as shown to you in guioracleobjmanager tool
For example “logpartformat /q ocrcfg” repeat this step for all link names listed in guioracleobjmanager

clip_image008

For OCFS:

run logpartformat /q <DRIVELETTER>
For example, if the drive letter for your OCFS partition is ‘ P ‘

logpartformat /q P:

Certain times Logpartformat can fail. For example:

$CRS_HOME/BIN>logpartformat /q \\.\votedsk1
Logical Partition Formatter
Version 2.0
Copyright 1989-2001 Oracle Corporation. All rights reserved.
Unable to validate logical partition for symbolic link votedsk1

This is typically an access problem but cleaning up the disks can be problematic in such a case. Physically removing the disks and creating new ones with different sizes has been known to help in some cases.

4. Remove the assigned link names using the GUIOracleobjmanager.exe
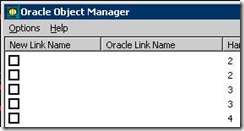
– Go back to the guioracleobjmanager tool and remove all link names:
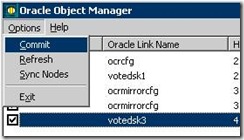
– place a check mark in the box preceding each link name / physical partition listed
– then go to the Options menu and click ‘commit
– the link names should now be removed

clip_image010 clip_image012

5. If possible remove and recreate your logical drives on top of extended partitions at this time from Windows Disk Management.

6. Use the Oracle Universal Installer to remove the empty CRS home (cleans up the inventory file)

7. Remove Oracle binaries using Windows explorer, both the CRS home and the files located in:

8. Using Windows explorer, remove the following driver files from: %systemroot%\windows\system32\drivers:
* ocfs.sys
* orafencedrv.sys
* orafenceservice.sys

9. Reboot all servers in your RAC configuration

You can also look at metalink note 341214.1

ADD/REMOVE/REPLACE/MOVE Oracle Cluster Registry (OCR) and Voting Disk

Posted by Sagar Patil

Note: You must be logged in as the root user, because root owns the OCR files.  Make sure there is a recent copy of the OCR file before making any changes: ocrconfig ­showbackup

If there is not a recent backup copy of the OCR file, an export can be taken for the current OCR file.

Use the following command to generate an export of the online OCR file:
ocrconfig ­export <OCR export_filename> -s online
If you should need to recover using this file, the fol owing command can be used:
ocrconfig import <OCR export_filename>

1. To add an OCR device:
To add an OCR device, provide the ful path including file name.

ocrconfig -replace ocr <filename>
To add an OCR mirror device, provide the ful path including file name.

ocrconfig -replace ocrmirror <filename>
2. To remove an OCR device:
To remove an OCR device:

ocrconfig -replace ocr
To remove an OCR mirror device

ocrconfig -replace ocrmirror
3. To replace or move the location of an OCR device:
To replace the OCR device with <filename>, provide the ful path including file name.

ocrconfig -replace ocr <filename>
To replace the OCR mirror device with <filename>, provide the ful path including file name.

ocrconfig -replace ocrmirror <filename>

Example moving OCR file from OCFS to raw devices
The OCR disk must be owned by root, must be in the oinstal group, and must have permissions set to 640.
In this example the OCR files are located in the ocfs2 file system:
/ocfs2/ocr1
/ocfs2/ocr2

Create raw device files of at least 100 MB. In this example the new OCR file wil be on the fol owing devices:
/dev/raw/raw1
/dev/raw/raw2
Once the raw devices are created, use the dd command to zero out the device and make sure no data is written
to the raw devices:
dd if=/dev/zero of=/dev/raw/raw1
dd if=/dev/zero of=/dev/raw/raw2

Note: Use UNIX man pages for additional information on the dd command.Now you are ready to move/replace the OCR file to the new storage location.

Move/Replace the OCR device
ocrconfig -replace ocr /dev/raw/raw1
Add /dev/raw/raw2 as OCR mirror device

ocrconfig -replace ocr /dev/raw/raw2
Example of adding an OCR device file
If you have upgraded your environment from a previous version, where you only had one OCR device file, you can
use the fol owing step to add an additional OCR file.
In this example a second OCR device file is added:
Add /dev/raw/raw2 as OCR mirror device

ocrconfig -replace ocr /dev/raw/raw2
ADD/DELETE/MOVE Voting Disk
Note: crsctl votedisk commands must be run as root
Note: Only use the -force flag when CRS is down
Shutdown the Oracle Clusterware (crsctl stop crs as root) on al nodes before making any modification to the
voting disk. Determine the current voting disk location using:
crsctl query css votedisk
Take a backup of al voting disk:

dd if=voting_disk_name of=backup_file_name
Note: Use UNIX man pages for additional information on the dd command.  The following can be used to restore the voting disk from the backup file created.

dd if=backup_file_name of=voting_disk_name
1. To add a Voting Disk, provide the full path including file name.:

crsctl add css votedisk <RAW_LOCATION> -force
2. To delete a Voting Disk, provide the full path including file name.:

crsctl delete css votedisk <RAW_LOCATION> -force
3. To move a Voting Disk, provide the full path including file name.:

crsctl delete css votedisk <OLD_LOCATION> ­force
crsctl add css votedisk <NEW_LOCATION> ­force
After modifying the voting disk, start the Oracle Clusterware stack on al nodes

crsctl start crs
Verify the voting disk location using

crsctl query css votedisk

1> Example : Moving Voting Disk from OCFS to raw devices. The voting disk is a partition that Oracle Clusterware uses to verify cluster node membership and status.
The voting disk must be owned by the oracle user, must be in the dba group, and must have permissions set to 644. Provide at least 20 MB disk space for the voting disk.
In this example the Voting Disks are located in the ocfs2 file system:
/ocfs2/voting1
/ocfs2/voting2
/ocfs2/voting3
Create raw device files of at least 20 MB. In this example the new voting disks wil be on the fol owing devices:
/dev/raw/raw3
/dev/raw/raw4
/dev/raw/raw5

Once the raw devices are created, use the dd command to zero out the device and make sure no data is written to the raw devices:
dd if=/dev/zero of=/dev/raw/raw3
dd if=/dev/zero of=/dev/raw/raw4
dd if=/dev/zero of=/dev/raw/raw5

Now you are ready to move/replace the voting disks to the new storage location.

To move a Voting Disk to new storage location:
crsctl delete css votedisk /ocfs2/voting1 ­force
crsctl add css votedisk /dev/raw/raw3 ­force
crsctl delete css votedisk /ocfs2/voting2 ­force
crsctl add css votedisk /dev/raw/raw4 ­force
crsctl delete css votedisk /ocfs2/voting3 ­force
crsctl add css votedisk /dev/raw/raw5 ­force

2> Example of adding Voting Disks
If you have upgraded your environment from a previous version, where you only had one voting disk, you can use
the fol owing steps to add additional voting disk.
In this example 2 additional Voting Disks are added:

crsctl add css votedisk /dev/raw/raw4 ­force
crsctl add css votedisk /dev/raw/raw5 ­force
After modifying the voting disk, start the Oracle Clusterware stack on al nodes

crsctl start crs
Verify the voting disk location using
crsctl query css votedisk

References
Note 390880.1 – OCR Corruption after Adding/Removing voting disk to a cluster when CRS stack is running

Get the current Session ID

Posted by Sagar Patil

SQL> desc v$mystat
Name Null? Type
—————————————– ——– —————————-
SID NUMBER
STATISTIC# NUMBER
VALUE NUMBER

SQL> select distinct sid from v$mystat;

SID
———-
139

SQL> select sid, serial# from v$session
2 where audsid=SYS_CONTEXT(‘USERENV’,’SESSIONID’);

SID SERIAL#
———- ———-
139 6

SQL> select dbms_session.unique_session_id from dual;

UNIQUE_SESSION_ID
——————————————————————————–
008B00060001

Identify Master node in RAC cluster

Posted by Sagar Patil

1. Grep occsd Log file
[oracle @ tadrac1]: /u1/app/../cssd >grep -i “master node” ocssd.log | tail -1
[CSSD]CLSS-3001: local node number 1, master node number 1

2. Grep crsd log file
[oracle @ tadrac1]: /u1/app/../crsd>grep MASTER crsd.log | tail -1

3. Query V$GES_RESOURCE view

4. ocrconfig -showbackup
The node that store OCR backups is the master node.

The role of the master node is basically that this is the node where other “clients”/nodes will contact to get information about node status… ect.

The rule is like this.
-> the first node in a cluster to be up will become the master node. -> and/or the node with the lowest number will become the master node. Information about who is the master can be found in the cssd logfile. Check for reconfiguration information at the end of the reconfiguration.

Bring Cluster Online/Offline

Posted by Sagar Patil

Step A> Sequence of events to pull cluster database down..

1. Bring down load balanced/TAF service
srvctl stop service -d orcl -s RAC

2. Stop RAC instances using
srvctl stop instance -d (database) -I (instance)

3. If needed stop ASM instnace using
srvctl stop asm -n (node)

4. Stop all services using
srvctl stop -nodeapps

Step B> Sequence of events to bring cluster database back..

1. Start all services using
srvctl start -nodeapps

2. Start ASM instnace using
srvctl start asm -n (node)

3. Start RAC instances using
srvctl start instance -d (database) -I (instance)

4. Finish up by bringing our load balanced/TAF service online
srvctl start service -d orcl -s RAC

Managing CRS/ Commands

Posted by Sagar Patil

CRS DAEMON FUNCTIONALITY

CRSD: Performs high availability recovery and management operations such as maintaining the OCR and managing application resources.
– Engine for HA operation
– Manages ‘application resources’
– Starts, stops, and fails ‘application resources’ over
– Spawns separate ‘actions’ to start/stop/check application resources
– Maintains configuration profiles in the OCR (Oracle Configuration Repository)
– Stores current known state in the OCR.
– Runs as root
– Is restarted automatically on failure

OCSSD:
– OCSSD is part of RAC and Single Instance with ASM
– Provides access to node membership
– Provides group services
– Provides basic cluster locking
– Integrates with existing vendor clusteware, when present
– Can also runs without integration to vendor clustware
– Runs as Oracle.
– Failure exit causes machine reboot.
— This is a feature to prevent data corruption in event of a split brain.

EVMD: Event manager daemon. This process also starts the racgevt process to manage FAN server callouts.
– Generates events when things happen
– Spawns a permanent child evmlogger
– Evmlogger, on demand, spawns children
– Scans callout directory and invokes callouts.
– Runs as Oracle.
– Restarted automatically on failure

RESOURCE STATUS
Status of the database, all instances and all services

srvctl status database -d ORACLE -v

Status of named instances with their current services.

srvctl status instance -d ORACLE -i RAC01, RAC02 -v

Status of a named services

srvctl status service -d ORACLE -s ERP -v

Status of all nodes supporting database applications

srvctl status node

START RESOURCES
Start the database with all enabled instances

srvctl start database -d ORACLE

Start named instances

srvctl start instance -d ORACLE -i RAC03, RAC04

Start named services. Dependent instances are started as needed

srvctl start service -d ORACLE -s CRM

Start a service at the named instance

srvctl start service -d ORACLE -s CRM -i RAC04

Start node applications

srvctl start nodeapps -n myclust-4

STOP RESOURCES
Stop the database, all instances and all services

srvctl stop database -d ORACLE

Stop named instances, first relocating all existing services

srvctl stop instance -d ORACLE -i RAC03,RAC04

Stop the service

srvctl stop service -d ORACLE -s CRM

Stop the service at the named instances

srvctl stop service -d ORACLE -s CRM -i RAC04

Stop node applications. Note that instances and services also stop

srvctl stop nodeapps -n myclust-4

ADD RESOURCES

Add a new node

srvctl add nodeapps -n myclust-1 -o $ORACLE_HOME –A 139.184.201.1/255.255.255.0/hme0

Add a new database

srvctl add database -d ORACLE -o $ORACLE_HOME

Add named instances to an existing database

srvctl add instance -d ORACLE -i RAC01 -n myclust-1
srvctl add instance -d ORACLE -i RAC02 -n myclust-2
srvctl add instance -d ORACLE -i RAC03 -n myclust-3

Add a service to an existing database with preferred instances (-r) and available instances (-a). Use basic failover to the available instances

srvctl add service -d ORACLE -s STD_BATCH -r RAC01,RAC02 -a RAC03,RAC04

Add a service to an existing database with preferred instances in list one and available instances in list two. Use preconnect at the available instances

srvctl add service -d ORACLE -s STD_BATCH -r RAC01,RAC02 -a RAC03,RAC04 -P PRECONNECT

REMOVE  RESOURCES
Remove the applications for a database.
srvctl remove database -d ORACLE
Remove the applications for named instances of an existing database.
srvctl remove instance -d ORACLE -i RAC03
srvctl remove instance -d ORACLE -i RAC04
Remove the service.
srvctl remove service -d ORACLE -s STD_BATCH
Remove the service from the instances.
srvctl remove service -d ORACLE -s STD_BATCH -i RAC03,RAC04
Remove all node applications from a node.
srvctl remove nodeapps -n myclust-4

MODIFY RESOURCES
Modify an instance to execute on another node.
srvctl modify instance -d ORACLE -n my

Display tablespace usage

Posted by Sagar Patil

column tsname format a30 heading ‘Tablespace Name’
column tbs_size_mb format 99999,999 heading ‘Size|(MB)’
column used format 99999,999 heading ‘Used|(MB)’
column avail format 99999,999 heading ‘Free|(MB)’
column used_visual format a11 heading ‘Used’
column pct_used format 999 heading ‘% Used’

set linesize 1000;
set trimspool on;
set pagesize 32000;
set verify off;
set feedback off;

PROMPT
PROMPT *************************
PROMPT *** TABLESPACE STATUS ***
PROMPT *************************

SELECT df.tablespace_name tsname
, round(sum(df.bytes)/1024/1024) tbs_size_mb
, round(nvl(sum(e.used_bytes)/1024/1024,0)) used
, round(nvl(sum(f.free_bytes)/1024/1024,0)) avail
, rpad(‘ ‘||rpad(‘X’,round(sum(e.used_bytes)
*10/sum(df.bytes),0), ‘X’),11,’-‘) used_visual
, nvl((sum(e.used_bytes)*100)/sum(df.bytes),0) pct_used
FROM sys.dba_data_files df
, (SELECT file_id
, sum(nvl(bytes,0)) used_bytes
FROM sys.dba_extents
GROUP BY file_id) e
, (SELECT max(bytes) free_bytes
, file_id
FROM dba_free_space
GROUP BY file_id) f
WHERE e.file_id(+) = df.file_id
AND df.file_id = f.file_id(+)
GROUP BY df.tablespace_name
ORDER BY 6;

Will produce results like

XYZ Live Database
===================
Size Used Free
Tablespace Name (MB) (MB) (MB) Used % Used
—————————— ———- ———- ———- ———– ——
STATSPACK 2,048 0 2,047 ———- 0
TOOLS 1,024 0 1,024 ———- 0
ACF_XYZ 2,048 0 2,048 ———- 0
ACF_IABC 2,048 3 2,045 ———- 0
UNDOTBS1 1,024 337 449 XXX——- 33
SYSTEM 1,024 557 467 XXXXX—– 54
SYSAUX 5,000 2,738 1,032 XXXXX—– 55
USERS 14,000 9,210 2,678 XXXXXXX— 66
UNDOTBS2 1,024 703 20 XXXXXXX— 69
UNDOTBS3 1,024 740 5 XXXXXXX— 72

Enabling ArchiveLog Mode in a RAC Environment

Posted by Sagar Patil

Login to one of the nodes (i.e. linux1) and disable the cluster instance parameter by setting cluster_database to FALSE from the current instance:
$ sqlplus “/ as sysdba”
SQL> alter system set cluster_database=false scope=spfile sid=’orcl1′;

Shutdown all instances accessing the clustered database:
$ srvctl stop database -d orcl

Using the local instance, MOUNT the database:
$ sqlplus “/ as sysdba”
SQL> startup mount
Enable archiving:
SQL> alter database archivelog;

Re-enable support for clustering by modifying the instance parameter cluster_database to TRUE from the current instance:
SQL> alter system set cluster_database=true scope=spfile sid=’orcl1′;
Shutdown the local instance:
SQL> shutdown immediate

Bring all instance back up using srvctl:
$ srvctl start database -d orcl
(Optional) Bring any services (i.e. TAF) back up using srvctl:
$ srvctl start service -d orcl

Login to the local instance and verify Archive Log Mode is enabled:
$ sqlplus “/ as sysdba”
SQL> archive log list
Database log mode Archive Mode
Automatic archival Enabled
Archive destination USE_DB_RECOVERY_FILE_DEST
Oldest online log sequence 83
Next log sequence to archive 84
Current log sequence 84

Oracle Clusterware Administration Quick Reference

Posted by Sagar Patil

Sequence of events to bring cluster database back..

1.    Start all services using “start -nodeapps”
2.    Start ASM instnace using “srvctl start asm -n (node)”
3.    Start RAC instances using “srvctl start instance -d (database) -I (instance)”
4.    Finish up by bringing our load balanced/TAF service online “srvctl start service -d orcl -s RAC”

List of nodes and other information for all nodes participating in the cluster:

[oracle@oradb4 oracle]$ olsnodes -n
oradb4 oradb3 oradb2 oradb1

List all nodes participating in the cluster with their assigned node numbers:

[oracle@oradb4 tmp]$ olsnodes -n
oradb4 1 oradb3 2 oradb2 3 oradb1 4

List all nodes participating in the cluster with the private interconnect assigned to each node:

[oracle@oradb4 tmp]$ olsnodes -p
oradb4 oradb4-priv oradb3 oradb3-priv oradb2 oradb2-priv oradb1 oradb1-pr

Check the health of the Oracle Clusterware daemon processes:

[oracle@oradb4 oracle]$ crsctl check crs
CSS appears healthy
CRS appears healthy
EVM appears healthy

Query and administer css vote disks :

[root@oradb4 root]# crsctl add css votedisk /u03/oradata/ CssVoteDisk.dbf
Now formatting voting disk: /u03/oradata/CssVoteDisk.dbfRead -1 bytes of 512 at offset 0 in voting device (CssVoteDisk.dbf) successful addition of votedisk /u03/oradata/CssVoteDisk.dbf

For dynamic state dump of the CRS:

[root@oradb4 root]# crsctl debug statedump crs
dumping State for crs objects Dynamic state dump information is appended to the crsd log file located in the $ORA_CRS_HOME/log/oradb4/crsd directory.

Verify the Oracle Clusterware version:

[oracle@oradb4 log]$ crsctl query crs softwareversion
CRS software version on node [oradb4] is [10.2.0.0.0]

Verify the current version of Oracle Clusterware being used:

[oracle@oradb4 log]$ crsctl query crs activeversion
CRS active version on the cluster is [10.2.0.0.0]

10g RAC Management Commands

Posted by Sagar Patil

Read more…

RAC | How to use SRVCTL Command

Posted by Sagar Patil

Check out current configuration information

srvctl config database Displays the configuration information of the cluster database.
srvctl config service Displays the configuration information for the services.
srvctl config nodeapps Displays the configuration information for the node applications.
srvctl config asm Displays the configuration for the ASM instances on the node.

Summary of srvctl commands.

Command Targets Description
srvctl add
srvctl modify
srvctl remove
database
instance
service
nodeapps
srvctl add / remove adds/removes target‘s configuration information to/from the OCR.srvctl modify allows you to change some of target‘s configuration information in the OCR without wiping out the rest.
srvctl relocate service Allows you to reallocate a service from one named instance to another named instance.
srvctl config database
service
nodeapps
asm
Lists configuration information for target from the OCR.
srvctl disable
srvctl enable
database
instance
service
asm
srvctl disable disables target, meaning CRS will not consider it for automatic startup, failover, or restart. This option is useful to ensure an object that is down for maintenance is not accidentally automatically restarted.srvctl enable reenables the specified object.
srvctl getenv
srvctl setenv
srvctl unsetenv
database
instance
service
nodeapps
srvctl getenv displays the environment variables stored in the OCR for target.srvctl setenv allows these variables to be set, and unsetenv unsets them.
srvctl start
srvctl status
srvctl stop
database
instance
service
nodeapps
asm
Start, stop, or display status (started or stopped) of target.

Adding a Database Service
srvctl add service -d <database_name> -s <5ervice_name> -r “<preferred list>”

londonl$ srvctl add service -6 RAC -s SERVICE2 -i “RACl,RAC2” -a “RAC3,RAC4”

Starting a Database Service
srvctl start service -d <database_name> [-s “<service_name_li$t>” [-1 <in$t_name>]] [-0 <start_options>] [-c <connect_str> | -q]

londonl$ srvctl start service -d RAC -s “SERVICEl,SERVICE2”

Stopping a Database Service
srvctl stop service -d <database_name> [-s “<service_naine_list>” [-1 <inst_name>]] [-C <connect_str> | -q] [-f]

londonl$ srvctl stop service -d RAC -s “SERVICE2,SERVICE3” -f

Checking the Current Database Service Configuration
srvctl config service -d <database_name> [-s <service_name>] [-a] [-S <level>]

londonl$ srvctl config service -d RAC -a
The -a option includes information about the configuration of TAF for the database service

Checking Current Database Service Status
srvctl status service -d <name> -s “<service_name_list>” [-f] [-v] [-S <level>]

londonl$ srvctl status service -d RAC -s “SERVICEl,SERVICE4”

Enabling and Disabling a Database Service
srvctl disable service -d <database_name> -s “<service_name_list>” [-i <in$t_name>]

londonl$ srvctl disable service -d RAC -s SERVICE2 -i RAC4

srvctl enable service -d <database_name> -s “<service_name_list>” [-i <inst_name>]

londonl$ srvctl enable service -d RAC -s SERVICE2 -i RAC4

Removing a Database Service
srvctl remove service -d <database_name> -s <service_name> [ – i <inst_narne>] [-f]

londonl$ srvctl remove service -d RAC -s SERVICE4

Relocating a Database Service
srvctl relocate service -d <database_name> -s <service_name> -i <old_inst_name> -r <new_inst_name> [-f]

londonl$ srvctl relocate service -d RAC -s SERVICES -i RAC2 -t RAC4

Administering Instances

Starting an instance : srvctl start instance -d prod -i “prod1,prod2”

Stopping an instance: srvctl stop instance -d prod -i “prod1,prod2”

Checking the status of an instance : srvctl status instance -d prod – i “prod1,prod2”

Adding a new instance configuration : srvctl add instance -d prod – i prod3 -n prod3_node

Removing an existing instance configuration: srvctl remove instance -d prod3-i prod3_node

Disabling an instance: srvctl disable instance -d prod -i “prod1,prod2”

Enabling an instance : srvctl enable instance -d prod -i “prod1,prod2

Top of Page

Top menu