GRID 11g| User-Defined SQL Metric alert if a query TOPs CPU Time

Posted by Sagar Patil

It often happens that DBMS statistics  though do  good for most queries can turn a best performing query into worse performing piece of SQL.
Here is a process I used to raise an Grid alert when a good query turns BAD.

You need to locate SQL_ID first before raising an SQL UDM for it. To identify culprit you will have to sample system number of  times to pick up right candidate SQL_ID.

SELECT SQL_ID
 , Round ( elapsed_time )
 FROM ( SELECT sql_id
 , elapsed_time / 60000000 elapsed_time       -- CPU_TIME/EXECUTIONS,
 , disk_reads
 , executions
 , first_load_time
 , last_load_time
 FROM v$sql
 ORDER BY elapsed_time DESC )
 WHERE ROWNUM < 5;

#    SQL_ID    ROUND(ELAPSED_TIME)
1    6hhbs09sb16j2    1006
2    7x3utw1gc9bqn    219
3    9y7yvrq53ju75    113
4    cr988d50t86za    106

Elapsed_Time : Minutes spent
SQL_ID I need to monitor is “6hhbs09sb16j2”

select 'The culprit SQL with SQL_ID 6hhbs09sb16j2 has topped CPU time'
 from ( SELECT SQL_ID
 , Round ( elapsed_time / executions )
 , executions
 FROM ( SELECT sql_id
 , elapsed_time / 1000 elapsed_time
 , disk_reads
 , executions
 , first_load_time
 , last_load_time
 FROM v$sql
 ORDER BY elapsed_time DESC )
 WHERE ROWNUM < 5 )
 where SQL_ID = '6hhbs09sb16j2';

Navigate to Targets -> Databases -> select “Grid Database”

Scroll down at this page and select “User-Defined Metrics” under “Related Links”.  Add entry for UDM  with above SQL.

Alter schedule and Frequency per your need

Click TEST button on right hand corner to test UDM. You shoudl see response as below.

Once SQL UDM is in place you will see an alert when above SQL_ID tops up CPU time.

If you want to be notified when UDM alert raised, don’t forget to add a Notification Rule.


11g RAC | Using Duplicate target database 11g Active Database option

Posted by Sagar Patil

I have a 2 Node RAC Standby database (STDBY) . I need to replicate it as a Load TEST database (LDTEST) in a read/write mode.

I will run thru following steps:
1. Preparing the Auxiliary Instance
2. Starting and Configuring RMAN Before Duplication
3. Duplicating a Database

1. Preparing the Auxiliary Instance

Step 1: Create an Oracle Password File for the Auxiliary Instance

When using FROM ACTIVE DATABASE option the source database instance which is the database instance to which RMAN is connected as TARGET connects directly to the auxiliary database instance.  This connection requires a password file with the same SYSDBA password.

[oracle@Node3]$ pwd
/mnt/data/oradata/LDTEST   — The password file placed at Clustered storage.
[oracle@Node3]$ cp orapwSTDBY ../LDTEST
[oracle@Node3]$ cd ../LDTEST
[oracle@Node3]$ ls -lrt
total 4
-rw-r—– 1 oracle oinstall 1536 May 3 12:57 orapwSTDBY

[oracle@Node3]$ mv orapwSTDBY orapwLDTTEST
[oracle@Node3]$ ls -lrt
total 4
-rw-r—– 1 oracle oinstall 1536 May 3 12:57 orapwLDTTEST

Step 2: Establish Oracle Net Connectivity to the Auxiliary Instance

When duplicating from an active database, you must first have connected as SYSDBA to the auxiliary instance by means of a net service name.
Add new database instance details $ORACLE_HOME/netaork/admin/listener.ora

(SID_LIST =
(SID_DESC =
(GLOBAL_DBNAME = LDTEST) # Replicated DB
(ORACLE_HOME = /opt/app/oracle/product/11.2/db_1)
(SID_NAME =LDTTEST1)
)

[oracle@Node3 admin]$ lsnrctl reload
[oracle@Node3 admin]$ lsnrctl status
Service “LDTEST” has 1 instance(s).
Instance “LDTTEST1”, status UNKNOWN, has 1 handler(s) for this service…
Service “STDBY_DGMGRL” has 1 instance(s).
Instance “STDBY1”, status UNKNOWN, has 1 handler(s) for this service…
The command completed successfully

Add following dedicated entry at /opt/app/oracle/product/11.2/db_1/network/admin

LDTTEST1=
(DESCRIPTION =
(ADDRESS = (PROTOCOL = TCP)(HOST = Node3scan)(PORT = 1529))
(CONNECT_DATA =
(SERVER = DEDICATED)
(SERVICE_NAME = LDTEST)
)
)

[oracle@Node3 admin]$ tnsping LDTTEST1
TNS Ping Utility for Linux: Version 11.2.0.2.0 – Production on 03-MAY-2011
Attempting to contact (DESCRIPTION = (ADDRESS = (PROTOCOL = TCP)(HOST = Node3scan)(PORT = 1529)) (CONNECT_DATA = (SERVER = DEDICATED) (SERVICE_NAME = LDTEST)))
OK (10 msec)

Step 3: Create an Initialization Parameter File for An Auxiliary Instance

Change directories at pfile to point to new database directory structure
** : set *.cluster_database=false
Let’s create dump directories needed. The easiest way is to copy structure of directory tree from existing instance.

[oracle@Node3 STDBY]$ pwd
/opt/app/oracle/diag/rdbms/STDBY
find . -type d -exec mkdir /opt/app/oracle/diag/rdbms/LDTEST/{} \;
“du -a” showed right directory structure created
84 ./LDTTEST1/trace
4 ./LDTTEST1/sweep
4 ./LDTTEST1/metadata
4 ./LDTTEST1/alert
4 ./LDTTEST1/stage
4 ./LDTTEST1/hm
4 ./LDTTEST1/incident
136 ./LDTTEST1

SQL> create pfile=’$ORACLE_HOME/dbs/initLDTTEST1.ora’ from spfile;

Edit pfile and make directory location changes required for new Database.

Step 4: Start Auxiliary Instance with SQL*Plus

SQL> startup nomount;
ORA-32004: obsolete or deprecated parameter(s) specified for RDBMS instance
ORACLE instance started.
Total System Global Area 9152860160 bytes
Fixed Size 2234056 bytes
Variable Size 6945769784 bytes
Database Buffers 2181038080 bytes
Redo Buffers 23818240 bytes
SQL> show parameter db_name
NAME TYPE VALUE
———————————— ———– ——————————
db_name string LDTTEST1

2. Starting and Configuring RMAN Before Duplication
Step 1: Start RMAN and Connect to the Database Instances
Step 2: Mount or Open the Source Database
Step 1: Start RMAN and Connect to the Database Instances

RMAN> connect target sys/sysgsadm@STDBY
connected to target database: PROD (DBID=4020163110)
RMAN> CONNECT AUXILIARY SYS/sysgsadm@LDTTEST1
connected to auxiliary database: LDTTEST1 (not mounted)

Step 2: Mount or Open the Source Database

Before beginning RMAN duplication, mount or open the source database it if it is not already mounted or open.

3. Duplicating a Database

Run following RMAN command

RMAN> DUPLICATE TARGET DATABASE TO LDTEST
FROM ACTIVE DATABASE
DB_FILE_NAME_CONVERT ‘/PROD’,’/LDTEST’
PFILE=’/opt/app/oracle/product/11.2/db_1/dbs/initLDTTEST1.ora’;

Starting Duplicate Db at 03-MAY-11
using target database control file instead of recovery catalog
allocated channel: ORA_AUX_DISK_1
channel ORA_AUX_DISK_1: SID=392 device type=DISK
allocated channel: ORA_AUX_DISK_2
channel ORA_AUX_DISK_2: SID=490 device type=DISK
allocated channel: ORA_AUX_DISK_3
channel ORA_AUX_DISK_3: SID=586 device type=DISK
contents of Memory Script:
{
sql clone “create spfile from memory”;
}
executing Memory Script
sql statement: create spfile from memory
contents of Memory Script:
{
shutdown clone immediate;
startup clone nomount;
}
executing Memory Script
Oracle instance shut down
connected to auxiliary database (not started)
Oracle instance started
Total System Global Area 9152860160 bytes
Fixed Size 2234056 bytes
Variable Size 6979324216 bytes
Database Buffers 2147483648 bytes
Redo Buffers 23818240 bytes
contents of Memory Script:
{
sql clone “alter system set db_name =
”PROD” comment=
”Modified by RMAN duplicate” scope=spfile”;
sql clone “alter system set db_unique_name =
”LDTEST” comment=
”Modified by RMAN duplicate” scope=spfile”;
shutdown clone immediate;
startup clone force nomount
backup as copy current controlfile auxiliary format ‘/mnt/data/oradata/LDTEST/control01.ctl’;
restore clone controlfile to ‘/mnt/data/oradata/LDTEST/control02.ctl’ from
‘/mnt/data/oradata/LDTEST/control01.ctl’;
alter clone database mount;
}
executing Memory Script
sql statement: alter system set db_name = ”PROD” comment= ”Modified by RMAN duplicate” scope=spfile
sql statement: alter system set db_unique_name = ”LDTEST” comment= ”Modified by RMAN duplicate” scope=spfile
Oracle instance shut down
Oracle instance started
Total System Global Area 9152860160 bytes
Fixed Size 2234056 bytes
Variable Size 6979324216 bytes
Database Buffers 2147483648 bytes
Redo Buffers 23818240 bytes
Starting backup at 03-MAY-11
allocated channel: ORA_DISK_1
channel ORA_DISK_1: SID=300 instance=STDBY1 device type=DISK
allocated channel: ORA_DISK_2
channel ORA_DISK_2: SID=396 instance=STDBY1 device type=DISK
allocated channel: ORA_DISK_3
channel ORA_DISK_3: SID=495 instance=STDBY1 device type=DISK
channel ORA_DISK_1: starting datafile copy
copying current control file
output file name=/opt/app/oracle/product/11.2/db_1/dbs/snapcf_STDBY1.f tag=TAG20110503T162228 RECID=13 STAMP=750183751
channel ORA_DISK_1: datafile copy complete, elapsed time: 00:00:07
Finished backup at 03-MAY-11
Starting restore at 03-MAY-11
allocated channel: ORA_AUX_DISK_1
channel ORA_AUX_DISK_1: SID=392 device type=DISK
allocated channel: ORA_AUX_DISK_2
channel ORA_AUX_DISK_2: SID=490 device type=DISK
allocated channel: ORA_AUX_DISK_3
channel ORA_AUX_DISK_3: SID=586 device type=DISK
channel ORA_AUX_DISK_2: skipped, AUTOBACKUP already found
channel ORA_AUX_DISK_3: skipped, AUTOBACKUP already found
channel ORA_AUX_DISK_1: copied control file copy
Finished restore at 03-MAY-11
database mounted
contents of Memory Script:
{
set newname for datafile 1 to
“/mnt/data/oradata/LDTEST/system01.dbf”;
set newname for datafile 2 to
“/mnt/data/oradata/LDTEST/sysaux01.dbf”;
set newname for datafile 3 to
“/mnt/data/oradata/LDTEST/undotbs01.dbf”;
set newname for datafile 4 to
“/mnt/data/oradata/LDTEST/users01.dbf”;
set newname for datafile 5 to
“/mnt/data/oradata/LDTEST/undotbs02.dbf”;
backup as copy reuse
datafile 1 auxiliary format
“/mnt/data/oradata/LDTEST/system01.dbf” datafile
2 auxiliary format
“/mnt/data/oradata/LDTEST/sysaux01.dbf” datafile
3 auxiliary format
“/mnt/data/oradata/LDTEST/undotbs01.dbf” datafile
4 auxiliary format
“/mnt/data/oradata/LDTEST/users01.dbf” datafile
5 auxiliary format
“/mnt/data/oradata/LDTEST/undotbs02.dbf” datafile
}
executing Memory Script
Starting backup at 03-MAY-11
using channel ORA_DISK_1
using channel ORA_DISK_2
using channel ORA_DISK_3
channel ORA_DISK_1: starting datafile copy
input datafile file number=00002 name=/mnt/data/oradata/PROD/sysaux01.dbf
channel ORA_DISK_2: starting datafile copy
input datafile file number=00001 name=/mnt/data/oradata/PROD/system01.dbf
output file name=/mnt/data/oradata/LDTEST/system01.dbf tag=TAG20110503T162300
channel ORA_DISK_3: datafile copy complete, elapsed time: 00:04:05
channel ORA_DISK_3: starting datafile copy
input datafile file number=00005 name=/mnt/data/oradata/PROD/undotbs02.dbf
output file name=/mnt/data/oradata/LDTEST/sysaux01.dbf tag=TAG20110503T162300
channel ORA_DISK_1: datafile copy complete, elapsed time: 00:06:50
channel ORA_DISK_1: starting datafile copy
input datafile file number=00003 name=/mnt/data/oradata/PROD/undotbs01.dbf
output file name=/mnt/data/oradata/LDTEST/cdc_data01.dbf tag=TAG20110503T162300
channel ORA_DISK_2: datafile copy complete, elapsed time: 00:02:15
channel ORA_DISK_2: starting datafile copy
input datafile file number=00004 name=/mnt/data/oradata/PROD/users01.dbf
output file name=/mnt/data/oradata/LDTEST/undotbs01.dbf tag=TAG20110503T162300
Finished backup at 03-MAY-11
sql statement: alter system archive log current
contents of Memory Script:
{
backup as copy reuse
archivelog like “/mnt/logs/oradata/PROD/arch/2_753_747681489.arc” auxiliary format
“/mnt/logs/oradata/LDTEST/arch/2_753_747681489.arc” archivelog like
“/mnt/logs/oradata/PROD/arch/1_664_747681489.arc” auxiliary format
“/mnt/logs/oradata/LDTEST/arch/1_664_747681489.arc” archivelog like
“/mnt/logs/oradata/PROD/arch/2_754_747681489.arc” auxiliary format
“/mnt/logs/oradata/LDTEST/arch/2_754_747681489.arc” ;
catalog clone archivelog “/mnt/logs/oradata/LDTEST/arch/2_753_747681489.arc”;
catalog clone archivelog “/mnt/logs/oradata/LDTEST/arch/1_664_747681489.arc”;
catalog clone archivelog “/mnt/logs/oradata/LDTEST/arch/2_754_747681489.arc”;
switch clone datafile all;
}
executing Memory Script
Starting backup at 03-MAY-11
using channel ORA_DISK_1
using channel ORA_DISK_2
using channel ORA_DISK_3
channel ORA_DISK_1: starting archived log copy
input archived log thread=2 sequence=753 RECID=782 STAMP=750183649
channel ORA_DISK_2: starting archived log copy
input archived log thread=1 sequence=664 RECID=784 STAMP=750184270
channel ORA_DISK_3: starting archived log copy
input archived log thread=2 sequence=754 RECID=786 STAMP=750184271
output file name=/mnt/logs/oradata/LDTEST/arch/2_753_747681489.arc RECID=0 STAMP=0
channel ORA_DISK_1: archived log copy complete, elapsed time: 00:00:02
output file name=/mnt/logs/oradata/LDTEST/arch/1_664_747681489.arc RECID=0 STAMP=0
channel ORA_DISK_2: archived log copy complete, elapsed time: 00:00:01
output file name=/mnt/logs/oradata/LDTEST/arch/2_754_747681489.arc RECID=0 STAMP=0
channel ORA_DISK_3: archived log copy complete, elapsed time: 00:00:01
Finished backup at 03-MAY-11
cataloged archived log
archived log file name=/mnt/logs/oradata/LDTEST/arch/2_753_747681489.arc RECID=783 STAMP=750184304
cataloged archived log
archived log file name=/mnt/logs/oradata/LDTEST/arch/1_664_747681489.arc RECID=784 STAMP=750184304
cataloged archived log
archived log file name=/mnt/logs/oradata/LDTEST/arch/2_754_747681489.arc RECID=785 STAMP=750184305
datafile 1 switched to datafile copy
input datafile copy RECID=13 STAMP=750184307 file name=/mnt/data/oradata/LDTEST/system01.dbf
datafile 2 switched to datafile copy
input datafile copy RECID=14 STAMP=750184308 file name=/mnt/data/oradata/LDTEST/sysaux01.dbf
datafile 3 switched to datafile copy
input datafile copy RECID=15 STAMP=750184309 file name=/mnt/data/oradata/LDTEST/undotbs01.dbf
datafile 4 switched to datafile copy
input datafile copy RECID=16 STAMP=750184309 file name=/mnt/data/oradata/LDTEST/users01.dbf
datafile 5 switched to datafile copy
input datafile copy RECID=17 STAMP=750184310 file name=/mnt/data/oradata/LDTEST/undotbs02.dbf
contents of Memory Script:
{
set until scn 263980944;
recover
clone database
delete archivelog
;
}
executing Memory Script
executing command: SET until clause
Starting recover at 03-MAY-11
using channel ORA_AUX_DISK_1
using channel ORA_AUX_DISK_2
using channel ORA_AUX_DISK_3
starting media recovery
archived log for thread 1 with sequence 664 is already on disk as file /mnt/logs/oradata/LDTEST/arch/1_664_747681489.arc
archived log for thread 2 with sequence 754 is already on disk as file /mnt/logs/oradata/LDTEST/arch/2_754_747681489.arc
archived log file name=/mnt/logs/oradata/LDTEST/arch/1_664_747681489.arc thread=1 sequence=664
archived log file name=/mnt/logs/oradata/LDTEST/arch/2_754_747681489.arc thread=2 sequence=754
media recovery complete, elapsed time: 00:00:03
Finished recover at 03-MAY-11
Oracle instance started
Total System Global Area 9152860160 bytes
Fixed Size 2234056 bytes
Variable Size 6945769784 bytes
Database Buffers 2181038080 bytes
Redo Buffers 23818240 bytes
sql statement: CREATE CONTROLFILE REUSE SET DATABASE “LDTEST” RESETLOGS ARCHIVELOG
MAXLOGFILES 192
MAXLOGMEMBERS 3
MAXDATAFILES 2048
MAXINSTANCES 32
MAXLOGHISTORY 1168
LOGFILE
GROUP 1 SIZE 50 M ,
GROUP 2 SIZE 50 M
DATAFILE
‘/mnt/data/oradata/LDTEST/system01.dbf’
CHARACTER SET AL32UTF8
sql statement: ALTER DATABASE ADD LOGFILE
INSTANCE ‘i2’
GROUP 3 SIZE 50 M ,
GROUP 4 SIZE 50 M
contents of Memory Script:
{
set newname for tempfile 1 to
“/mnt/data/oradata/LDTEST/temp01.dbf”;
switch clone tempfile all;
catalog clone datafilecopy “/mnt/data/oradata/LDTEST/sysaux01.dbf”,
“/mnt/data/oradata/LDTEST/undotbs01.dbf”,
“/mnt/data/oradata/LDTEST/users01.dbf”,
“/mnt/data/oradata/LDTEST/undotbs02.dbf”,
switch clone datafile all;
}
executing Memory Script
executing command: SET NEWNAME
renamed tempfile 1 to /mnt/data/oradata/LDTEST/temp01.dbf in control file
cataloged datafile copy
datafile copy file name=/mnt/data/oradata/LDTEST/sysaux01.dbf RECID=1 STAMP=750184356
cataloged datafile copy
datafile copy file name=/mnt/data/oradata/LDTEST/undotbs01.dbf RECID=2 STAMP=750184356
cataloged datafile copy
datafile copy file name=/mnt/data/oradata/LDTEST/users01.dbf RECID=3 STAMP=750184356
cataloged datafile copy
datafile copy file name=/mnt/data/oradata/LDTEST/undotbs02.dbf RECID=4 STAMP=750184357
cataloged datafile copy
datafile 2 switched to datafile copy
input datafile copy RECID=1 STAMP=750184356 file name=/mnt/data/oradata/LDTEST/sysaux01.dbf
datafile 3 switched to datafile copy
input datafile copy RECID=2 STAMP=750184356 file name=/mnt/data/oradata/LDTEST/undotbs01.dbf
datafile 4 switched to datafile copy
input datafile copy RECID=3 STAMP=750184356 file name=/mnt/data/oradata/LDTEST/users01.dbf
datafile 5 switched to datafile copy
input datafile copy RECID=4 STAMP=750184357 file name=/mnt/data/oradata/LDTEST/undotbs02.dbf
Reenabling controlfile options for auxiliary database
Executing: alter database add supplemental log data(PRIMARY KEY, UNIQUE) columns
Executing: alter database force logging
contents of Memory Script:
{
Alter clone database open resetlogs;
}
executing Memory Script
database opened
Finished Duplicate Db at 03-MAY-11

The database is now working fine on One Node1, I will have to convert it into a 2 node RAC database.

Create shared spfile for both instances , set CLUSTER_DATABASE to TRUE at spfile/pfile

SQL> alter system set cluster_database=TRUE scope=spfile;
System altered.
SQL> shutdown abort;
ORACLE instance shut down.
[oracle@Node3 dbs]$ cat initLDTTEST1.ora
SPFILE=’/mnt/data/oradata/LDTEST/spfileLDTTEST.ora'[oracle@Node4 dbs]$ cat initLDTTEST2.ora
SPFILE=’/mnt/data/oradata/LDTEST/spfileLDTTEST.ora’

Move password file to clustered shared storage and create soft links from both nodes Node3, Node4 to orapwLDTTEST

[oracle@Node3 dbs]$ ln -s /mnt/data/oradata/LDTEST/orapwLDTTEST orapwLDTTEST2
[oracle@Node3 dbs]$ ln -s /mnt/data/oradata/LDTEST/orapwLDTTEST orapwLDTTEST1
[oracle@Node3 dbs]$ scp initLDTTEST1.ora oracle@Node4:/opt/app/oracle/product/11.2/db_1/dbs
SQL> startup;
ORACLE instance started.
Total System Global Area 9152860160 bytes
Fixed Size 2234056 bytes
Variable Size 6945769784 bytes
Database Buffers 2181038080 bytes
Redo Buffers 23818240 bytes
Database mounted.
Database opened.

Make changes at Listener.ora,tnsnames.ora files on Second Node RAC – Node4

RACNode3> show parameter instance_name
instance_name string LDTTEST1
RACNode3> select count(*) from tab;
4865
RACNode3> show parameter cluster_database
cluster_database boolean TRUE

RACNode4> show parameter instance_name
instance_name string LDTTEST2
RACNode4> select count(*) from tab;
4865
RACNode4> show parameter cluster_database
cluster_database boolean TRUE

Lets make the database Cluster services aware.

[oracle@Node3 dbs]$ srvctl add database -d LDTEST -o /opt/app/oracle/product/11.2/db_1 -p /mnt/data/oradata/LDTEST/spfileLDTTEST.ora
[oracle@Node3 dbs]$ srvctl add instance -d LDTEST -i LDTTEST1 -n Node3
[oracle@Node3 dbs]$ srvctl add instance -d LDTEST -i LDTTEST2 -n Node4
[oracle@Node3 arch]$ /home/oracle/Scripts/crsstat.sh | grep LDTEST
ora.LDTEST.db OFFLINE OFFLINE

Finally  stop/start RAC Databases using srvctl commands

[oracle@Node3 dbs]$ srvctl start database -d LDTEST
[oracle@Node3 dbs]$ $HOME/Scripts/crsstat.sh | grep prod
ora.prod.db ONLINE ONLINE on Node3
[oracle@Node3 dbs]$ srvctl status database -d LDTEST
Instance LDTTEST1 is running on node Node3
Instance LDTTEST2 is running on node Node4

Have a look at alrtlog for any issues reported.

Modifying the Default Login Timeout Value for Grid Control 10g/11g

Posted by Sagar Patil

To prevent unauthorized access to the Grid Control console, Enterprise Manager will automatically log you out of the Grid Control console when there is no activity for a predefined period of time. For example, if you leave your browser open and leave your office, this default behavior prevents unauthorized users from using your Enterprise Manager administrator account.
By default, if the system is inactive for 45 minutes or more, and then you attempt to perform an Enterprise Manager action, you will be asked to log in to the Grid Control console again.

11g :

1. [oracle@EM_BOX config]$ $OMS_HOME/bin/emctl set property -name oracle.sysman.eml.maxInactiveTime -value -1 -sysman_pwd grid_pwd
Oracle Enterprise Manager 11g Release 1 Grid Control
Copyright (c) 1996, 2010 Oracle Corporation.  All rights reserved.
Property oracle.sysman.eml.maxInactiveTime for oms EM_BOX:4889_Management_Service has been set to value -1

#oracle.sysman.eml.maxInactiveTime=time_in_minutes
-1 : Unlimited Duration

2. Restart services to apply changed value

[oracle@EM_BOX config]$ $OMS_HOME/bin/emctl stop oms
[oracle@EM_BOX config]$ $OMS_HOME/bin/emctl start oms

10G :

1. Navigate to the <OMS_HOME>/sysman/config directory
2. Make a backup copy of the emoms.properties file. Go to the bottom of the file and add the line
#oracle.sysman.eml.maxInactiveTime=time_in_minutes
oracle.sysman.eml.maxInactiveTime=60

3. Restart services to apply changed value

[oracle@EM_BOX config]$ $OMS_HOME/bin/emctl stop oms
[oracle@EM_BOX config]$ $OMS_HOME/bin/emctl start oms

Replicating RAC database using RMAN at Remote Server

Posted by Sagar Patil

Here I am duplicating 11g RAC database from one RHEL Server to Another by old 10g method.
I could have used 11g “DUPLICATE TARGET DATABASE TO TARGET_DB FROM ACTIVE DATABASE” which doesn’t need previous rman backup at source. But it may not be a good option for large databases or at places with narrow network bandwidth.

Assumptions Made:

– RAC Clusterware and Database binaries are installed at Destination Nodes
– Clusterware services “crsctl check crs” reported active

PRIMARY site Tasks (Ora01a1,Ora01a2):

  • Create FULL RMAN Backup
  • Copy backup files from PRIMARY server to New server
  • Create pfile from spfile at source RAC
  • Copy init.ora from $Primary_Server:ORACLE_HOME/dbs to $New_Server:ORACLE_HOME/dbs
  • Copy $Primary_Server:ORACLE_HOME/dbs/password file to $New_Server:ORACLE_HOME/dbs

[oracle@Ora01a1 RAC1]$ scp Ora01a1BKUP.tgz oracle@Node1:/mnt/data
Warning: Permanently added (RSA) to the list of known hosts.
Ora01a1BKUP.tgz                                                          100%  274MB  11.4MB/s   00:24

SQL> show parameter pfile
NAME                                 TYPE        VALUE
———————————— ———– ——————————
spfile                               string      /mnt/data/oradata/primary/spfileRAC.ora

SQL> show parameter spfile
NAME                                 TYPE        VALUE
———————————— ———– ——————————
spfile                               string      /mnt/data/oradata/primary/spfileRAC.ora

SQL> create pfile=’/mnt/data/oradata/primary/init.ora’ from spfile;
File created

[oracle@Ora01a1 RAC]$ scp init.ora oracle@Node1:/mnt/data/rman_backups/bkup/init.ora 100% 1612     1.6KB/s   00:00
[oracle@Ora01a1 dbs]$ scp /mnt/data/oradata/primary/orapwRAC oracle@Node1:/mnt/data/rman_backups/bkup   orapwRAC 100% 1536     1.5KB/s   00:00

Destination Site Tasks (Node1,Node2)
Create required directories for bdump,adump as well as database mount volumes.

[oracle@Node1]$ grep /mnt initRAC.ora
*.control_files=’/mnt/data/oradata/primary/control01.ctl’,’/mnt/data/oradata/primary/control02.ctl’
*.db_recovery_file_dest=’/mnt/logs/oradata/primary/fast_recovery_area’
*.log_archive_dest_1=’LOCATION=/mnt/logs/oradata/primary/arch’

[oracle@Node1]$ mkdir -p /mnt/data/oradata/primary/
[oracle@Node1]$ mkdir -p /mnt/logs/oradata/primary/fast_recovery_area
[oracle@Node1]$ mkdir -p /mnt/logs/oradata/primary/arch

“opt” is a local volume for each instance so create directories on both RAC nodes
[oracle@Node1]$ grep /opt initRAC.ora
*.audit_file_dest=’/opt/app/oracle/admin/primary/adump’
*.diagnostic_dest=’/opt/app/oracle’

[oracle@Node1]$ mkdir -p /opt/app/oracle/admin/primary/adump
[oracle@Node1]$ mkdir -p /opt/app/oracle

[oracle@Node2]$ mkdir -p /opt/app/oracle/admin/primary/adump
[oracle@Node3]$ mkdir -p /opt/app/oracle

Under 11g background trace will be maintained at “$ORACLE_BASE/diag/rdbms”, if required create necessary directories there.

Modify init.ora file ($ORACLE_HOME/dbs/init.ora) and amend/change parameters. I had to comment out “remote_listener” parameter as the serversnames at destination are different.

Copy init.ora at both nodes “Node1,Node2″@$ORACLE_HOME/dbs

[oracle@Node1 dbs]$ cp initRAC.ora initRAC1.ora

[oracle@Node1 dbs]$ echo $ORACLE_SID
RAC1
SQL> startup nomount;
ORACLE instance started.
Total System Global Area 9152860160 bytes
Fixed Size                  2234056 bytes
Variable Size            6945769784 bytes
Database Buffers         2181038080 bytes
Redo Buffers               23818240 bytes

[oracle@Node1 dbs]$ rman target / nocatalog
connected to target database: RAC (not mounted)
using target database control file instead of recovery catalog
RMAN> restore controlfile from ‘/mnt/data/rman_backups/bkup/c-4020163152-20110405-01’;
allocated channel: ORA_DISK_1
channel ORA_DISK_1: SID=588 instance=RAC1 device type=DISK
channel ORA_DISK_1: restoring control file
channel ORA_DISK_1: restore complete, elapsed time: 00:00:03
output file name=/mnt/data/oradata/primary/control01.ctl
output file name=/mnt/data/oradata/primary/control02.ctl
.

………
Finished restore at 05-APR-11

Verify controlfiles are copied at right location

[oracle@Node2 RAC]$ pwd
/mnt/data/oradata/RAC

[oracle@Node2 RAC]$ ls -lrt
-rw-r—–  1 oracle oinstall 22986752 Apr  5 16:35 control01.ctl
-rw-r—–  1 oracle oinstall 22986752 Apr  5 16:35 control02.ctl

RMAN> alter database mount;
database mounted
RMAN> RESTORE DATABASE;
Starting restore at 05-APR-11
Starting implicit crosscheck backup at 05-APR-11
allocated channel: ORA_DISK_1
allocated channel: ORA_DISK_2
******* This returned errors
RMAN-00571: ===========================================================
RMAN-00569: =============== ERROR MESSAGE STACK FOLLOWS ===============
RMAN-00571: ===========================================================
RMAN-03002: failure of restore command at 04/05/2011 16:36:54
RMAN-06026: some targets not found – aborting restore
RMAN-06023: no backup or copy of datafile 3 found to restore

RMAN was not able to locate backup since backupset was not registered with rman inventory & copied at different location. Let’s catalog backup pieces that were shipped from Primary database.

I have multiple copies of backup files so I used
RMAN> CATALOG START WITH ‘/mnt/data/rman_backups/bkup/’ NOPROMPT;
List of Cataloged Files
=======================
File Name: /mnt/data/rman_backups/bkup/c-4020163152-20110405-04
File Name: /mnt/data/rman_backups/bkup/c-4020163152-20110405-05
File Name: /mnt/data/rman_backups/bkup/db_bk_ub8m91cg7_s3432_p1_t747680263.bkp
File Name: /mnt/data/rman_backups/bkup/db_bk_ub9m91cg8_s3433_p1_t747680264.bkp
File Name: /mnt/data/rman_backups/bkup/db_bk_ubam91cg9_s3434_p1_t747680265.bkp
File Name: /mnt/data/rman_backups/bkup/db_bk_ubcm91cgi_s3436_p1_t747680274.bkp
File Name: /mnt/data/rman_backups/bkup/db_bk_ubdm91cgi_s3437_p1_t747680274.bkp
File Name: /mnt/data/rman_backups/bkup/db_bk_ubbm91cgi_s3435_p1_t747680274.bkp
File Name: /mnt/data/rman_backups/bkup/db_bk_ubem91ck0_s3438_p1_t747680384.bkp
File Name: /mnt/data/rman_backups/bkup/db_bk_ubfm91ck0_s3439_p1_t747680384.bkp
File Name: /mnt/data/rman_backups/bkup/ctl_bk_ubhm91ck3_s3441_p1_t747680387.bkp

RMAN> RESTORE DATABASE;
channel ORA_DISK_1: starting datafile backup set restore
channel ORA_DISK_1: specifying datafile(s) to restore from backup set
channel ORA_DISK_1: restoring datafile 00001 to /mnt/data/oradata/primary/system01.dbf
channel ORA_DISK_1: restoring datafile 00005 to /mnt/data/oradata/primary/undotbs02.dbf
channel ORA_DISK_1: reading from backup piece /mnt/data/rman_backups/bkup/db_bk_ubdm91cgi_s3437_p1_t747680274.bkp
.
..
channel ORA_DISK_1: piece handle=/mnt/data/rman_backups/bkup/db_bk_ubdm91cgi_s3437_p1_t747680274.bkp tag=TAG20110405T165753
channel ORA_DISK_1: restored backup piece 1
channel ORA_DISK_1: restore complete, elapsed time: 00:01:26
channel ORA_DISK_2: piece handle=/mnt/data/rman_backups/bkup/db_bk_ubcm91cgi_s3436_p1_t747680274.bkp tag=TAG20110405T165753
channel ORA_DISK_2: restored backup piece 1
channel ORA_DISK_2: restore complete, elapsed time: 00:01:26
channel ORA_DISK_3: piece handle=/mnt/data/rman_backups/bkup/db_bk_ubbm91cgi_s3435_p1_t747680274.bkp tag=TAG20110405T165753
channel ORA_DISK_3: restored backup piece 1
channel ORA_DISK_3: restore complete, elapsed time: 00:01:56
Finished restore at 05-APR-11

RMAN> recover database;
channel ORA_DISK_1: starting archived log restore to default destination
channel ORA_DISK_1: restoring archived log
archived log thread=1 sequence=3289
channel ORA_DISK_1: reading from backup piece /mnt/data/rman_backups/bkup/db_bk_ubem91ck0_s3438_p1_t747680384.bkp
channel ORA_DISK_2: starting archived log restore to default destination
channel ORA_DISK_2: restoring archived log
archived log thread=2 sequence=3484
RMAN-00571: ===========================================================
RMAN-00569: =============== ERROR MESSAGE STACK FOLLOWS ===============
RMAN-00571: ===========================================================
RMAN-03002: failure of recover command at 04/05/2011 17:17:46
RMAN-06054: media recovery requesting unknown archived log for thread 1 with sequence 3290 and starting SCN of 246447604

RMAN> ALTER DATABASE OPEN RESETLOGS;
database opened

Shutdown and restart database RAC1

SQL> shutdown abort;
ORACLE instance shut down.

set sqlprompt ‘&_CONNECT_IDENTIFIER > ‘
RAC1> startup;
ORACLE instance started.
Total System Global Area 9152860160 bytes
Fixed Size                  2234056 bytes
Variable Size            6945769784 bytes
Database Buffers         2181038080 bytes
Redo Buffers               23818240 bytes
Database mounted.
Database opened.

RAC1> set linesize 200;
RAC1> set pagesize 20;
RAC1> select inst_id,substr(member,1,35) from gv$logfile;
INST_ID SUBSTR(MEMBER,1,35)
———- ——————————————————————————————————————————————–
1 /mnt/data/oradata/primary/redo02.log
1 /mnt/data/oradata/primary/redo01.log
1 /mnt/data/oradata/primary/redo03.log
1 /mnt/data/oradata/primary/redo04.log

I can see , INSTANCE 2 REDO log files are not listed so startup RAC2 instance at Node2

[oracle@Node2 dbs]$ echo $ORACLE_SID
RAC2
SQL> set sqlprompt ‘&_CONNECT_IDENTIFIER > ‘
RAC2> startup;
ORACLE instance started.
Total System Global Area 9152860160 bytes
Fixed Size                  2234056 bytes
Variable Size            6610225464 bytes
Database Buffers         2516582400 bytes
Redo Buffers               23818240 bytes
Database mounted.
Database opened.

I can now locate REDO files for Instance 1 as well as 2

select inst_id,substr(member,1,35) from gv$logfile;
INST_ID SUBSTR(MEMBER,1,35)
———- ——————————————————————————————————————————————–
2 /mnt/data/oradata/primary/redo02.log
2 /mnt/data/oradata/primary/redo01.log
2 /mnt/data/oradata/primary/redo03.log
2 /mnt/data/oradata/primary/redo04.log
1 /mnt/data/oradata/primary/redo02.log
1 /mnt/data/oradata/primary/redo01.log
1 /mnt/data/oradata/primary/redo03.log
1 /mnt/data/oradata/primary/redo04.log
8 rows selected.

I will carry log switchs to see ARCHIVE files create at Archive Destination “/mnt/logs/oradata/primary/arch”

RAC1 > alter system switch logfile;
System altered.
RAC1 > /
System altered.
RAC2 > alter system switch logfile;
System altered.
RAC2 > /
System altered.
[oracle@Node2 arch]$ pwd
/mnt/logs/oradata/primary/arch
[oracle@Node2 arch]$ ls -lrt
total 5348
-rw-r—–  1 oracle oinstall  777216 Apr  6 10:00 1_10_747681489.arc
-rw-r—–  1 oracle oinstall    4096 Apr  6 10:00 1_11_747681489.arc
-rw-r—–  1 oracle oinstall 4667392 Apr  6 10:00 2_11_747681489.arc
-rw-r—–  1 oracle oinstall   56832 Apr  6 10:01 2_12_747681489.arc

We have some background jobs in this database. I will set them to sleep at both databases for some time

RAC1 > alter system set job_queue_processes=0;
System altered.

RAC2 > alter system set job_queue_processes=0;
System altered.

See if there are any alrtlog errors reported at nodes node1/node2 before Registering  database with CRS

RAC1> create spfile from pfile;
File created.

[oracle@Node1 dbs]$ pwd
/opt/app/oracle/product/11.2/db_1/dbs
-rw-r—–  1 oracle oinstall     3584 Apr  6 10:20 spfileRAC1.ora

Move spfile at a shared clustered location accessible to both Nodes/Instances RAC1/RAC2.

cp spfileRAC1.ora /mnt/data/oradata/primary/spfileRAC.ora

[oracle@(RAC1 or RAC2 ) ]$ df -k
/dev/mapper/System-Opt 20314748  14636172   4630208  76% /opt   — Local Storage
NETAPP_Server:/vol/prod_data 52428800  33919456  18509344  65% /mnt/data — Clustered Storage

[oracle@RAC1 PROD]$ ls -l /mnt/data/oradata/primary/spfile*
-rw-r—– 1 oracle oinstall 7680 May 10 15:18 spfileRAC.ora

Link individual init files on nodes RAC1/RAC2 to spfile

[oracle@RAC1]$ cd $ORACLE_HOME/dbs

[oracle@RAC1 dbs]$ cat initRAC1.ora
SPFILE=’/mnt/data/oradata/primary/spfileRAC.ora’

[oracle@RAC2 dbs]$ cat initRAC2.ora
SPFILE=’/mnt/data/oradata/primary/spfileRAC.ora’

Registering  database with CRS

[oracle@Node1 dbs]$ srvctl add database -d RAC -o /opt/app/oracle/product/11.2/db_1 -p  /mnt/data/oradata/primary/spfileRAC.ora
[oracle@Node1 dbs]$ srvctl add instance -d RAC -i RAC1 -n Node1
[oracle@Node1 dbs]$ srvctl add instance -d RAC -i RAC2 -n Node2
[oracle@Node2 arch]$ crsstat.sh  | grep RAC
ora.RAC.db                                 OFFLINE    OFFLINE

Before using services, we must check the cluster configuration is correct

[oracle@Node1 dbs]$ srvctl config database -d RAC
Database unique name: RAC
Database name:
Oracle home: /opt/app/oracle/product/11.2/db_1
Oracle user: oracle
Spfile: /mnt/data/oradata/primary/spfileRAC.ora
Domain:
Start options: open
Stop options: immediate
Database role: PRIMARY
Management policy: AUTOMATIC
Server pools: RAC
Database instances: RAC1,RAC2
Disk Groups:
Mount point paths:
Services:
Type: RAC
Database is administrator managed

[oracle@Node1 dbs]$ srvctl start database -d RAC
PRCR-1079 : Failed to start resource ora.RAC.db
CRS-5017: The resource action “ora.RAC.db start” encountered the following error:
ORA-29760: instance_number parameter not specified

Solution of the Problem
srvctl is case sensitive. So we need to ensure that instance and database definitions set in spfile/pfile are same case as those in the OCR and as are used in the srvctl commands. I made a mistake here and added “GDPROD1/2” in lowercase “RAC1/RAC2” while creating services.
Before going into solution be sure that ORACLE_SID reflects correct case so that instance can be accessed using SQL*Plus

I will have to remove services created earlier and add them with “UPPERCASE” instance name

[oracle@Node1 dbs]$ srvctl remove database -d RAC

Remove the database RAC? (y/[n]) y
[oracle@Node1 dbs]$ srvctl remove instance -d RAC -i RAC1
PRCD-1120 : The resource for database RAC could not be found.
PRCR-1001 : Resource ora.RAC.db does not exist
[oracle@Node1 dbs]$ srvctl remove instance -d RAC -i RAC2
PRCD-1120 : The resource for database RAC could not be found.

[oracle@Node1 dbs]$ srvctl add database -d RAC -o /opt/app/oracle/product/11.2/db_1 -p /mnt/data/oradata/primary/spfileRAC.ora
[oracle@Node1 dbs]$ srvctl add instance -d RAC -i RAC1 -n Node1
[oracle@Node1 dbs]$ srvctl add instance -d RAC -i RAC2 -n Node2
[oracle@Node2 arch]$ crsstat.sh  | grep RAC
ora.RAC.db                                 OFFLINE OFFLINE

Moment of TRUTH , start the Database

[oracle@Node1 dbs]$ srvctl start database -d RAC
[oracle@Node1 dbs]$ crsstat.sh  | grep RAC
ora.RAC.db                                 ONLINE ONLINE on Node1

[oracle@Node1 ~]$ export ORACLE_SID=RAC1
SQL> set sqlprompt ‘&_CONNECT_IDENTIFIER > ‘
RAC1 > archive log list;
Database log mode              Archive Mode
Automatic archival             Enabled
Archive destination            /mnt/logs/oradata/primary/arch
Oldest online log sequence     18
Next log sequence to archive   19
Current log sequence           19

SQL>  set sqlprompt ‘&_CONNECT_IDENTIFIER > ‘
RAC2 > archive log list;
Database log mode              Archive Mode
Automatic archival             Enabled
Archive destination            /mnt/logs/oradata/primary/arch
Oldest online log sequence     20
Next log sequence to archive   21
Current log sequence           21

Finally have a look at alrtlog for any issues reported

To test session failover , I will create SQLPLUS connection and see if  it gets migrated to other node when instance goes down.

SQL> select machine from v$session where rownum <5;
MACHINE
—————————————————————-
Node1
Node1
Node1
Node1

Node1 RAC1> shutdown abort;
ORACLE instance shut down.

SQL> select machine from v$session where rownum <5;
MACHINE
—————————————————————-
Node2
Node2
Node2
Node2

11g Grid | Fixing Incident (BEA-101020 [HTTP]) detected in ..Middleware/gc_inst/user_projects

Posted by Sagar Patil

I have tonnes of these errors reported as critical at Grid Control. It is a bug, solved in 11.2 ( not released yet).

This error message is meaningless and can be safety ignored and there is one off patch to suppress this “error” Article ID 1139600.1

Log Details show:

<msg time=’2011-04-20T18:51:48.889+01:00′ org_id=’oracle’ comp_id=’ofm’
msg_id=’719226105′ type=’INCIDENT_ERROR’ level=’1′
host_id=’omsnode.oobm.travel.lcl’ host_addr=’10.241.156.201′ prob_key=’BEA-101020 [HTTP]’
upstream_comp=” downstream_comp=” ecid=’0000Ixo2XQP2RPJ5Ing8yf1Dfim_00000M’
errid=’132′ detail_path=’/opt/app/oracle/Middleware/gc_inst/user_projects/domains/GCDomain/servers/EMGC_OMS1/adr/diag/ofm/GCDomain/EMGC_OMS1/incident/incdir_132′>
<txt>Errors in directory: /opt/app/oracle/Middleware/gc_inst/user_projects/domains/GCDomain/servers/EMGC_OMS1/adr/diag/ofm/GCDomain/EMGC_OMS1/incident/incdir_132  (incident=132):
null
</txt>

The incident doesn’t indicate cause of an error

Description
———–
Incident detected using watch rule “UncheckedException”:
Watch time:             Jan 20, 2011 6:51:48 PM BST
Watch ServerName:       EMGC_OMS1
Watch RuleType:         Log
Watch Rule:             (SEVERITY = ‘Error’) AND ((MSGID = ‘BEA-101020’) OR (MSGID = ‘BEA-101017’) OR (MSGID = ‘BEA-000802’))
Watch DomainName:       GCDomain
Watch Data:
DATE : Jan 20, 2011 6:51:48 PM BST
SERVER : EMGC_OMS1
MESSAGE : [ServletContext@2127000850[app:emgc module:/em path:/em spec-version:2.5]] Servlet failed with Exception
java.lang.IllegalStateException: Response already committed

To fix these issues follow this process : {From Metalink}

1.   Apply Patch 9882856 in the $AGENT_HOME monitoring the target for which the alert was raised.

2.    Create filter expression similar to the database 10g Alert Log Filter expression in Note 949858.1

.*BEA-(101020)\D.* – Any string
.*BEA-(101020)\D.* – Followed by the string â??BEA-â??
.*BEA-(101020)\D.* – Then 101020
.*BEA-(101020)\D.* – Followed by anything other than a digit
.*BEA-(101020)\D.* – Followed by any string

Which translates to the following errors:
BEA-101020
To add this filter expression, edit the AGENT_HOME/sysman/config/emd.properties file, add:
adrAlertLogAsErrorCodeExcludeRegex=.*BEA-(101020)\D.*
Note: There should be no spaces. This will make sure that the WLS incidents that match this regex are filtered.

3.  Restart agent

4. To manually clear the existing or old alerts about [..]EMGC_OMS1/adr/diag/ofm/GCDomain/EMGC_OMS1/alert/log.xml from Enterprise Manager Grid Control User Interface / webpage,
apply Patch 9914120

How to apply Patch 9882856?

[oracle@omsnode 9882856]$ opatch apply
Invoking OPatch 11.1.0.8.0
Oracle Interim Patch Installer version 11.1.0.8.0
Copyright (c) 2009, Oracle Corporation.  All rights reserved.
Oracle Home       : /opt/app/oracle/product/11.2/db_1
Central Inventory : /opt/app/oracle/oraInventory
from           : /etc/oraInst.loc
OPatch version    : 11.1.0.8.0
OUI version       : 11.2.0.1.0
OUI location      : /opt/app/oracle/product/11.2/db_1/oui
Log file location : /opt/app/oracle/product/11.2/db_1/cfgtoollogs/opatch/opatch.log
Patch history file: /opt/app/oracle/product/11.2/db_1/cfgtoollogs/opatch/opatch_history.txt
OPatch detects the Middleware Home as “/opt/app/oracle/Middleware/WebLogicServer”
ApplySession applying interim patch ‘9882856’ to OH ‘/opt/app/oracle/product/11.2/db_1’
Running prerequisite checks…
Prerequisite check “CheckApplicable” failed.
The details are:
Patch 9882856: Required component(s) missing : [ oracle.sysman.top.agent, 11.1.0.1.0 ]
ApplySession failed during prerequisite checks: Prerequisite check “CheckApplicable” failed.
System intact, OPatch will not attempt to restore the system
OPatch failed with error code 74

[oracle@omsnode 9882856]$ which opatch
/opt/app/oracle/Middleware/WebLogicServer/agent11g/OPatch/opatch

Opatch failed as it is looking for ORACLE_HOME set to AGENT_HOME
[oracle@omsnode 9882856]$ export ORACLE_HOME=$AGENT_HOME

[oracle@omsnode 9882856]$ echo $ORACLE_HOME
/opt/app/oracle/Middleware/WebLogicServer/agent11g
[oracle@omsnode 9882856]$ opatch apply
Invoking OPatch 11.1.0.8.0
Oracle Interim Patch Installer version 11.1.0.8.0
Copyright (c) 2009, Oracle Corporation.  All rights reserved.
Oracle Home       : /opt/app/oracle/Middleware/WebLogicServer/agent11g
Central Inventory : /opt/app/oracle/oraInventory
from           : /etc/oraInst.loc
OPatch version    : 11.1.0.8.0
OUI version       : 11.1.0.8.0
OUI location      : /opt/app/oracle/Middleware/WebLogicServer/agent11g/oui
Log file location : /opt/app/oracle/Middleware/WebLogicServer/agent11g/cfgtoollogs/opatch/opatch.log
Patch history file: /opt/app/oracle/Middleware/WebLogicServer/agent11g/cfgtoollogs/opatch/opatch_history.txt
OPatch detects the Middleware Home as “/opt/app/oracle/Middleware/WebLogicServer”
ApplySession applying interim patch ‘9882856’ to OH ‘/opt/app/oracle/Middleware/WebLogicServer/agent11g’
Running prerequisite checks…
OPatch detected non-cluster Oracle Home from the inventory and will patch the local system only.

Please shutdown Oracle instances running out of this ORACLE_HOME on the local system.
(Oracle Home = ‘/opt/app/oracle/Middleware/WebLogicServer/agent11g’)
Is the local system ready for patching? [y|n]
y
User Responded with: Y
Backing up files and inventory (not for auto-rollback) for the Oracle Home
Backing up files affected by the patch ‘9882856’ for restore. This might take a while…
Backing up files affected by the patch ‘9882856’ for rollback. This might take a while…
Patching component oracle.sysman.top.agent, 11.1.0.1.0…
Copying file to “/opt/app/oracle/Middleware/WebLogicServer/agent11g/sysman/admin/scripts/alertlogAdrAs.pl”
ApplySession adding interim patch ‘9882856’ to inventory
Verifying the update…
Inventory check OK: Patch ID 9882856 is registered in Oracle Home inventory with proper meta-data.
Files check OK: Files from Patch ID 9882856 are present in Oracle Home.
The local system has been patched and can be restarted.
OPatch succeeded.

How to apply Patch 9914120?

[oracle@omsnode 9914120]$ opatch apply
Invoking OPatch 11.1.0.8.0
Oracle Interim Patch Installer version 11.1.0.8.0
Copyright (c) 2009, Oracle Corporation.  All rights reserved.
Oracle Home       : /opt/app/oracle/Middleware/WebLogicServer/agent11g
Central Inventory : /opt/app/oracle/oraInventory
from           : /etc/oraInst.loc
OPatch version    : 11.1.0.8.0
OUI version       : 11.1.0.8.0
OUI location      : /opt/app/oracle/Middleware/WebLogicServer/agent11g/oui
Log file location : /opt/app/oracle/Middleware/WebLogicServer/agent11g/cfgtoollogs/opatch/opatch.log
Patch history file: /opt/app/oracle/Middleware/WebLogicServer/agent11g/cfgtoollogs/opatch/opatch_history.txt

OPatch detects the Middleware Home as “/opt/app/oracle/Middleware/WebLogicServer”
ApplySession applying interim patch ‘9914120’ to OH ‘/opt/app/oracle/Middleware/WebLogicServer/agent11g’
Running prerequisite checks…
OPatch detected non-cluster Oracle Home from the inventory and will patch the local system only.
Please shutdown Oracle instances running out of this ORACLE_HOME on the local system.
(Oracle Home = ‘/opt/app/oracle/Middleware/WebLogicServer/agent11g’)
Is the local system ready for patching? [y|n]
y
User Responded with: Y
Backing up files and inventory (not for auto-rollback) for the Oracle Home
Backing up files affected by the patch ‘9914120’ for restore. This might take a while…
Backing up files affected by the patch ‘9914120’ for rollback. This might take a while…
Patching component oracle.sysman.top.agent, 11.1.0.1.0…
Copying file to “/opt/app/oracle/Middleware/WebLogicServer/agent11g/sysman/admin/metadata/weblogic_j2eeserver.xml”
ApplySession adding interim patch ‘9914120’ to inventory
Verifying the update…
Inventory check OK: Patch ID 9914120 is registered in Oracle Home inventory with proper meta-data.
Files check OK: Files from Patch ID 9914120 are present in Oracle Home.
The local system has been patched and can be restarted.
OPatch succeeded.

11g |Monitoring DataGuard using Broker Commands

Posted by Sagar Patil

DGMGRL> show database PROD;
Object “prod” was not found

** 11.2.0.2 – You may see errors at dgmgrl if you don’t include database name in quotes

Use : DGMGRL> show database ‘prod’;

1    Check the DG configuration status.
The status of the broker configuration is an aggregated status of all databases and instances in the broker configuration

DGMGRL> show configuration
Configuration – dataguard
Protection Mode: MaxPerformance
Databases:
stdby – Primary database
prod  – Physical standby database
Fast-Start Failover: DISABLED
Configuration Status:
SUCCESS

2   Check the database status  :

DGMGRL> show database  STDBY;
Database – prod
Role:            PHYSICAL STANDBY
Intended State:  APPLY-ON
Transport Lag:   0 seconds
Apply Lag:       1 hour(s) 3 minutes 6 seconds (Note Apply Lag of an hour)
Real Time Query: OFF
Instance(s):
PROD1 (apply instance)
PROD2
Database Status:
SUCCESS

We can also run an SQL to locate the lag between Primary and Standby

set linesize 200;
set pagesize 2000;
COLUMN NAME FORMAT A30;
COLUMN value FORMAT A20;
COLUMN UNIT FORMAT A20;
COLUMN time_computed FORMAT A20;
select name
 , value
 , unit
 , time_computed
 from v$dataguard_stats;
NAME                           VALUE                UNIT                 TIME_COMPUTED
------------------------------ -------------------- -------------------- --------------------
transport lag                  +00 00:22:37         day(2) to second(0)  06/09/2011 12:06:09
 interval
apply lag                      +00 00:22:40         day(2) to second(0)  06/09/2011 12:06:09
 interval
apply finish time              +00 00:00:00.035     day(2) to second(3)  06/09/2011 12:06:09
 interval
estimated startup time         18                   second               06/09/2011 12:06:09

3. Check the monitorable property StatusReport
To identify which database has the failure, you need to go through all of the databases in the configuration one by one.

DGMGRL> show database prod statusreport;
STATUS REPORT
INSTANCE_NAME   SEVERITY ERROR_TEXT

DGMGRL> show database stdby statusreport;
STATUS REPORT
INSTANCE_NAME   SEVERITY ERROR_TEXT

4   Check the monitorable property LogXptStatus
To identify exact log transport errors, we can use monitorable property LogXptStatus

DGMGRL> show database prod logxptstatus
LOG TRANSPORT STATUS
PRIMARY_INSTANCE_NAME STANDBY_DATABASE_NAME               STATUS

5.    Check the monitorable property InconsistentProperties
If you see warning ORA-16714 reported, to identify inconsistent values for property LogArchiveTrace we can use property InconsistentProperties

DGMGRL> SHOW DATABASE prod InconsistentProperties;
INCONSISTENT PROPERTIES
INSTANCE_NAME        PROPERTY_NAME         MEMORY_VALUE         SPFILE_VALUE         BROKER_VALUE

6.    Check the monitorable property InconsistentLogXptProps
To identify the inconsistent values for the redo transport property use monitorable property InconsistentLogXptProps:

DGMGRL> show database prod InconsistentLogXptProps
INCONSISTENT PROPERTIES
INSTANCE_NAME        PROPERTY_NAME         MEMORY_VALUE         SPFILE_VALUE         BROKER_VALUE

Cleaning up a machine with previous Oracle 11g Clusterware/RAC install

Posted by Sagar Patil

Here I will be deleting everything from a 2 node 11g RAC cluster

  1. Use “crs_stop -all” to stop all services on RAC nodes
  2. Use DBCA GUI to delete all RAC databases from nodes
  3. Use netca to delete LISTENER config
  4. Deinstall Grid Infrastructure from Server
  5. Deinstall Oracle database software from Server

Steps 1-3 are self-explanatory

4.Deinstall Grid Infrastructure from Server :

[oracle@RAC2 backup]$ $GRID_HOME/deinstall/deinstall

Checking for required files and bootstrapping …
Please wait …
Location of logs /opt/app/oracle/oraInventory/logs/
############ ORACLE DEINSTALL & DECONFIG TOOL START ############

######################### CHECK OPERATION START #########################
Install check configuration START
Checking for existence of the Oracle home location /opt/app/grid/product/11.2/grid_1
Oracle Home type selected for de-install is: CRS
Oracle Base selected for de-install is: /opt/app/oracle
Checking for existence of central inventory location /opt/app/oracle/oraInventory
Checking for existence of the Oracle Grid Infrastructure home /opt/app/grid/product/11.2/grid_1
The following nodes are part of this cluster: RAC1,RAC2
Install check configuration END
Skipping Windows and .NET products configuration check
Checking Windows and .NET products configuration END
Traces log file: /opt/app/oracle/oraInventory/logs//crsdc.log
Network Configuration check config START
Network de-configuration trace file location: /opt/app/oracle/oraInventory/logs/netdc_check2011-03-31_10-14-05-AM.log
Network Configuration check config END
Asm Check Configuration START
ASM de-configuration trace file location: /opt/app/oracle/oraInventory/logs/asmcadc_check2011-03-31_10-14-06-AM.log
ASM configuration was not detected in this Oracle home. Was ASM configured in this Oracle home (y|n) [n]:
######################### CHECK OPERATION END #########################

####################### CHECK OPERATION SUMMARY #######################
Oracle Grid Infrastructure Home is: /opt/app/grid/product/11.2/grid_1
The cluster node(s) on which the Oracle home de-installation will be performed are:RAC1,RAC2
Oracle Home selected for de-install is: /opt/app/grid/product/11.2/grid_1
Inventory Location where the Oracle home registered is: /opt/app/oracle/oraInventory
Skipping Windows and .NET products configuration check
ASM was not detected in the Oracle Home
Do you want to continue (y – yes, n – no)? [n]: y
A log of this session will be written to: ‘/opt/app/oracle/oraInventory/logs/deinstall_deconfig2011-03-31_10-14-02-AM.out’
Any error messages from this session will be written to: ‘/opt/app/oracle/oraInventory/logs/deinstall_deconfig2011-03-31_10-14-02-AM.err’

######################## CLEAN OPERATION START ########################
ASM de-configuration trace file location: /opt/app/oracle/oraInventory/logs/asmcadc_clean2011-03-31_10-14-44-AM.log
ASM Clean Configuration END
Network Configuration clean config START
Network de-configuration trace file location: /opt/app/oracle/oraInventory/logs/netdc_clean2011-03-31_10-14-44-AM.log
De-configuring Naming Methods configuration file on all nodes…
Naming Methods configuration file de-configured successfully.
De-configuring Local Net Service Names configuration file on all nodes…
Local Net Service Names configuration file de-configured successfully.
De-configuring Directory Usage configuration file on all nodes…
Directory Usage configuration file de-configured successfully.
De-configuring backup files on all nodes…
Backup files de-configured successfully.
The network configuration has been cleaned up successfully.
Network Configuration clean config END
—————————————->
The deconfig command below can be executed in parallel on all the remote nodes. Execute the command on  the local node
Run the following command as the root user or the administrator on node “RAC1″.
/tmp/deinstall2011-03-31_10-13-56AM/perl/bin/perl -I/tmp/deinstall2011-03-31_10-13-56AM/perl/lib -I/tmp/deinstall2011-mp/deinstall2011-03-31_10-13-56AM/response/deinstall_Ora11g_gridinfrahome1.rsp”
Run the following command as the root user or the administrator on node “RAC2″.
/tmp/deinstall2011-03-31_10-13-56AM/perl/bin/perl -I/tmp/deinstall2011-03-31_10-13-56AM/perl/lib -I/tmp/deinstall2011-mp/deinstall2011-03-31_10-13-56AM/response/deinstall_Ora11g_gridinfrahome1.rsp” -lastnode
Press Enter after you finish running the above commands
<—————————————-

Let’s run these comamnds on Nodes

[oracle@RAC1 app]$ /tmp/deinstall2011-03-31_10-13-56AM/perl/bin/perl -I/tmp/deinstall2011-03-31_10-13-56AM/perl/lib -I/tmp/deinstall2011mp/deinstall2011-03-31_10-13-56AM/response/deinstall_Ora11g_gridinfrahome1.rsp
[oracle@RAC1 app]$ su –
Password:
[root@RAC1 ~]# /tmp/deinstall2011-03-31_10-13-56AM/perl/bin/perl -I/tmp/deinstall2011-03-31_10-13-56AM/perl/lib -I/tmp/deinstall2011-mp/deinstall2011-03-31_10-13-56AM/response/deinstall_Ora11g_gridinfrahome1.rsp”
>
[root@RAC1 ~]# /tmp/deinstall2011-03-31_10-22-37AM/perl/bin/perl -I/tmp/deinstall2011-03-31_10-22-37AM/perl/lib -I/tmp/deinstall2011-03-31_10-22-37AM/crs/install /tmp/deinstall2011-03-31_10-22-37AM/crs/install/rootcrs.pl -force  -deconfig -paramfile “/tmp/deinstall2011-03-31_10-22-37AM/response/deinstall_Ora11g_gridinfrahome1.rsp”
Using configuration parameter file: /tmp/deinstall2011-03-31_10-22-37AM/response/deinstall_Ora11g_gridinfrahome1.rsp
Network exists: 1/192.168.31.0/255.255.255.0/bond0, type static
VIP exists: /RAC1-vip/192.168.31.21/192.168.31.0/255.255.255.0/bond0, hosting node RAC1
VIP exists: /RAC2-vip/192.168.31.23/192.168.31.0/255.255.255.0/bond0, hosting node RAC2
GSD exists
ONS exists: Local port 6100, remote port 6200, EM port 2016
ACFS-9200: Supported
CRS-2791: Starting shutdown of Oracle High Availability Services-managed resources on ‘RAC1’
CRS-2673: Attempting to stop ‘ora.crsd’ on ‘RAC1’
CRS-2677: Stop of ‘ora.crsd’ on ‘RAC1’ succeeded
CRS-2673: Attempting to stop ‘ora.mdnsd’ on ‘RAC1’
CRS-2673: Attempting to stop ‘ora.crf’ on ‘RAC1’
CRS-2673: Attempting to stop ‘ora.ctssd’ on ‘RAC1’
CRS-2673: Attempting to stop ‘ora.evmd’ on ‘RAC1’
CRS-2673: Attempting to stop ‘ora.cluster_interconnect.haip’ on ‘RAC1’
CRS-2677: Stop of ‘ora.crf’ on ‘RAC1’ succeeded
CRS-2677: Stop of ‘ora.mdnsd’ on ‘RAC1’ succeeded
CRS-2677: Stop of ‘ora.cluster_interconnect.haip’ on ‘RAC1’ succeeded
CRS-2677: Stop of ‘ora.evmd’ on ‘RAC1’ succeeded
CRS-2677: Stop of ‘ora.ctssd’ on ‘RAC1’ succeeded
CRS-2673: Attempting to stop ‘ora.cssd’ on ‘RAC1’
CRS-2677: Stop of ‘ora.cssd’ on ‘RAC1’ succeeded
CRS-2673: Attempting to stop ‘ora.gipcd’ on ‘RAC1’
CRS-2673: Attempting to stop ‘ora.diskmon’ on ‘RAC1’
CRS-2677: Stop of ‘ora.diskmon’ on ‘RAC1’ succeeded
CRS-2677: Stop of ‘ora.gipcd’ on ‘RAC1’ succeeded
CRS-2673: Attempting to stop ‘ora.gpnpd’ on ‘RAC1’
CRS-2677: Stop of ‘ora.gpnpd’ on ‘RAC1’ succeeded
CRS-2793: Shutdown of Oracle High Availability Services-managed resources on ‘RAC1’ has completed
CRS-4133: Oracle High Availability Services has been stopped.
Successfully deconfigured Oracle clusterware stack on this node
************** **************

… continue as below once above commands compiled successfully

Removing Windows and .NET products configuration END
Oracle Universal Installer clean START
Detach Oracle home ‘/opt/app/grid/product/11.2/grid_1’ from the central inventory on the local node : Done
Failed to delete the directory ‘/opt/app/grid/product/11.2/grid_1’. The directory is in use.
Delete directory ‘/opt/app/grid/product/11.2/grid_1’ on the local node : Failed <<<<
The Oracle Base directory ‘/opt/app/oracle’ will not be removed on local node. The directory is in use by Oracle Home ‘/opt/app/oracle/product/11.2/db_1’.
The Oracle Base directory ‘/opt/app/oracle’ will not be removed on local node. The directory is in use by central inventory.
Detach Oracle home ‘/opt/app/grid/product/11.2/grid_1’ from the central inventory on the remote nodes ‘RAC1’ : Done
Delete directory ‘/opt/app/grid/product/11.2/grid_1’ on the remote nodes ‘RAC1’ : Done
The Oracle Base directory ‘/opt/app/oracle’ will not be removed on node ‘RAC1’. The directory is in use by Oracle Home ‘/opt/app/oracle/product/11.2/db_1’.
The Oracle Base directory ‘/opt/app/oracle’ will not be removed on node ‘RAC1’. The directory is in use by central inventory.
Oracle Universal Installer cleanup was successful.
Oracle Universal Installer clean END
Oracle install clean START
Clean install operation removing temporary directory ‘/tmp/deinstall2011-03-31_10-22-37AM’ on node ‘RAC2’
Clean install operation removing temporary directory ‘/tmp/deinstall2011-03-31_10-22-37AM’ on node ‘RAC1’
Oracle install clean END
######################### CLEAN OPERATION END #########################

####################### CLEAN OPERATION SUMMARY #######################
Oracle Clusterware is stopped and successfully de-configured on node “RAC2”
Oracle Clusterware is stopped and successfully de-configured on node “RAC1”
Oracle Clusterware is stopped and de-configured successfully.
Skipping Windows and .NET products configuration clean
Successfully detached Oracle home ‘/opt/app/grid/product/11.2/grid_1’ from the central inventory on the local node.
Failed to delete directory ‘/opt/app/grid/product/11.2/grid_1’ on the local node.
Successfully detached Oracle home ‘/opt/app/grid/product/11.2/grid_1’ from the central inventory on the remote nodes ‘RAC1’.
Successfully deleted directory ‘/opt/app/grid/product/11.2/grid_1’ on the remote nodes ‘RAC1’.
Oracle Universal Installer cleanup was successful.
Oracle deinstall tool successfully cleaned up temporary directories.
#######################################################################
############# ORACLE DEINSTALL & DECONFIG TOOL END #############

[oracle@RAC2 11.2]$ cd $GRID_HOME
[oracle@RAC2 grid_1]$ pwd
/opt/app/grid/product/11.2/grid_1
[oracle@RAC2 grid_1]$ ls -lrt
total 0

Oracle clusterware was clearly removed from $CRS_HOME /$GRID_HOME. Lets proceed with next step.

5. Deinstall Oracle database software from Server

Note: Always use the Oracle Universal Installer to remove Oracle software. Do not delete any Oracle home directories without first using the Installer to remove the software.

[oracle@RAC2 11.2]$ pwd
/opt/app/oracle/product/11.2
oracle@RAC2 11.2]$ du db_1/
4095784 db_1/

Start the Installer as follows:
[oracle@RAC2 11.2]$ $ORACLE_HOME/oui/bin/runInstaller
Starting Oracle Universal Installer…

Checking swap space: must be greater than 500 MB.   Actual 2047 MB    Passed
Checking monitor: must be configured to display at least 256 colors.    Actual 16777216    Passed
Preparing to launch Oracle Universal Installer from /tmp/OraInstall2011-03-31_10-37-33AM. Please wait …[oracle@RAC2 11.2]$ Oracle Universal Installer, Version 11.2.0.2.0 Production
Copyright (C) 1999, 2010, Oracle. All rights reserved.

####################### CHECK OPERATION SUMMARY #######################
Oracle Grid Infrastructure Home is:
The cluster node(s) on which the Oracle home de-installation will be performed are:RAC1,RAC2
Oracle Home selected for de-install is: /opt/app/oracle/product/11.2/db_1
Inventory Location where the Oracle home registered is: /opt/app/oracle/oraInventory
Skipping Windows and .NET products configuration check
Following RAC listener(s) will be de-configured: LISTENER
No Enterprise Manager configuration to be updated for any database(s)
No Enterprise Manager ASM targets to update
No Enterprise Manager listener targets to migrate
Checking the config status for CCR
RAC1 : Oracle Home exists with CCR directory, but CCR is not configured
RAC2 : Oracle Home exists with CCR directory, but CCR is not configured
CCR check is finished
Do you want to continue (y – yes, n – no)? [n]:

……………………………………….  You will see lots of messages

####################### CLEAN OPERATION SUMMARY #######################
Following RAC listener(s) were de-configured successfully: LISTENER
Cleaning the config for CCR
As CCR is not configured, so skipping the cleaning of CCR configuration
CCR clean is finished
Skipping Windows and .NET products configuration clean
Successfully detached Oracle home ‘/opt/app/oracle/product/11.2/db_1’ from the central inventory on the local node.
Successfully deleted directory ‘/opt/app/oracle/product/11.2/db_1’ on the local node.
Successfully detached Oracle home ‘/opt/app/oracle/product/11.2/db_1’ from the central inventory on the remote nodes ‘RAC2’.
Successfully deleted directory ‘/opt/app/oracle/product/11.2/db_1’ on the remote nodes ‘RAC2’.
Oracle Universal Installer cleanup completed with errors.

Oracle deinstall tool successfully cleaned up temporary directories.
#######################################################################
############# ORACLE DEINSTALL & DECONFIG TOOL END #############

Let’s go to $ORACLE_HOME and see if any executables are remaining?

[oracle@RAC1 app]$ cd $ORACLE_HOME
-bash: cd: /opt/app/oracle/product/11.2/db_1: No such file or directory
[oracle@RAC2 product]$ pwd
/opt/app/oracle/product
[oracle@RAC2 product]$ du 11.2/
4       11.2/
(clearly no files available here)

Oracle 11g Grid| How to add custom shell script to raise user defined alert/notification

Posted by Sagar Patil

Although, I can use grid to carry my RMAN backups  I am not entirely convinced about it’s transparency. As a DBA I like to  have more control to myself and I trust my custom scripts used for years more than anything else. Here is a small process I added to raise alert for failed rman backups.

I wrote 2 scripts though I can possibly combine them in a single script. Please feel free to make changes.

rman_full.sh : Level 0 RMAN bckup script & check_rman_log.sh :  Shell script to check for keywords & raise errors

#!/bin/ksh
# Declare your ORACLE environment variables  (rman_full.sh)

export ORACLE_SID=GRID
export ORACLE_BASE=/opt/app/oracle
export ORACLE_HOME=/opt/app/oracle/product/11.2/db_1
export PATH=$PATH:${ORACLE_HOME}/bin
$ORACLE_HOME/bin/rman target / msglog=/mnt/data/backups/rman/rman_${ORACLE_SID}.log <<eof
run {
allocate channel d1 type disk;
backup incremental level 0 cumulative
skip inaccessible
tag Full_Online_Backup
format ‘/mnt/data/backups/rman/OMS_data_t%t_s%s_p%p’
database;
copy current controlfile to ‘/mnt/data/backups/rman/snap_ctl.ctl’;
sql ‘alter system archive log current’;
backup
format ‘/mnt/data/backups/rman/OMS_archive_t%t_s%s_p%p’
archivelog all
delete input;
DELETE NOPROMPT OBSOLETE;
DELETE NOPROMPT EXPIRED BACKUP;
release channel d1;
}

Following shell script (check_rman_log.sh) will look for error codes & messages at rman log file and will return string value of  “Backup Completed  Successfully” else “Backup Failed” to grid control

#!/bin/bash
#author: Sagar PATIL  (check_rman_log.sh)

#!/bin/bash
#author: Sagar PATIL

# Exit codes
STATE_OK=”em_result=Backup Completed  Successfully”
STATE_CRITICAL=”em_result=Backup Failed”

#I’m just declaring the logfile variable
# logfile=/mnt/data/backups/rman/rman_GRID01DB.log

#this is the minimum size that the file should have (bytes)
minimumLogSize=1000

#I need to get current date
curDate=$(date “+%d-%b-%y” | tr ‘a-z’ ‘A-Z’)

#debug (1 = ON)
DEBUG=0

#this array will contain the words that should be found into the log
#keywordsOK[0]=”Finished backup at $curDate”
keywordsOK[1]=”Finished Control File and SPFILE Autobackup at $curDate”

#this array will contain the words that shouldn’t be found in the log.
#if they are found the script will exit with STATE_CRITICAL code (2)
keywordsBad[0]=”ORA-”
keywordsBad[1]=”ERR-”
keywordsBad[2]=”err-”
keywordsBad[3]=”Ora-”
keywordsBad[4]=”user interrupt received”

#this function checks the log file creation date. if the
#creation date is different that the current date, the
#script will exit with $STATE_CRITICAL state (error code 2)
checkCreationDate() {
#this is the date of creation of the log file (I’m using ctime UNIX stuff)
fileDate=$(stat $logfile | grep Access | tail -n 1 | awk ‘{print $2}’)
currentDate=$(date “+%Y-%m-%d”)
#compare dates
if [[ “$fileDate” != “$currentDate” ]]; then
#in this case, the dates don’t match so the script
#will print an error msg and then exit
#        echo “Error checking date: today is $currentDate and the file creation is $fileDate”
echo $STATE_CRITICAL “| Error checking date: today is $currentDate and the file creation is $fileDate”
else
#show a message if the log file creation date is OK
if [ $DEBUG -eq 1 ]; then
echo “Date checked. All OK”
fi
fi
}

#this function will first check for the words that shouldnt be
#in the log file (the ones in the keywordsBad array); if they are
#found the script will exit with STATE_CRITICAL code (2). On the
#other hand, if the ‘bad’ keywords are not found, then it will
#loop through the array that contains the words that shoud be
#found; if those keywords are not found the script will exit with
#STATE_CRITICAL code (2).
checkKeywords() {
#loop through the undesirable keywords
for i in “${keywordsBad[@]}”; do
#look for the keyword in the file
if tac $logfile | grep -w -i -m1 “$i” > /dev/null
then
#show error msg and exit
#            echo “Errors in the log ($i)”
echo $STATE_CRITICAL “|Errors in the log ($i)”
else
echo > /dev/null
fi
done

#status: 1 = OK, 0 = fail
status=1
#since the keywords that shouldnt be found in the script
#were NOT found… check for the ones that should
for i in “${keywordsOK[@]}”; do
#look for the keyword backwards in the file
if tac $logfile | grep -i -m1 “$i” > /dev/null
then
echo > /dev/null
else
#if there were found a keyword the status
#will be set to 0 indicating something wrong is happening
status=0
fi
done

#if all is OK
if [[ $status -eq 1 ]]; then
if [ $DEBUG -eq 1 ]; then
echo “The ‘good’ keywords were found :)”
fi
else #if the script couldnt find one of the keywords
#show error msg and exit
#        echo “Couldnt find the Good  keywords in the file”
echo $STATE_CRITICAL “|Couldnt find the Good  keywords in the file”
fi
}
#this function checks the log size. if it’s greater than
#1KB we consider the log file is OK; otherwise the script
#will exit with error code
checkFileSize() {
#get the file size
fileSize=$(ls -l $logfile | awk ‘{print $5}’)
#compare the log size
if [[ $fileSize -gt $minimumLogSize ]]; then
if [ $DEBUG -eq 1 ]; then
echo “Log file size is OK ($fileSize)”
fi
else
#        echo “Log file size is not OK ($fileSize)”
echo $STATE_CRITICAL “| Log file size is not OK ($fileSize)”
fi
}
#loop through the script parameters (each parameter is a path with
#logfile name example /u07/backup/RMAN/).
#Then, for each parameter run the functions.

while [ $# -ne 0 ]; do
logfile=”$1″
if [ $DEBUG -eq 1 ]; then
echo “————————————-”
echo “Checking the log file: $logfile”
fi
#check if file exists or not
if [ -e “$logfile” ]; then
#check the log file creation date
checkCreationDate
#check the file size (it uses the $minimumLogSize var)
checkFileSize
#search keywords in the file
checkKeywords
else
#        echo “The file ‘$logfile’ doesn’t exist”
echo $STATE_CRITICAL  “| The file ‘$logfile’ doesn’t exist”
fi
shift
echo
done

#At end of the program move logfile to preseve history of 30 days
#mv $logfile $logfile_curDate
#find /u07/backup/RMAN/ -name rman_*.log -mtime +30 -exec rm {} \;

#if the script was not killed in the checking part,
#then it’s probably that all is OK

  • Click at Targets from Top menu and select required  “Host” machine
  • Scroll down and you will see a link for “User-Defined Metrics” , at next screen select “create”

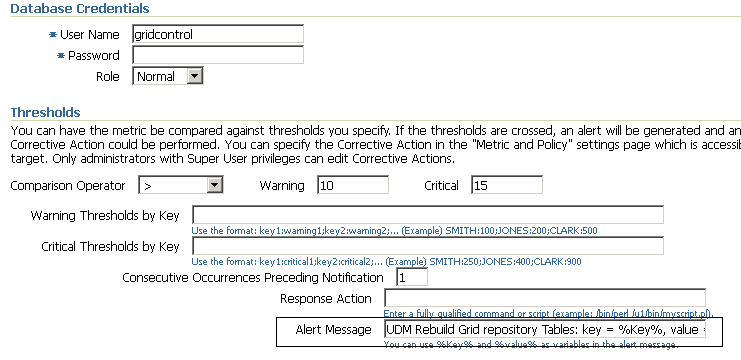
  • Enter details like Metric Name, Metric Type, Command Line, Operating System Credentials, Thresholds as below

  • select required Schedule and click OK.

  • If you have selected “Start Immediately after creation” radio button, in minutes you will see an alert if there is a failed backup

  • Click on message for details

Oracle 11g Grid| How to add a custom SQL UDM (User Defined Metric)

Posted by Sagar Patil

I have number of systems on grid and I want to keep grid working as smoothly as I can.
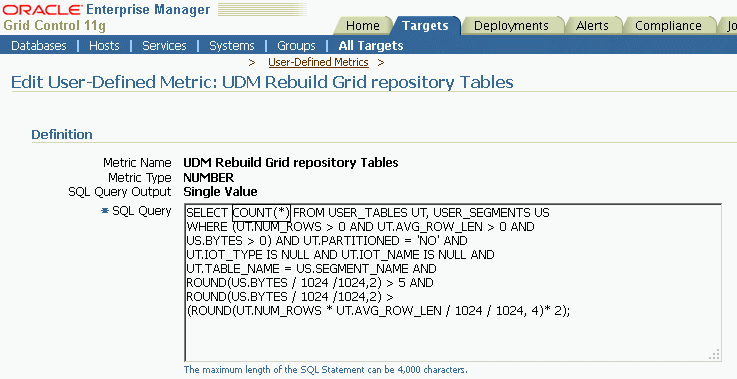
Since there are many alerts/notificatins raised & inserts/deletes happening  every single minute, often repository tables will need rebuild to gain EM performance.
I have SQL script to track tables in need of a rebuild.

SELECT COUNT ( * )
 FROM USER_TABLES UT
 , USER_SEGMENTS US
 WHERE ( UT.NUM_ROWS > 0 AND UT.AVG_ROW_LEN > 0 AND US.BYTES > 0 )
 AND UT.PARTITIONED = 'NO'
 AND UT.IOT_TYPE IS NULL
 AND UT.IOT_NAME IS NULL
 AND UT.TABLE_NAME = US.SEGMENT_NAME
 AND ROUND ( US.BYTES / 1024 / 1024
 , 2 ) > 5
 AND ROUND ( US.BYTES / 1024 / 1024
 , 2 ) > ( ROUND ( UT.NUM_ROWS * UT.AVG_ROW_LEN / 1024 / 1024
 , 4 ) * 2 );

Navigate to Targets -> Databases -> select “Grid Database”

Scroll down at this page and select “User-Defined Metrics” under “Related Links”

Oracle 11g Grid | Remove failed EM Agent

Posted by Sagar Patil

Often you will come across a failed Agent installation or old agent to be removed before installing new one. Here is a porocess ..

[oracle@RACNode01 bin]$ pwd
/opt/app/oracle/product/10.2/agent11g/agent11g/oui/bin
[oracle@RACNode01 bin]$ pwd
/opt/app/oracle/product/10.2/agent11g/agent11g/oui/bin
[oracle@RACNode01 bin]$ cd ../../bin/
[oracle@RACNode01 bin]$ ./emctl stop agent
Oracle Enterprise Manager 11g Release 1 Grid Control 11.1.0.1.0
Copyright (c) 1996, 2010 Oracle Corporation.  All rights reserved.
Stopping agent … stopped.

[oracle@RACNode01 bin]$ /opt/app/oracle/product/10.2/agent11g/agent11g/oui/bin/runInstaller.sh -silent “REMOVE_HOMES={/opt/app/oracle/product/10.2/agent11g/agent11g}” -deinstall -waitForCompletion -removeallfiles -local

Starting Oracle Universal Installer…
Checking swap space: must be greater than 500 MB.   Actual 1983 MB    Passed
Preparing to launch Oracle Universal Installer from /tmp/OraInstall2011-03-04_01-38-02PM. Please wait …Oracle Universal Installer, Version 11.1.0.8.0 Productio                                                                            n
Copyright (C) 1999, 2010, Oracle. All rights reserved.

Starting deinstall
Deinstall in progress (Friday, 4 Dec 2010 13:38:09 o’clock GMT)
Configuration assistant “Agent Deinstall Assistant” succeeded
Configuration assistant “Oracle Configuration Manager Deinstall” succeeded
……………………………………………………… 100% Done.
Deinstall successful
End of install phases.(Friday, 4 Dec 2010 13:38:56 o’clock GMT)
End of deinstallations
Please check ‘/opt/app/oracle/oraInventory/logs/silentInstall2011-03-04_01-38-02PM.log’ for more details.

In this way you can remove failed EMAgent in Oracle 11g Grid.

IBM Web Server Plug-in Analyzer for WebSphere Application Server

Posted by Sagar Patil

What is IBM Web Server Plug-in Analyzer for WebSphere Application Server?
Plug-in Analyzer for helps discover potential problems with trace and configuration files during use of WebSphere Application Server. The tool parses both plug-in configuration and corresponding trace files and then applies pattern recognition algorithms in order to alert users of possible inconsistencies.

The tool provides a list of HTTP return codes, URI and graphical presentations of available clusters, and server topologies from the configuration and trace files.

The primary automatic capabilities of this tool are as follows:

  • detection of incorrect or potentially problematic configurations that could cause service interruption or performance degradation
  • identification of request failure or response failure
  • HTTP return code tracking
  • URI failure tracking
  • graphical presentation of WebSphere Application Server and cluster topology
  • cluster and cluster member tracking.

How does it work?
The tool parses WebSphere Application Server plug-in configuration files and trace files. Based on results obtained from a pattern recognition engine, IBM Web Server Plug-in Analyzer provides information about any potential problems within the configuration.
The pattern recognition engine maintains various patterns of configurations that are not usually recommended and provides warnings if these same patterns are detected in the configuration files.

The tool takes the following approach:

  1. It parses configuration files.
  2. It provides warnings or clues to information when configurations appear to be set inappropriately.
  3. It collects WebSphere Application Server cluster and member topology information within the configuration file.
  4. It displays a visual mapping of the cluster and member topology.
  5. It parses the plug-in trace files and creating models based on HTTP request/response header/body information, HTTP return code, URI, start/end time, cluster name, and server name.
  6. It displays the requested trace information based on query. The trace information has HTTP return code analysis and HTTP request/response header/body analysis.

Download Plug-in Analyzer from  here : Unzip in a directory and run as ” java -jar wspa35.jar”

Installing Tivoli Common Agent Services Agent/Manager

Posted by Sagar Patil

Overview of Tivoli Common Agent Services

The Tivoli Common Agent Services component provides a way to deploy agent code across multiple end-user machines or application servers throughout an enterprise. The agents collect data from and perform operations on managed resources for Fabric Manager.

The Tivoli Common Agent Services agent manager provides authentication and authorization and maintains a registry of configuration information about the agents and resource managers in your environment. The resource managers (Fabric Manager, for example) are the server components of products that manage agents deployed on the common agent. Management applications use the services of the agent manager to communicate securely with and to obtain information about the computer systems running the Tivoli common agent software, referred to in this document as the agent.

Tivoli Common Agent Services also provides common agents to act as containers to host product agents and common services. The common agent provides remote deployment capability, shared machine resources, and secure connectivity.

Tivoli Common Agent Services is comprised of two subcomponents:

Agent manager
The agent manager handles the registration of managers and agents, security (such as the issuing of certificates and keys and the performing of authentication). It also provides query APIs for use by other products. One agent manager instance can manage multiple resource managers and agents. The agent manager can be on same machine as Fabric Manager or on a separate machine.
Common agent
The common agent resides on the agent machines of other Tivoli products. One common agent can manage multiple product agents on the same machine. It provides monitoring capabilities and can be used to install and update product agents.
Installing Agent


Oracle 11g Grid : Using EMCLI to run Remote OS Commands

Posted by Sagar Patil

Here , I wish to locate disk space acquired by a Remote target Host using df command

Please read post Using EMCLI , A command line Grid Control Interface to understand how EMCLI is used

C:\EMCLI>emcli execute_hostcmd -cmd=”df -k”  -targets=”sagar-pc:host”
Error : Preferred Credentials do not exist for some targets.

The error indicates preferred user credentials are not set at Grid cntrol for this host.

Navigate to Grid -> Preferences -> Preferred Credentials -> Host ( I selected host as my target to run above command and not database)

One can set Default Credentials applied to all hosts or specific details for each individual Host

Test entered credentials by using “test button” and run  failed command again.

C:\EMCLI>emcli execute_hostcmd -cmd=”df -k”  -targets=”sagar-pc:host”
*******************************************************************************
* Target: Sagar-PC
* Execution Status: Succeeded
*******************************************************************************
Filesystem           1K-blocks      Used Available Use% Mounted on
/dev/mapper/System-Root
10063176   3090500   6461496  33% /
/dev/cciss/c0d0p1       194442     23285    161118  13% /boot
none                  16471340         0  16471340   0% /dev/shm
/dev/mapper/System-Home
2483488   2042464    314868  87% /home
/dev/mapper/System-Opt
4999260   4299264    446044  91% /opt
/dev/mapper/System-Tmp
2483488     36608   2320724   2% /tmp
*******************************************************************************
* Execution Summary
*     Targets Succeeded: 1
*     Targets Failed: 0
*******************************************************************************

Oracle 11g Grid: Using EMCLI , A command line Grid Control Interface

Posted by Sagar Patil

The Enterprise Manager Command Line Interface (EM CLI) enables you to access Enterprise Manager Grid Control functionality from text-based consoles (shells and command windows) for a variety of operating systems. You can call Enterprise Manager functionality using custom scripts, such as SQL*Plus, OS shell, Perl, or Tcl, thus easily integrating Enterprise Manager functionality with a company’s business process.

1. Requirements : Before installing EM CLI, you will need the following:
Java version 1.6.0 or greater
Workstation running Solaris, Linux, HPUX, Tru64, AIX, or Windows with NTFS (client installation)


2. Download the EM CLI Kit to your workstation.
If you have Grid control in place use URL http://%Gridcontrol%HOST%/em/console/emcli/download

3. Install EM CLI Client.

You can install client portion of EM CLI in any directory either on the same machine as the OMS or on any machine on your network (download the emclikit.jar to that machine).
Run “java -jar emclikit.jar client -install_dir=<emcli client dir>”

4. The CLI must be set up and connected to an OMS

Execute “emcli help setup” from the EM CLI Client for instructions on how to use the “setup” verb to configure client for a particular OMS. Setup emcli to work with the EM Management Server (OMS) specified by the -url argument. Issuing the “emcli setup” command with no arguments will show current OMS connection details.

C:\EMCLI>emcli setup -url=http://gridcontrol/em -username=sysman -dir=C:\EMCLI
Oracle Enterprise Manager 11g Release 11.1.0.1.0.
Enter password
Emcli setup successful

C:\EMCLI>emcli setup < Will flash Current Configuration>
Oracle Enterprise Manager 11g Release 11.1.0.1.0.
Copyright (c) 1996, 2010 Oracle Corporation and/or its affiliates. All rights re
served.
CONFIG DIRECTORY : C:\EMCLI\.emcli
OMS              : http://gridcontrol/em
EM USER          : sysman
TRUST ALL        : false

C:\EMCLI>emcli help setup

-url=”http[s]://host:port/em/”
[-username=<EM Console Username]>
[-ssousername=<EM SSO Username>]
[-ssopassword=<EM SSO Password>]
[-password=<EM Console Password>]
[-ssologinurl=<sso final login url>]
[-ssousernameparamname=<username text field name>]
[-ssopasswordparamname=<password text field name>]]
[-licans=YES|NO]
[-dir=<local emcli configuration directory>]
[-trustall]
[-novalidate]
[-noautologin]
[-custom_attrib_file=<Custom attribute file path>]
[-nocertvalidate]

C:\EMCLI>emcli create_group -name=”TEST_EMCLI_GROUP”
Group “TEST_EMCLI_GROUP:group” created successfully

C:\EMCLI>emcli get_targets -targets=”oracle_database”
Status  Status   Target Type      Target Name
ID
0       Down     oracle_database  spdtsta.gta.travel.lcl
1       Up       oracle_database  DEV2
1       Up       oracle_database  DEVDB
1       Up       oracle_database  DEV1
1       Up       oracle_database  GRIDB

The following example shows all targets. Critical and Warning columns are not included.
emcli get_targets

The following example shows all targets. Critical and Warning columns are shown.
emcli get_targets -alerts

The following example shows all oracle_database targets.
emcli get_targets -targets=”oracle_database”

The following example shows all targets whose type contains the string oracle.
emcli get_targets -targets=”%oracle%”

The following example shows all targets registered at OMS repository

emcli get_targets
Status  Statu  Target Type      Target Name
-9      n/a    group            RAC DataGuard Group
-9      n/a    metadata_reposi  /secFarm_GCDomain/GCDomain/EMGC_ADMINSERVER/mdstory             -sysman_mds
-9      n/a    oracle_ias_farm  secFarm_GCDomain
-9      n/a    weblogic_domain  /secFarm_GCDomain/GCDomain
0       Down   weblogic_j2eese  /secFarm_GCDomain/GCDomain/EMGC_OMS1
1       Up     j2ee_applicatio  /secFarm_GCDomain/GCDomain/EMGC_OMS1/OCMRepeaten
1       Up     netapp_filer
1       Up     oracle_database
1       Up     oracle_emd
1       Up     oracle_listener  LISTENER_
1       Up     rac_database
1       Up     host

Users and Credentials :

Create a new USER :

emcli create_user -name=CLI_TEST -desc=”This is a new superuser” -privilege=”SUPER_USER” -expire=”true” -password=”manager”

How to Delete User? : emcli delete_user -name=CLI_TEST

Creating BlackOuts :

Consider you don’t have access to GRID GUI or you want to embed creating blackout on fly as part of a shell script

emcli create_blackout -name=”Agent Install” -add_targets=”%TARGETNAME%:oracle_database” -reason=”Agent Install” -description=”Agent required for Monitoring” -schedule=”duration::30″

For all emcli command reference please see Oracle Documentation

Oracle 11g Grid | How to stop and start OMS Services

Posted by Sagar Patil

Stop OMS Services

[oracle@OMS_HOST bin]$ $OMS_HOME/bin/emctl stop oms
Oracle Enterprise Manager 11g Release 1 Grid Control
Copyright (c) 1996, 2010 Oracle Corporation.  All rights reserved.
Stopping WebTier…
WebTier Successfully Stopped
Stopping Oracle Management Server…
Oracle Management Server Successfully Stopped
Oracle Management Server is Down

From the AGENT_HOME directory run the following to stop the Agent.

[oracle@OMS_HOST bin]$ $AGENT_HOME/bin/emctl stop agent
Oracle Enterprise Manager 11g Release 1 Grid Control 11.1.0.1.0
Copyright (c) 1996, 2010 Oracle Corporation.  All rights reserved.
Stopping agent … stopped.

Stop Database

[oracle@OMS_HOST bin]$ sqlplus / as sysdba
SQL*Plus: Release 11.2.0.1.0 Production on Thu Mar 10 14:38:49 2011
Copyright (c) 1982, 2009, Oracle.  All rights reserved.
Connected to:
Oracle Database 11g Enterprise Edition Release 11.2.0.1.0 – 64bit Production
With the Partitioning, OLAP, Data Mining and Real Application Testing options
SQL> shutdown immediate;
Database closed.
Database dismounted.
ORACLE instance shut down.

Locate name of Listener and stop it

[oracle@OMS_HOST bin]$ ps -ef | grep tns
oracle    1958 18839  0 14:39 pts/1    00:00:00 grep tns
oracle   24736     1  0 Feb10 ?        00:01:28 /opt/app/oracle/product/11.2/db_1/bin/tnslsnr LISTENER -inherit

[oracle@OMS_HOST bin]$ lsnrctl stop LISTENER
LSNRCTL for Linux: Version 11.2.0.1.0 – Production on 10-MAR-2011 14:40:00
Copyright (c) 1991, 2009, Oracle.  All rights reserved.
Connecting to (DESCRIPTION=(ADDRESS=(PROTOCOL=TCP)(HOST=OMS_HOST)(PORT=1529)))
The command completed successfully

StartOMS Services

[oracle@OMS_HOST bin]$ lsnrctl start LISTENER

[oracle@OMS_HOST]$ sqlplus / as sysdba
SQL*Plus: Release 11.2.0.1.0 Production on Thu Mar 10 14:42:43 2011
Copyright (c) 1982, 2009, Oracle.  All rights reserved.
Connected to an idle instance.
SQL> startup;
ORACLE instance started.

[oracle@OMS_HOST]$ $OMS_HOME/bin/emctl start oms
Oracle Enterprise Manager 11g Release 1 Grid Control
Copyright (c) 1996, 2010 Oracle Corporation.  All rights reserved.
Starting WebTier…
WebTier Successfully Started
Starting Oracle Management Server…
Oracle Management Server Successfully Started
Oracle Management Server is Up

[oracle@OMS_HOST]$ cd $AGENT_HOME
[oracle@OMS_HOSTagent11g]$ cd bin/
[oracle@OMS_HOST]$ ./emctl start agent
Oracle Enterprise Manager 11g Release 1 Grid Control 11.1.0.1.0
Copyright (c) 1996, 2010 Oracle Corporation.  All rights reserved.
Starting agent …….. started.

You may come across times when OMS doens’t go down very well. Have a look at Log files for error & kill oms processess. It worked for me

[oracle]$ $OMS_HOME/bin/emctl stop oms
Oracle Enterprise Manager 11g Release 1 Grid Control
Copyright (c) 1996, 2010 Oracle Corporation.  All rights reserved.
Stopping WebTier…
WebTier Successfully Stopped
Stopping Oracle Management Server…
Error Occurred: Error during stop oms. Please check error and log files

[oracle]$ ps -ef | grep oms | cut -d: -f1
oracle   31007     1  0 15
oracle   31893 31847 30 15

[oracle]$ kill -9 31007  31893

[oracle]$ $OMS_HOME/bin/emctl start oms
Oracle Enterprise Manager 11g Release 1 Grid Control
Copyright (c) 1996, 2010 Oracle Corporation.  All rights reserved.
Starting WebTier…
WebTier Successfully Started
Starting Oracle Management Server…
Oracle Management Server Successfully Started
Oracle Management Server is Up


Understanding the 11g Grid Directory Structure , Config & Log files 

$cd /opt/app/oracle/Middleware
[oracle@Middleware]$ tree -L 2
.
|-- WebLogicServer
|   |-- Oracle_WT
|   |-- agent11g
|   |-- domain-registry.xml
|   |-- logs
|   |-- modules
|   |-- oms11g ($OMS_HOME)
|		|-- cfgtoollogs (Install Log)
|			|-- oui
|				|-- installActions2011XXX.log
|				|-- oraInstall2011XXX.log
|		|-- sysman
|			|-- log
|				|-- emrepocminst.log
|			|-- schemamanager
|				|-- emschema.log (Install Log)
|   |-- oracle_common
|   |-- patch_wls1032
|   |-- registry.dat
|   |-- registry.xml
|   |-- user_projects
|   |-- utils
|   |-- wlserver_10.3
|		|-- common
|			|-- emnodemanager (Oracle WebLogic Server Logs)
|				|-- nodemanager.log
|				|-- nodemanager.properties
|
-- gc_inst (EM INSTANCE BASE)
    |-- WebTierIH1
    |   |-- OHS
    |   |-- auditlogs
    |   |-- bin
    |   |-- config
    |   |-- diagnostics
    |       |-- logs
    |           |-- OPMN
    |               |-- opmn  (WebTier logs)
    |               	|-- provision.log
    |               	|-- opmn.out
    |               	|-- debug.log
    |               	|-- opmn.log
    |           |-- OHS
    |               |-- ohs1  (WebTier logs)
    |               	|-- access_log
    |               	|-- mod_wl_ohs.log
    |-- em
    |   |-- EMGC_OMS1 (OMS_NAME)
    |       |-- Sysman
    |           |-- Log
    |               |--	emoms.log : Main log file for the OMS.
	| 				|		Number of files created will be = (log4j.appender.emlogAppender.MaxBackupIndex + 1)
	|				|--	emoms.trc :	Main trace file for the OMS.
	|				|		Number of files created will be = (log4j.appender.emtrcAppender.MaxBackupIndex + 1)
	|				|--	secure.log
	|				|		Contains output from the 'emctl secure oms' commands.
	|				|--	emctl.msg
	|				|		Created / written to by the HealthMonitor thread of the OMS, when it re-starts the OMS due to a critical error.
	|				|--	emctl.log
	|						Created by the emctl utility, when any commands are executed in the OMS home
    |-- user_projects
        |-- domains
			|-- GCDomain
				|-- servers
					|-- EMGC_OMS1 (Oracle WebLogic Server Logs : GRID Logs)
						|-- logs
							|-- EMGC_OMS1.log		- JVM Application Log
							|-- access.log   		- Smiilar to http acess_log
							|-- EMGC_OMS1.out
					|-- EMGC_ADMINSERVER  (Oracle WebLogic Server Logs : AdminServer Logs)
						|-- logs
							|-- EMGC_ADMINSERVER.log
							|-- GCDomain.log
							|-- EMGC_ADMINSERVER.out

---------------------------------------------------------------------------------------------------------
Component 								Location
---------------------------------------------------------------------------------------------------------
Oracle HTTP Server (OHS)   	<EM_INSTANCE_BASE>/<webtier_instance_name>/diagnostics/logs/OHS/<ohs_name>
For example,				/u01/app/Oracle/gc_inst/WebTierIH1/diagnostics/logs/OHS/ohs1

OPMN						<EM_INSTANCE_BASE>/<webtier_instance_name>/diagnostics/logs/OPMN/<opmn_name>
For example,				/u01/app/Oracle/gc_inst/WebTierIH1/diagnostics/logs/OPMN/opmn1

Oracle WebLogic				<EM_INSTANCE_BASE>/user_projects/domains/<domain_name>/servers/<SERVER_NAME>/logs/<SERVER_NAME>.out
For example,				/u01/app/Oracle/gc_inst/user_projects/domains/GCDomain/servers/EMGC_OMS1/logs/EMGC_OMS1.out

Oracle 11g Grid | Setting Preferred Credentials to avoid Priv Warnings

Posted by Sagar Patil

Generally we use grid for performance and availability monitoring . I have a NON- DBA user configured at a grid preferred credential.   Sometimes I have to use grid to carry DBA tasks and here is a way to switch database preferred credentials & become a DBA

select “Preferences” and click on Preferred Credentials

Since I wish to change credentials for my Database Instance running streams I will choose “Database”

select required Target and alter username/password fields. Click on “Test” to verify credentils.


I have logged out

When I logged in again, I don’t see same privilege error

This issue could be entirely resolved by creating different user for each Grid user and adding separate database preferred credentials.

11g Grid | Where to Locate AWR reports

Posted by Sagar Patil

Navigate to TARGETs  -> Select Databases  you wish to run AWR reports at ->  Server TAB

Read more…

Oracle Grid | Tracking OS procsses using User Defined Matrix (UDM)Shell Script

Posted by Sagar Patil

Oracle grid can display number of processes for a host.  But I have a odd requirement where I need to keep track of oracle/java processes on the server.

This reminds me about other issues I had in past where I had to keep track of java/application procsses on the box.  On a odd day, I have seen them spawning at speed exhausting server resources (memory) in no time.

I wrote a small shell script to get count of oracle processes. This could be altered for absolutely anything as far as it returns number which grid can plot as a chart.

numprocesses.sh
echo “em_result=`ps -ef | grep oracle | wc -l`”

Copy above shell script at $HOST/$Directory.

Goto Grid -> targets -> Host , now select HOST where you wish to run this script.

Create UDM for shell script we wrote earlier. Add complete path at “Command Line” on AGENT BOX.

Schedule it for execution and define how frequently you want to execute this script.

Wait for next day or so to see graph as below.

You can later change your threshold level for generating an Alert/Email notification.

DMGR HA: How to backup websphere deployment manager for a Disaster Recovery

Posted by Sagar Patil

By its very nature, WebSphere Application Server Network Deployment is a distributed system ranging across many machines. While few things are more stressful and frustrating than an unplanned outage, there are ways you can lessen the impact. The goal of this article is to show how you can harness deployment manger system and make recovery a quick and simple task.

So why do you want to backup DMGR(deployment manger) configuration?

In an ideal world this is not necessary but I have massive distributed environments. Although I have admin access to systems, there are other teams with access to Monitor, Control websphere processes. Often I came across issues where something was changed and DMGR breaks next time I recycled services, thanks to websphers’s XML repository approach. It breaks not when you make change but next time services recycled.

I ended up writing backup-dmgr_sh to backup DMGR on my RHEL boxes , but it does it with a twist.

What is a twist?

To make sure I have a working configuration for a reliable backup , I shutdown DMGR services and restart them. I then use RHEL wget command to receive valid response from DMGR port before making a DMGR backup.  This way I know backup is valid and don’t contain a rogue configuration.

Attached is a sample log file

#! /bin/bash
# This shell script will backup profile at a websphere node
# Script tested successfully on 15-Dec-2010
# Script generate logfiles taking hardware clock than unix date format

set -x
## Every shell command will be expanded and printed.

TEE=/usr/bin/tee
[[ ! -x $TEE ]] && TEE=/bin/tee
if [[ ! -x $TEE ]]
then
echo $0 will not work without ‘tee(1)’ command!
exit 1
fi
TEE=”$TEE -a”

# Shell’s internal field separator
# The default value should be <space><tab><new-line>
IFS=$’ \t’ # == <space><tab>

# Current date and time
# OS clock
# DATE=`/bin/date +%Y%m%d-%H%M%S`
# Hardware RT chip
# DATE=`/sbin/hwclock –show`
# DATE=`echo $DATE | awk ‘{print $2 “-” $3 “-” $4 “-” $5}’`
# Use following to get well-formatted RT chip’s date and time
DATE=$(hwclock –show | cut -d ‘ ‘ -f 1,2,3,4,5,6,7)
DATE=$(date -d “$DATE” “+%Y%m%d-%H%M%S”)

# Log file name for tee(1)
# We may have LOG_FILE been empty string or unset/commented at all.
LOG_FILE=/home/was61/`/bin/basename $0`-${DATE}.log

# TMPDIR If set, Bash uses its value as the name of a directory in  which
#    Bash creates temporary files for the shell’s use.
#    But we need to assure it exists and has write permissions.
#    The same directory as backup destination, as a last resort.
test -d ${TMPDIR:=/tmp} && test -w $TMPDIR || TMPDIR=/var/tmp
test -d $TMPDIR && test -w $TMPDIR || TMPDIR=`/usr/bin/dirname $LOG_FILE`
# Temp file for wget output
TMP_WGET=${TMPDIR}/$$.wget.tmp

# Diagnostic messages level
# 0 == be silent
# 1 == normal messages
# 2 == additional debug messages
# 3 == yet more messages
DEBUG=3

DMGR=dmgr
# Regexp to look by “ps|grep” for dmgr process
DMGR_REGEXP=’java.*ibm.*websphere.*dmgr’
####DMGR_REGEXP=’bin.*httpd’

STOP_COMMAND=/opt/IBM/WebSphere/AppServer/profiles/Profile01/dmgr/bin/stopServer.sh
START_COMMAND=/opt/IBM/WebSphere/AppServer/profiles/Profile01/dmgr/bin/startServer.sh

WGET_URL=’https://websphere_node:9043/ibm/console/logon.jsp’
# –spider
#    Wget will not download the pages, just check that they are there
# -T seconds, –timeout=seconds
#    Set the network timeout to seconds seconds.  This is equivalent to
#    specifying –dns-timeout, –connect-timeout, and –read-timeout,
#    all at the same time
# –retry-connrefused
#    Consider “connection refused” a transient error and try again
# -t number, –tries=number
#    Set number of retries to number
# -w seconds, –wait=seconds
#    Wait the specified number of seconds between the retrievals
WGET_OPT=”–spider –timeout=10 –retry-connrefused –tries=3 –wait=5 –no-check-certificate”
if [[ $DEBUG -eq 0 ]]
then
# -q, –quiet
#    Turn off Wget’s output
WGET_OPT=”–quiet “$WGET_OPT
elif [[ $DEBUG -eq 1 ]]
then
# -nv, –no-verbose
#    Turn off verbose without being completely quiet (use -q for that),
#    which means that error messages and basic information still get
#    printed
WGET_OPT=”–no-verbose “$WGET_OPT
elif [[ $DEBUG -ge 2 ]] # 2+
then
# -v, –verbose
#    Turn on verbose output, with all the available data.
#    The default output is verbose
# -S, –server-response
#    Print the headers sent by HTTP servers and
#     responses sent by FTP servers
WGET_OPT=”–verbose –server-response “$WGET_OPT
fi

# Array declaration: sources for backup,
# may be several files and/or directories
typeset -a BACKUP_SRC=( /opt/IBM/WebSphere/AppServer/profiles/Profile01 )
####typeset -a BACKUP_SRC=(/home/spk/src1 /home/spk/src2)

# Array declaration: backup exclusion patterns
# May be emty list.
# May contain shell regexp patterns or plain strings,
# entire directory(-ies) exclusion is also possible..
####### Read “info tar”, section 6.5 describes tar patterns in details. ########
#    A PATTERN should be written according to shell syntax, using wildcard
# characters to effect globbing.  Most characters in the pattern stand
# for themselves in the matched string, and case is significant: `a’ will
# match only `a’, and not `A’.  The character `?’ in the pattern matches
# any single character in the matched string.  The character `*’ in the
# pattern matches zero, one, or more single characters in the matched
# string.  The character `\’ says to take the following character of the
# pattern _literally_; it is useful when one needs to match the `?’, `*’,
# `[‘ or `\’ characters, themselves.
#    Periods (`.’) or forward slashes (`/’) are not considered special
# for wildcard matches.  However, if a pattern completely matches a
# directory prefix of a matched string, then it matches the full matched
# string: excluding a directory also excludes all the files beneath it.
###############################################################################
# Log files are often very big so I added them in exclude list
typeset -a BACKUP_EXCLUDE=(/opt/IBM/WebSphere/AppServer/profiles/Profile01/Node/logs  /opt/IBM/WebSphere/AppServer/profiles/Profile01/dmgr/logs/dmgr)
####typeset -a BACKUP_EXCLUDE=(*.o *.a Makefile Makefile.am README)

# Backup destination file name (.tgz suffix and timestamp will be appended)
BACKUP_DST=/home/was61/dmgr_bkup

if [[ $DEBUG -ge 2 ]]
then
TAR_VERBOSE=”–verbose”
fi

#start log file (deleting previous one, if any)
echo ” *************  DMGR & profile backup started (at `date “+%d-%m-%Y %H:%M”`) Per OS Date ********** ” | $TEE $LOG_FILE
echo “———-> The Hardware Clock is (`/sbin/hwclock`) <———- ” | $TEE $LOG_FILE

################################################################################

found=`ps -ef | /bin/grep –invert-match grep\
| /bin/grep –ignore-case $DMGR_REGEXP`

if [[ -n $found ]]
then # dmgr is running
if [[ $DEBUG -ge 1 ]]
then
echo Running \”$DMGR\” found. | $TEE $LOG_FILE
if [[ $DEBUG -ge 2 ]]
then
count=`echo $found | wc -l`
if [[ $count -ge 2 ]]
then
echo Warning: found $count matching processes.\
| $TEE $LOG_FILE
if [[ $DEBUG -ge 3 ]]
then
echo $’\n’$found$’\n’ | $TEE $LOG_FILE
fi
fi
fi
echo Stopping \”$DMGR\” server… | $TEE $LOG_FILE
fi

if ! $STOP_COMMAND $DMGR
then
if [[ $DEBUG -ge 1 ]]
then
echo Can not stop \”$DMGR\ server. | $TEE $LOG_FILE
fi
exit 1
fi
else    # dmgr is not running
if [[ $DEBUG -ge 1 ]]
then
echo \”$DMGR\” is not running. | $TEE $LOG_FILE
fi
fi

if [[ $DEBUG -ge 1 ]]
then echo Starting \”$DMGR\” server… | $TEE $LOG_FILE
fi

if ! $START_COMMAND $DMGR
then
if [[ $DEBUG -ge 1 ]]
then
echo Can not start \”$DMGR\” server. | $TEE $LOG_FILE
fi
exit 1
fi

#——————————————————————————-

/usr/bin/wget $WGET_OPT $WGET_URL > $TMP_WGET 2>&1
res=$?
/bin/cat $TMP_WGET | $TEE $LOG_FILE
/bin/rm -f $TMP_WGET
if [[ $res -ne 0 ]]
then
if [[ $DEBUG -ge 1 ]]
then
echo wget returned $res | $TEE $LOG_FILE
echo Can not connect to \”$WGET_URL\” | $TEE $LOG_FILE
fi
exit 1
fi

#——————————————————————————-

if [[ $DEBUG -ge 1 ]]
then
echo Starting backup… | $TEE $LOG_FILE
fi

# Separate temporary output files for tar, gzip, exclusion list…
TMP_TAR=${TMPDIR}/$$.tar.tmp
TMP_GZIP=${TMPDIR}/$$.gzip.tmp
echo -n “gzip: ” > $TMP_GZIP

if [[ -n $BACKUP_EXCLUDE ]]
then # Build exclusions’ file
TMP_EXCLUDE=${TMPDIR}/$$.exclude.tmp
TAR_EXCLUDE=’–exclude-from’
echo -n > $TMP_EXCLUDE
for f in ${BACKUP_EXCLUDE[@]}
do
echo $f >> $TMP_EXCLUDE
done
fi

# Do we need absolute names to be stored in tar?
# Tar complains and strips leading slashes.
# -P , –absolute-names
#    Don’t strip leading ‘/’s from file names
/bin/tar c $TAR_VERBOSE $TAR_EXCLUDE $TMP_EXCLUDE –file – ${BACKUP_SRC[@]} \
2>$TMP_TAR | /usr/bin/gzip -v9 > $BACKUP_DST-$DATE.tgz 2>>$TMP_GZIP

res=$? # $res will be exit code of last program in the pipe, i. e. gzip.
/bin/cat $TMP_TAR | $TEE $LOG_FILE
/bin/cat $TMP_GZIP | $TEE $LOG_FILE
/bin/rm -f $TMP_TAR
/bin/rm -f $TMP_GZIP
/bin/rm -f $TMP_EXCLUDE

if [[ $res -ne 0 ]]
then
if [[ $DEBUG -ge 1 ]]
then
echo Backup failed. | $TEE $LOG_FILE
fi
exit 1
else
if [[ $DEBUG -ge 1 ]]
then
echo Backup succeeded. | $TEE $LOG_FILE
fi
exit 0
fi

#——————————————————————————-

exit 255

Oracle 11g Grid | Installing Grid Agent using "agentDownload" method

Posted by Sagar Patil

To get AGENT working with OMS Grid , you will need ports 3872,4889/4900 accessible between machines.

If you wish to delete host from OMS Grid then delete Targets/Host at grid control first. Now use following SQL script to make sure it’s not exisitng at OMS repository . It will save you lot of frustration.

SQL> select distinct target_name,target_type  from SYSMAN.MGMT$TARGET where target_name like ‘AGENT_HOST%’;
TARGET_NAME
——————————————————————————–
AGENT_HOST:3872
oracle_emd

If Agent is listed , use following SQL to remove it from OMS repository.

SQL> exec sysman.mgmt_admin.cleanup_agent(‘AGENT_HOST:3872’);
PL/SQL procedure successfully completed.

SQL> select distinct target_name,target_type  from SYSMAN.MGMT$TARGET where target_name like ‘AGENT_HOST%’;
no rows selected

Login at OMS and locate  “agentDownload” shell script

For my RHEL -11g OMS setup it’s under “$OMS_HOME/sysman/agent_download/11.1.0.1.0/linux_x64”

Copy this script at Destination AGENT_HOST location

I used “scp agentDownload.linux_x64 oracle@AGENT_HOST:/opt/app/oracle/product”

Now go to Agent host & run  script

[oracle@agent_host]$ ./agentDownload.linux_x64
agentDownload.linux_x64 invoked on Thu Mar 17 15:26:37 GMT 2011 with Arguments “”
agentDownload.linux_x64: Invalid Invocation
Usage: agentDownload.linux_x64 -b[cdhimnoprtuvxyNR]
b – Base installation location for Agent Oracle home
d – Do NOT initiate automatic target discovery
h – Usage (this message)
i – Inventory pointer location file
l – To specify as local host (pass -local to runInstaller)
m – Management Service host name for downloading the Management Agent software
n – Cluster name
o – Old Oracle Home location during Upgrade
p – Static port list file
r – Port for connecting to the Management Service host
t – Do NOT start the Agent
u – Upgrade
v – Inventory directory location
x – Debug output
c – CLUSTER_NODES
N – Do NOT prompt for Agent Registration Password
R – To use virtual hostname(ORACLE_HOSTNAME) for this installation. If this is being used along with more than one cluster nodes through -c option, then -l option also needs to be passed.

For RAC Install

Run $agentDownload.linux_x64 -b /opt/app/oracle/product -v /opt/app/oracle/oraInventory -n oct_prd_crs -c Sever1,Server2 -y
-b : Agent install Directory
-v : OraInventory Location

agentDownload.linux_x64 invoked on Thu Mar 17 15:48:27 GMT 2011 with Arguments “-b /opt/app/oracle/product -v /opt/app/oracle/product -n oct_prd_crs -y”
LogFile for this Download can be found at: “/opt/app/oracle/product/agentDownload11.1.0.1.0Oui/agentDownload.linux_x64031711154827.log”
Running on Selected Platform: Linux.x86_64
Installer location: /opt/app/oracle/product/agentDownload11.1.0.1.0Oui
Downloading Agent install response file …
using the url http://OMS_HOST:4900/agent_download/11.1.0.1.0/ to access OMS
Could not download through url . Trying secure download..
using the url https://OMS_HOST:4900/agent_download/11.1.0.1.0/ to access OMS
Downloading Oracle Installer …
using the url https://OMS_HOST:4900/agent_download/11.1.0.1.0/ to access OMS
Downloaded Oracle Installer with status=0
Downloading  Unzip Utility …
using the url https://OMS_HOST:4900/agent_download/11.1.0.1.0/ to access OMS
Downloaded UnzipUtility with status=0
Verifying Installer jar …
Verified InstallerJar with status=0
Unjarring Oracle Installer …
Archive:  /opt/app/oracle/product/agentDownload11.1.0.1.0Oui/oui_linux_x64.jar
inflating: Disk1/stage/products.xml
inflating: Disk1/stage/Queries/netQueries/10.2.0.2.0/1/netQueries.jar

—————————————————————
Agent Version     : 11.1.0.1.0
OMS Version       : 11.1.0.1.0
Protocol Version  : 11.1.0.0.0
Agent Home        : /opt/app/oracle/product/agent11g
Agent binaries    : /opt/app/oracle/product/agent11g
Agent Process ID  : 3003
Parent Process ID : 2967
Agent URL         : https://AGENT_HOST:3872/emd/main/
Repository URL    : https://OMS_HOST:4900/em/upload
Started at        : 2011-03-17 15:51:53
Started by user   : oracle
Last Reload       : 2011-03-17 15:51:53
Last successful upload                       : (none)
Last attempted upload                        : (none)
Total Megabytes of XML files uploaded so far :     0.00
Number of XML files pending upload           :       15
Size of XML files pending upload(MB)         :    20.31
Available disk space on upload filesystem    :    31.82%
Last attempted heartbeat to OMS              : 2011-03-17 15:51:58
Last successful heartbeat to OMS             : unknown
—————————————————————
Agent is Running and Ready
Querying Agent status: Agent is running
Removing the copied stuff…..
Removed: /opt/app/oracle/product/agentDownload11.1.0.1.0Oui/oui_linux_x64.jar
Removed: /opt/app/oracle/product/agentDownload11.1.0.1.0Oui/agent_download.rsp
Removed:/opt/app/oracle/product/agentDownload11.1.0.1.0Oui/Disk1
Log name of installation can be found at: “/opt/app/oracle/product/agentDownload.linux_x64031711154827.log”
/opt/app/oracle/product/agent11g/root.sh needs to be executed by root to complete this installation.

For Standalone (NON-RAC) Installs  use

agentDownload.linux_x64 -b /opt/app/oracle/product -v /opt/app/oracle/oraInventory  -y

Finally start agent using  $AGENT_HOME/emctl start agent”  command

Jython Script to list websphere ports

Posted by Sagar Patil

Following Jython script will return port listings as below.

WASX7357I: By request, this scripting client is not connected to any server process.
Certain configuration and application operations will be available in local mode.
Server name: dmgr
 Node name: Server1_Manager
Port#|EndPoint Name
-----+-------------
 7277|CELL_DISCOVERY_ADDRESS
 9352|DCS_UNICAST_ADDRESS
 9043|WC_adminhost_secure
 9909|BOOTSTRAP_ADDRESS
 8879|SOAP_CONNECTOR_ADDRESS
 9100|ORB_LISTENER_ADDRESS
 9401|SAS_SSL_SERVERAUTH_LISTENER_ADDRESS
 9402|CSIV2_SSL_MUTUALAUTH_LISTENER_ADDRESS
 9403|CSIV2_SSL_SERVERAUTH_LISTENER_ADDRESS
 9060|WC_adminhost

Server name: ihs
 Node name: Server1_Node01

Port#|EndPoint Name
-----+-------------
 90|WEBSERVER_ADDRESS
 9008|WEBSERVER_ADMIN_ADDRESS
#-------------------------------------------------------------------------------
# Name: ListPorts()
# From: WebSphere Application Server Administration using Jython
# Role: Display the Port Numbers configured for each AppServer
# History:
#   date   ver who what
# -------- --- --- ----------------------------------------------------
# 10/11/01 0.3 rag Fix - configIdAsDict()
# 10/10/30 0.2 rag Include showAsDict() so it doesn't need to be imported.
# 09/01/08 0.1 rag Minor cleanup for book
# 04/30/08 0.0 rag New - written for presentation at IMPACT 2008
#-------------------------------------------------------------------------------

import re;
import sys;

try :
 if 'AdminConfig' not in dir() :
 import AdminConfig;
except :
 print 'WebSphere Application Server scripting object unavailable: AdminConfig';
 sys.exit()

#-------------------------------------------------------------------------------
# Name: ListPorts()
# Role: Display all of the configured ports by named EndPoint for each server
#-------------------------------------------------------------------------------
def ListPorts() :
 SEs = AdminConfig.list( 'ServerEntry' ).splitlines();
 #-----------------------------------------------------------------------------
 # for each ServerEntry configuration ID
 #-----------------------------------------------------------------------------
 for SE in SEs :
 seDict = configIdAsDict( SE );
 SEname = seDict[ 'Name' ];
 SEnode = seDict[ 'nodes' ];
 print '''
Server name: %s
 Node name: %s\n
Port#|EndPoint Name
-----+-------------''' % ( SEname, SEnode );
 #---------------------------------------------------------------------------
 # For the given server (SE) get the list of NamedEndPoints
 # Then, for each NamedEndPoint, display the port # and endPointName values
 #---------------------------------------------------------------------------
 for NEP in AdminConfig.list( 'NamedEndPoint', SE ).splitlines() :
 NEPdict = showAsDict( NEP )
 EPdict  = showAsDict( NEPdict[ 'endPoint' ] )
 print '%5d|%s' % ( EPdict[ 'port' ], NEPdict[ 'endPointName' ] )

#-------------------------------------------------------------------------------
# Name: configIdAsDict()
# Role: Convert a configID into a dictionary
#  Fix: "name" can include a hyphen.
#-------------------------------------------------------------------------------
def configIdAsDict( configId ) :
 'configIdAsDict( configId ) - Given a configID, return a dictionary of the name/value components.'
 result  = {};                        # Result is a dictionary
 hier    = [];                        # Initialize to simplifiy checks
 try :                                # Be prepared for an error
 #-----------------------------------------------------------------
 # Does the specified configID match our RegExp pattern?
 # Note: mo == Match Object, if mo != None, a match was found
 #-----------------------------------------------------------------
 if ( configId[ 0 ] == '"' ) and ( configId[ -1 ] == '"' ) and ( configId.count( '"' ) == 2 ) :
 configId = configId[ 1:-1 ];
 mo = re.compile( r'^([-\w ]+)\(([^|]+)\|[^)]+\)$' ).match( configId );
 if mo :
 Name = mo.group( 1 );
 hier = mo.group( 2 ).split( '/' );
 if mo and ( len( hier ) % 2 == 0 ) :
 #---------------------------------------------------------------
 # hier == Extracted config hierarchy string
 #---------------------------------------------------------------
 for i in range( 0, len( hier ), 2 ) :
 name, value = hier[ i ], hier[ i + 1 ];
 result[ name ]  = value;
 if result.has_key( 'Name' ) :
 print '''%s: Unexpected situation - "Name" attribute conflict,
 Name = "%s", Name prefix ignored: "%s"''' % ( funName, result[ 'Name' ], Name );
 else :
 result[ 'Name' ] = Name;
 else :
 print '''configIdAsDict:
 Warning: The specified configId doesn\'t match the expected pattern,
 and is ignored.
 configId: "%(configId)s"''' % locals();
 except :
 ( kind, value ) = sys.exc_info()[ :2 ];
 print '''configIdAsDict: Unexpected exception.\n
 Exception  type: %(kind)s
 Exception value: %(value)s''' % locals();
 return result;

#-------------------------------------------------------------------------------
# Name: showAsDict()
# Role: Convert result of AdminConfig.show( configID ) to a dictionary
#-------------------------------------------------------------------------------
def showAsDict( configID ) :
 'Convert result of AdminConfig.show( configID ) to a dictionary & return it.'
 result = {}
 try :
 #---------------------------------------------------------------------------
 # The result of the AdminConfig.show() should be a string containing many
 # lines.  Each line of which starts and ends with brackets.  The "name"
 # portion should be separated from the associated value by a space.
 #---------------------------------------------------------------------------
 for item in AdminConfig.show( configID ).splitlines() :
 if ( item[ 0 ] == '[' ) and ( item[ -1 ] == ']' ) :
 ( key, value ) = item[ 1:-1 ].split( ' ', 1 )
 result[ key ] = value
 except NameError, e :
 print 'Name not found: ' + str( e )
 except :
 ( kind, value ) = sys.exc_info()[ :2 ]
 print 'Exception  type: ' + str( kind )
 print 'Exception value: ' + str( value )
 return result

#-------------------------------------------------------------------------------
# main entry point
#-------------------------------------------------------------------------------
if ( __name__ == '__main__' ) or ( __name__ == 'main' ) :
 ListPorts();
else :
 print 'This script should be executed, not imported.';

Adding Another IBM Http Server Instance at Websphere

Posted by Sagar Patil

While integrating SSO (Single Sign on) we decided to separate internal & external users. The idea was to use 2 separate URLs (internal/external) with different virtualhosts but I wanted independent control on HTTP server instances so went ahead with adding 2 separate HTTP servers. One at port 80 for internal users and another at port 8000 for external users.
I have HTTP server running at port 80 working with 2 JVMs on Websphere 6.1 vertical cluster.  I will now explain process to create & link new instance of IBM HTTP server at port 8000 with existing websphere JVMs.

Copy /opt/IBM/HTTPServer/conf/httpd.conf  as  /opt/IBM/HTTPServer/conf/httpd_opensso.conf

[spatil@Server1conf]$ netstat -an | grep 8000
Returned nothing so good to go

Edit httpd_opensso.conf  and change following references

< PidFile logs/httpd.pid
> PidFile logs/httpd_sso.pid

< Listen Server1.oracledbasupport.co.uk:80
< Listen Server1.oracledbasupport.co.uk:443
To
> Listen Server1.oracledbasupport.co.uk:8000
> Listen Server1.oracledbasupport.co.uk:4443

< #ErrorLog logs/error_log
To
> ErrorLog logs/error_sso_log

< LogLevel error
To
> LogLevel debug

< CustomLog “|/opt/IBM/HTTPServer/bin/rotatelogs /opt/IBM/HTTPServer/logs/access_log.log 86400” common
To
> CustomLog “|/opt/IBM/HTTPServer/bin/rotatelogs /opt/IBM/HTTPServer/logs/access_sso_log.log 86400” common

< <VirtualHost Server1.oracledbasupport.co.uk:443>
To
> <VirtualHost Server1.oracledbasupport.co.uk:4443>

<   LogLevel debug
To
>  LogLevel debug

<   CustomLog “|/opt/IBM/HTTPServer/bin/rotatelogs /opt/IBM/HTTPServer/logs/ssl_access.log 86400” SSL
to
>   CustomLog “|/opt/IBM/HTTPServer/bin/rotatelogs /opt/IBM/HTTPServer/logs/ssl_sso_access.log 86400” SSL

<   ErrorLog  “|/opt/IBM/HTTPServer/bin/rotatelogs /opt/IBM/HTTPServer/logs/ssl_error.log 86400”
To
>   ErrorLog  “|/opt/IBM/HTTPServer/bin/rotatelogs /opt/IBM/HTTPServer/logs/ssl_sso_error.log 86400”

Copy /opt/IBM/HTTPServer/Plugins/config/IHS  as /opt/IBM/HTTPServer/Plugins/config/openSSO.

Please change plugin logfile name at  “plugin-cfg.xml” – > Name=”/opt/IBM/WebSphere/Plugins/logs/IHS/http_plugin.log” to  http_sso_plugin.log

Update Pointers

WebSpherePluginConfig /opt/IBM/HTTPServer/Plugins/config/IHS/plugin-cfg.xml
to
WebSpherePluginConfig /opt/IBM/HTTPServer/Plugins/config/openSSO/plugin-cfg.xml

Update openSSO/plugin-cfg.xml  for log location

<Log LogLevel=”Debug” Name=”/opt/IBM/WebSphere/Plugins/logs/IHS/http_sso_plugin.log“/>

I have enabled DEBUG under plugin-cfg.xml to track any errors received . If you don’t want to do so please change LogLevel from “Debug” to “Error“

Login at deployment manager as Administrator and link the new instance of http server

The new server is added at DMGR, If you try and start new server thru DMGR it will return an error. The reason being, it is pointing to http.conf file and not httpd_sso.conf.

Link httpd_sso.conf to this new server.

Update Access & Error log files to view log messages from Deployment console


Go at shell prompt and start new HTTP server 8000 using

$sudo /opt/IBM/HTTPServer/bin/apachectl -k stop -f /opt/IBM/HTTPServer/conf/httpd_sso.conf
$sudo /opt/IBM/HTTPServer/bin/apachectl -k start -f /opt/IBM/HTTPServer/conf/httpd_sso.conf

Existing httpd server could be restarted using

$sudo /opt/IBM/HTTPServer/bin/apachectl -k stop
$ sudo /opt/IBM/HTTPServer/bin/apachectl -k start

See the httpd server is listening to both ports 80 & 8000

[spatil@Server1conf]$ netstat -an | grep 8000
tcp        0      0 172.30.9.31:8000            0.0.0.0:*                   LISTEN

[spatil@Server1conf]$ netstat -an | grep 80
tcp        0      0 172.30.9.31:8000            0.0.0.0:*                   LISTEN
tcp        0      0 0.0.0.0:780                 0.0.0.0:*                   LISTEN
tcp        0      0 172.30.9.31:80              0.0.0.0:*                   LISTEN

Now try and login at the front page using port http://Server1:8000 and it should return same result as port 80

The next thing to do is configure “Virtual Hosts” to connect on the new ports 8000 and SSL port 4443

Click on Default_Host & select Host Aliases

Now add ports 8000 & SSL port 4443 as listed below


Verify that Plug-in files have been updated by looking at “WebSpherePluginConfig : /opt/IBM/HTTPServer/Plugins/config/openSSO/plugin-cfg.xml
“ & WebSpherePluginConfig : /opt/IBM/HTTPServer/Plugins/config/IHS/plugin-cfg.xml


Check your plugin update interval  i.e. Web Servers > %Server_name%> Plug-in properties
If it’s not set to “Auto generate & propagate “, do -> Navigate to new Http server and Generate Plug-in & Propagate Plug-in

  • Refresh configuration interval

Specifies the time interval, in seconds, at which the plug-in should check the configuration file to see if updates or changes have occurred. The plug-in checks the file for any modifications that have occurred since the last time the plug-in configuration was loaded.

  • Automatically generate plug-in configuration file

To automatically generate a plug-in configuration file to a remote Web server:

  • This field must be checked.
  • The plug-in configuration service must be enabled

When the plug-in configuration service is enabled, a plug-in configuration file is automatically generated for a Web server whenever:

  • The WebSphere Application Server administrator defines new Web server.
  • An application is deployed to an Application Server.
  • An application is uninstalled.
  • A virtual host definition is updated and saved.

By default, this field is checked. Clear the check box if you want to manually generate a plug-in configuration file for this Web server.

  • Automatically propagate plug-in configuration file

Specifies whether or not you want the application server to automatically propagate a copy of a changed plug-in configuration file to a Web server:

  • This field must be checked.
  • The plug-in configuration service must be enabled
  • A WebSphere Application Server node agent must be on the node that hosts the Web server associated with the changed plug-in configuration file.

By default, this field is checked.

Note: The plug-in configuration file can only be automatically propagated to a remote Web server if that Web server is an IBM HTTP Server V6.1 Web server and its administration server is running.

Because the plug-in configuration service runs in the background and is not tied to the administrative console, the administrative console cannot show the results of the automatic propagation.


Verify pointers to new configuration files by looking at following details

Once done bounce Websphere & Httpd services to pick up new settings.
Check /opt/IBM/HTTPServer/Plugins/logs/openSSO/http_plugin.log to see the requests are being served successfully.

IBM ISA MustGather : Using IBM Support Assistant Lite (ISA Lite)

Posted by Sagar Patil

If you are fortunate enough to have IBM support , often you will be raising a PMR – Problem Record (IBM).

IBM uses a tool called  ISA lite very similar to Oracle RDA.  ISA(IBM support Assistant) can be used as client application on server itself or as a client-server application where client is nothing but ISA agents installed on IBM platform.  Here is what I did for my websphere 6.x ND server.

Download IBM Support Assistant Lite (ISA Lite)/Assistant Workbench from MustGather: Application Server, dmgr, and nodeagent start and stop problems

I downloaded “ISALiteForWebSphere_Unix_09162010.tar” for my Linux WAS ND 6.x.

Installing the Tool

In all cases, installation of the IBM Support Assistant Lite tool is simply a matter of extracting the files from the archived .zip file that you generated and transferred from the Workbench system. The files can be extracted to any file system location you choose on the system where you will be running the tool. This will create a subdirectory ISALite under your target directory.

Tool Usage

Setting the JAVA_HOME Environment Variable
Regardless of whether you will be using the IBM Support Assistant Lite tool in GUI mode or in command-line console mode, you use the same procedure to start it: you invoke the appropriate launch script from a command line.  In the case of a Windows system, these launch scripts are batch files.  For the other environments, they are shell scripts.

Since the tool is implemented as a Java application, it is necessary that Java can be located before the tool can start. If Java is not
available on the PATH, you will have to set the JAVA_HOME environment variable manually.
The IBM Support Assistant Lite tool requires a JRE at the level 1.4.2 or higher (1.5 or higher on Windows 7 64 bit), so you must first make sure that a suitable JRE is installed on the system where the tool will be running. If it is, then you will need to issue an operating-system-specific command to set the JAVA_HOME variable to point to this JRE. The Microsoft JVM/JDK and gij (GNU libgcj) are not supported.

For example, if on a Windows platform you have jre1.4.2 installed at c:\jre1.4.2, you would set JAVA_HOME using the following command:

SET JAVA_HOME=c:\jre1.4.2

NOTE: Do not use quotes in the value of the SET command, even if your value has whitespace characters.

On a Linux,, if you have the JRE installed in /opt/jre142, you would set JAVA_HOME using the following command:

was61@ jre]$ export JAVA_HOME=/opt/IBM/WebSphere/AppServer/java/jre
[was61@ jre]$ pwd
/opt/IBM/WebSphere/AppServer/java/jre
[was61@ jre]$ cd bin/
[was61@ bin]$ ./java -version
java version “1.5.0”
Java(TM) 2 Runtime Environment, Standard Edition (build pxa64devifx-20080908 (SR8a + IZ29767 + IZ30684 + IZ31214 + IZ31213))
IBM J9 VM (build 2.3, J2RE 1.5.0 IBM J9 2.3 Linux amd64-64 j9vmxa6423ifx-20080811 (JIT enabled)
J9VM – 20080809_21892_LHdSMr
JIT  – 20080620_1845_r8
GC   – 200806_19)
JCL  – 20080908a

Starting the Tool in Swing GUI Mode

You will need to issue the following launch script:

– For the Windows environment, it will be the runISALite.bat script in the tool’s \ISALite directory.
– For the Linux, AIX, HP-UX, and Solaris environments, it will be the runISALite.sh script in the tool’s /ISALite directory. Make sure that the runISALite.sh script has execute permission; you can use the
following command to give the file execute permission: chmod 755 runISALite.sh

The GUI mode is not supported in the iSeries and zSeries environments: see the section immediately following this one for information on how to start the tool in command-line console mode on iSeries and zSeries.

Starting the Tool in Command-Line Console Mode
If a GUI is not available, the tool should start in command line mode automatically.  If console mode is desired even if a GUI is available, specify “-console” on the command line.  In some instances, it will not be possible to determine that a GUI is not available and the tool will not start.  In these instances, the tool will need to be restarted using “-console”.

Files are written to the installation directory
By default, the ISA Lite installation directory is used for storing files created during execution.  On some systems, the ISA Lite installation directory will be read only.  In this instance, use the -useHome parameter.  This parameter will cause temporary files to be written to the systems temporary directory and persistent files written to the user home directory.

On how I used this tool see details at ISA Log.

If you explode zip file, you will see something similar as below collected by this tool.

C:\IBM Support Asst >tree /f
Folder PATH listing

C:.
├───autopdzip
│   │   autopd-collection-info.xml
│   │
│   └───autopd
│       │   inventory_rcf.xml
│       │
│       ├───log
│       │       autopdsetupinstance2011.01.24-13.48.59.615+0000.log
│       │       isalite-error0.xml
│       │       isalite-error1.xml
│       │       isalite-error2.xml
│       │       isalite-trace0.xml
│       │       isalite-trace1.xml
│       │       isalite-trace2.xml
│       │       Log_Viewer.xml
│       │       Trace_Viewer.xml
│       │       Viewer_Translations.js
│       │
│       └───wasexporter
│               Dmgr.websphere.configuration
│               Dmgr.websphere.log

├───Dmgr
│   ├───Server1_Cell
│   │   │   cell.xml
│   │   │   resources-cei.xml
│   │   │   resources-pme.xml
│   │   │   resources-pme502.xml
│   │   │   resources.xml
│   │   │   security.xml
│   │   │   variables.xml
│   │   │   virtualhosts.xml
│   │   │   ws-security.xml
│   │   │
│   │   └───Server1_Manager
│   │       │   node-metadata.properties
│   │       │   node.xml
│   │       │   serverindex.xml
│   │       │
│   │       └───dmgr
│   │               server-cei.xml
│   │               server-pme.xml
│   │               server-pme51.xml
│   │               server.xml
│   │
│   ├───logs
│   │   │   activity.log
│   │   │   wsadmin.traceout
│   │   │   wsadmin.valout
│   │   │
│   │   ├───dmgr
│   │   │       native_stderr.log
│   │   │       native_stdout.log
│   │   │       startServer.log
│   │   │       stopServer.log
│   │   │       SystemErr.log
│   │   │       SystemOut.log
│   │   │       SystemOut_11.01.21_22.15.08.log
│   │   │
│   │   └───ffdc
│   │           dmgr_0000000a_11.01.24_14.04.17_0.txt
│   │           dmgr_exception.log
│   │
│   ├───properties
│   │       sas.stdclient.properties
│   │       sas.tools.properties
│   │       sslbitsizes.properties
│   │       wsadmin.properties
│   │       wsjaas.conf
│   │       wsjaas_client.conf
│   │
│   └───tranlog
│       └───Server1_Cell
│           └───Server1_Manager
│               └───dmgr
│                   └───transaction
│                       ├───partnerlog
│                       │       log1
│                       │       log2
│                       │
│                       └───tranlog
│                               log1
│                               log2

└───WAS_General_Problem
│   aim-meta-data.html
│   aim-meta-data.xml
│   autopd-collection-environment-v2.xml
│   collector.jar
│   historyReport.html
│   levelreport.html
│   SizeOfCollection.txt
│   versionReport.html

├───Debug
│   ├───config
│   │       user_settings.txt
│   │       was-server-status-filled.jacl
│   │       was-start-status.txt
│   │       was-status.txt
│   │
│   └───jacl
│           was-filled-trace-restore.jacl
│           was-filled-trace.jacl
│           was-user-defaults-filled.jacl

└───PortChecker
profilePortChecker.html_PASS.html

Websphere : Using Collector.sh Tool for uploading details to IBM Support

Posted by Sagar Patil

The collector tool gathers information about your WebSphere Application Server installation and packages it in a Java archive (JAR) file that you can send to IBM Customer Support to assist in determining and analyzing your problem. Information in the JAR file includes logs, property files, configuration files, operating system and Java data, and the presence and level of each software prerequisite.

How to run it?

IBM Doc says, run the tool not from APPSERVER_INST_PATH/bin, but run from working directory.

mkdir -p /tmp/collector
/opt/IBM/WebSphere/AppServer/profiles/Profile61/Dmgr/bin/collector.sh

[was61@collector]$ ls -lrt
total 2560
-rw-r–r– 1 was61 web 2616675 Nov 30 12:07 Server1-Server1_Cell-Server1_Manager-Dmgr-WASenv.jar

Copy the Jar file created above on your windows desktop using winscp.

Use any utility to unjar contents of JAR file, I have used IZarc.

ger-Dmgr-WASenv>tree   ( Will list directories Created by IZarc )
Folder PATH listing
Volume serial number is 0070002E 4CEF:3F39
C:.
+---Server1
¦   +---debug
¦   +---Java
¦   +---MQ
¦   +---OS
¦   +---root
¦   ¦   +---etc
¦   ¦   +---opt
¦   ¦   ¦   +---IBM
¦   ¦   ¦       +---WebSphere
¦   ¦   ¦           +---AppServer
¦   ¦   ¦               +---bin
¦   ¦   ¦               +---configuration
¦   ¦   ¦               +---logs
¦   ¦   ¦               ¦   +---install
¦   ¦   ¦               ¦   +---manageprofiles
¦   ¦   ¦               ¦   ¦   +---Dmgr
¦   ¦   ¦               ¦   ¦   +---Node
¦   ¦   ¦               ¦   +---update
¦   ¦   ¦               ¦       +---6.1.0-WS-WAS-LinuxX64-FP0000021.install
¦   ¦   ¦               ¦       +---6.1.0-WS-WAS-LinuxX64-FP0000031.install
¦   ¦   ¦               ¦       +---6.1.0-WS-WASSDK-LinuxX64-FP0000021.install
¦   ¦   ¦               +---profiles
¦   ¦   ¦               ¦   +---Profile61
¦   ¦   ¦               ¦       +---Dmgr
¦   ¦   ¦               ¦           +---bin
¦   ¦   ¦               ¦           +---config
¦   ¦   ¦               ¦           ¦   +---cells
¦   ¦   ¦               ¦           ¦   ¦   +---Server1_Cell
¦   ¦   ¦               ¦           ¦   ¦       +---buses
¦   ¦   ¦               ¦           ¦   ¦       +---nodes
¦   ¦   ¦               ¦           ¦   ¦       +---wim
¦   ¦   ¦               ¦           ¦   +---templates
¦   ¦   ¦               ¦           ¦       +---buses
¦   ¦   ¦               ¦           ¦       ¦   +---default
¦   ¦   ¦               ¦           ¦       +---chains
¦   ¦   ¦               ¦           ¦       +---clusters
¦   ¦   ¦               ¦           ¦       +---default
¦   ¦   ¦               ¦           ¦       +---servertypes
¦   ¦   ¦               ¦           ¦       +---system
¦   ¦   ¦               ¦           ¦           +---nodes
¦   ¦   ¦               ¦           +---configuration
¦   ¦   ¦               ¦           +---logs
¦   ¦   ¦               ¦           ¦   +---Dmg
¦   ¦   ¦               ¦           ¦   +---Dmgr
¦   ¦   ¦               ¦           ¦   +---ffdc
¦   ¦   ¦               ¦           +---properties
¦   ¦   ¦               ¦               +---version
¦   ¦   ¦               +---properties
¦   ¦   ¦                   +---fsdb
¦   ¦   ¦                   ¦   +---_was_profile_default
¦   ¦   ¦                   +---version
¦   ¦   ¦                       +---history
¦   ¦   +---tmp
¦   ¦       +---collector
¦   +---WAS
+---META-INF
ger-Dmgr-WASenv>tree /f  ( Will list files created by IZarc )
Folder PATH listing
Volume serial number is 0070002E 4CEF:3F39
C:.
+---sagar-pc
¦   +---debug
¦   ¦       commands
¦   ¦       dmesg
¦   ¦       files
¦   ¦       getconf
¦   ¦       network
¦   ¦       system
¦   ¦
¦   +---Java
¦   ¦       Properties
¦   ¦
¦   +---MQ
¦   ¦       DspMq
¦   ¦       PubSub
¦   ¦       Ver
¦   ¦
¦   +---OS
¦   ¦       commands
¦   ¦       dmesg
¦   ¦       getconf
¦   ¦       installed
¦   ¦       network
¦   ¦       patches
¦   ¦       processes
¦   ¦       software
¦   ¦       system
¦   ¦       user
¦   ¦
¦   +---root
¦   ¦   +---etc
¦   ¦   ¦       hosts
¦   ¦   ¦       nsswitch.conf
¦   ¦   ¦
¦   ¦   +---opt
¦   ¦   ¦   +---IBM
¦   ¦   ¦       +---WebSphere
¦   ¦   ¦           +---AppServer
¦   ¦   ¦               +---bin
¦   ¦   ¦               ¦       setupCmdLine.sh
¦   ¦   ¦               ¦
¦   ¦   ¦               +---configuration
¦   ¦   ¦               ¦       config.ini
¦   ¦   ¦               ¦
¦   ¦   ¦               +---logs
¦   ¦   ¦               ¦   ¦   ModifyCloudscapePermission.log
¦   ¦   ¦               ¦   ¦   product_StartMenu.log
¦   ¦   ¦               ¦   ¦
¦   ¦   ¦               ¦   +---install
¦   ¦   ¦               ¦   ¦       installconfig.log.gz
¦   ¦   ¦               ¦   ¦       log.txt
¦   ¦   ¦               ¦   ¦       trace.txt.gz
¦   ¦   ¦               ¦   ¦       trace.xml.gz
¦   ¦   ¦               ¦   ¦
¦   ¦   ¦               ¦   +---manageprofiles
¦   ¦   ¦               ¦   ¦   ¦   create.log
¦   ¦   ¦               ¦   ¦   ¦   Dmgr_create.log
¦   ¦   ¦               ¦   ¦   ¦   Dmgr_getPath.log
¦   ¦   ¦               ¦   ¦   ¦   listProfiles.log
¦   ¦   ¦               ¦   ¦   ¦   Node_create.log
¦   ¦   ¦               ¦   ¦   ¦   Node_getPath.log
¦   ¦   ¦               ¦   ¦   ¦   validateRegistry.log
¦   ¦   ¦               ¦   ¦   ¦
¦   ¦   ¦               ¦   ¦   +---Dmgr
¦   ¦   ¦               ¦   ¦   ¦       clear_class_cache.log
¦   ¦   ¦               ¦   ¦   ¦       collect_metadata.log
¦   ¦   ¦               ¦   ¦   ¦       collect_node_metadata.log
¦   ¦   ¦               ¦   ¦   ¦       copyFiles.log
¦   ¦   ¦               ¦   ¦   ¦       createDefaultLibraries.log
¦   ¦   ¦               ¦   ¦   ¦       createDefaultServer.log
¦   ¦   ¦               ¦   ¦   ¦       createShortcutForProfile.log
¦   ¦   ¦               ¦   ¦   ¦       createVirtualHost.log
¦   ¦   ¦               ¦   ¦   ¦       createWebServer.log
¦   ¦   ¦               ¦   ¦   ¦       defaultapp_config.log
¦   ¦   ¦               ¦   ¦   ¦       defaultapp_deploy.log
¦   ¦   ¦               ¦   ¦   ¦       deploy_config.log
¦   ¦   ¦               ¦   ¦   ¦       filetransfer_config.log
¦   ¦   ¦               ¦   ¦   ¦       hamanager_config.log
¦   ¦   ¦               ¦   ¦   ¦       keyGeneration.log
¦   ¦   ¦               ¦   ¦   ¦       mejb_config.log
¦   ¦   ¦               ¦   ¦   ¦       SetSecurity.log
¦   ¦   ¦               ¦   ¦   ¦       SIBDefineChains.log
¦   ¦   ¦               ¦   ¦   ¦       SIBDeployRA.log
¦   ¦   ¦               ¦   ¦   ¦       webui_config.log
¦   ¦   ¦               ¦   ¦   ¦       wsadminListener.log
¦   ¦   ¦               ¦   ¦   ¦
¦   ¦   ¦               ¦   ¦   +---Node
¦   ¦   ¦               ¦   ¦           clear_class_cache.log
¦   ¦   ¦               ¦   ¦           collect_metadata.log
¦   ¦   ¦               ¦   ¦           copyFiles.log
¦   ¦   ¦               ¦   ¦           createShortcutForProfile.log
¦   ¦   ¦               ¦   ¦           createVirtualHost.log
¦   ¦   ¦               ¦   ¦           hamanager_config.log
¦   ¦   ¦               ¦   ¦           keyGeneration.log
¦   ¦   ¦               ¦   ¦           SetSecurity.log
¦   ¦   ¦               ¦   ¦           wsadminListener.log
¦   ¦   ¦               ¦   ¦
¦   ¦   ¦               ¦   +---update
¦   ¦   ¦               ¦       ¦   update.lock
¦   ¦   ¦               ¦       ¦
¦   ¦   ¦               ¦       +---6.1.0-WS-WAS-LinuxX64-FP0000021.install
¦   ¦   ¦               ¦       ¦       relabel.stderr.gz
¦   ¦   ¦               ¦       ¦       relabel.stdout.gz
¦   ¦   ¦               ¦       ¦       updateconfig.log.gz
¦   ¦   ¦               ¦       ¦       updatelog.txt
¦   ¦   ¦               ¦       ¦       updatetrace.log.gz
¦   ¦   ¦               ¦       ¦
¦   ¦   ¦               ¦       +---6.1.0-WS-WAS-LinuxX64-FP0000031.install
¦   ¦   ¦               ¦       ¦       relabel.stderr.gz
¦   ¦   ¦               ¦       ¦       relabel.stdout.gz
¦   ¦   ¦               ¦       ¦       updateconfig.log.gz
¦   ¦   ¦               ¦       ¦       updatelog.txt
¦   ¦   ¦               ¦       ¦       updatetrace.log.gz
¦   ¦   ¦               ¦       ¦
¦   ¦   ¦               ¦       +---6.1.0-WS-WASSDK-LinuxX64-FP0000021.install
¦   ¦   ¦               ¦               relabel.stderr.gz
¦   ¦   ¦               ¦               relabel.stdout.gz
¦   ¦   ¦               ¦               updatelog.txt
¦   ¦   ¦               ¦
¦   ¦   ¦               +---profiles
¦   ¦   ¦               ¦   +---Profile61
¦   ¦   ¦               ¦       +---Dmgr
¦   ¦   ¦               ¦           +---bin
¦   ¦   ¦               ¦           ¦       setupCmdLine.sh
¦   ¦   ¦               ¦           ¦
¦   ¦   ¦               ¦           +---config
¦   ¦   ¦               ¦           ¦   +---cells
¦   ¦   ¦               ¦           ¦   ¦   ¦   plugin-cfg.xml
¦   ¦   ¦               ¦           ¦   ¦   ¦
¦   ¦   ¦               ¦           ¦   ¦   +---sagar-pc_Cell
¦   ¦   ¦               ¦           ¦   ¦       ¦   admin-authz.xml
¦   ¦   ¦               ¦           ¦   ¦       ¦   cell.xml
¦   ¦   ¦               ¦           ¦   ¦       ¦   fileRegistry.xml
¦   ¦   ¦               ¦           ¦   ¦       ¦   filter.policy
¦   ¦   ¦               ¦           ¦   ¦       ¦   multibroker.xml
¦   ¦   ¦               ¦           ¦   ¦       ¦   namestore.xml
¦   ¦   ¦               ¦           ¦   ¦       ¦   naming-authz.xml
¦   ¦   ¦               ¦           ¦   ¦       ¦   pmirm.xml
¦   ¦   ¦               ¦           ¦   ¦       ¦   resources-cei.xml
¦   ¦   ¦               ¦           ¦   ¦       ¦   resources-pme.xml
¦   ¦   ¦               ¦           ¦   ¦       ¦   resources.xml
¦   ¦   ¦               ¦           ¦   ¦       ¦   security.xml
¦   ¦   ¦               ¦           ¦   ¦       ¦   variables.xml
¦   ¦   ¦               ¦           ¦   ¦       ¦   virtualhosts.xml
¦   ¦   ¦               ¦           ¦   ¦       ¦   ws-security.xml
¦   ¦   ¦               ¦           ¦   ¦       ¦
¦   ¦   ¦               ¦           ¦   ¦       +---buses
¦   ¦   ¦               ¦           ¦   ¦       +---nodes
¦   ¦   ¦               ¦           ¦   ¦       +---wim
¦   ¦   ¦               ¦           ¦   +---templates
¦   ¦   ¦               ¦           ¦       +---buses
¦   ¦   ¦               ¦           ¦       ¦   +---default
¦   ¦   ¦               ¦           ¦       +---chains
¦   ¦   ¦               ¦           ¦       ¦       hamanager-chains.xml
¦   ¦   ¦               ¦           ¦       ¦       orb-chains.xml
¦   ¦   ¦               ¦           ¦       ¦       proxy-chains.xml
¦   ¦   ¦               ¦           ¦       ¦       sibservice-chains.xml
¦   ¦   ¦               ¦           ¦       ¦       sipcontainer-chains.xml
¦   ¦   ¦               ¦           ¦       ¦       sipproxy-chains.xml
¦   ¦   ¦               ¦           ¦       ¦       webcontainer-chains.xml
¦   ¦   ¦               ¦           ¦       ¦
¦   ¦   ¦               ¦           ¦       +---clusters
¦   ¦   ¦               ¦           ¦       +---default
¦   ¦   ¦               ¦           ¦       ¦       admin-authz.xml
¦   ¦   ¦               ¦           ¦       ¦       cluster-components.xml
¦   ¦   ¦               ¦           ¦       ¦       coregroup-template.xml
¦   ¦   ¦               ¦           ¦       ¦       resource-templates.xml
¦   ¦   ¦               ¦           ¦       ¦       virtualhosts.xml
¦   ¦   ¦               ¦           ¦       ¦
¦   ¦   ¦               ¦           ¦       +---servertypes
¦   ¦   ¦               ¦           ¦       +---system
¦   ¦   ¦               ¦           ¦           ¦   multibroker.xml
¦   ¦   ¦               ¦           ¦           ¦   sibjmsresources-ra.xml
¦   ¦   ¦               ¦           ¦           ¦
¦   ¦   ¦               ¦           ¦           +---nodes
¦   ¦   ¦               ¦           +---configuration
¦   ¦   ¦               ¦           ¦       .lastTouched
¦   ¦   ¦               ¦           ¦
¦   ¦   ¦               ¦           +---logs
¦   ¦   ¦               ¦           ¦   ¦   AboutThisProfile.txt
¦   ¦   ¦               ¦           ¦   ¦   activity.log
¦   ¦   ¦               ¦           ¦   ¦   iscinstall.log
¦   ¦   ¦               ¦           ¦   ¦   UpdatePK91844.log
¦   ¦   ¦               ¦           ¦   ¦   wsadmin.traceout
¦   ¦   ¦               ¦           ¦   ¦   wsadmin.valout
¦   ¦   ¦               ¦           ¦   ¦
¦   ¦   ¦               ¦           ¦   +---Dmg
¦   ¦   ¦               ¦           ¦   ¦       stopServer.log
¦   ¦   ¦               ¦           ¦   ¦
¦   ¦   ¦               ¦           ¦   +---Dmgr
¦   ¦   ¦               ¦           ¦   ¦       Dmgr.pid
¦   ¦   ¦               ¦           ¦   ¦       fileRepositoryCellLevel.epoch
¦   ¦   ¦               ¦           ¦   ¦       native_stderr.log
¦   ¦   ¦               ¦           ¦   ¦       native_stdout.log
¦   ¦   ¦               ¦           ¦   ¦       startServer.log
¦   ¦   ¦               ¦           ¦   ¦       stopServer.log
¦   ¦   ¦               ¦           ¦   ¦       SystemErr.log
¦   ¦   ¦               ¦           ¦   ¦       SystemOut.log
¦   ¦   ¦               ¦           ¦   ¦       SystemOut_10.11.18_16.56.13.log
¦   ¦   ¦               ¦           ¦   ¦
¦   ¦   ¦               ¦           ¦   +---ffdc
¦   ¦   ¦               ¦           ¦           Dmgr_0000000a_10.11.30_09.52.19_0.txt
¦   ¦   ¦               ¦           ¦           Dmgr_0000000a_10.11.30_10.16.49_0.txt
¦   ¦   ¦               ¦           ¦           Dmgr_0000000a_10.11.30_10.27.16_0.txt
¦   ¦   ¦               ¦           ¦           Dmgr_0000000e_10.11.30_09.52.28_0.txt
¦   ¦   ¦               ¦           ¦           Dmgr_0000000e_10.11.30_10.16.55_0.txt
¦   ¦   ¦               ¦           ¦           Dmgr_0000000f_10.11.30_10.27.21_0.txt
¦   ¦   ¦               ¦           ¦           Dmgr_0000001e_10.11.30_10.27.43_0.txt
¦   ¦   ¦               ¦           ¦           Dmgr_0000001e_10.11.30_10.27.43_1.txt
¦   ¦   ¦               ¦           ¦           Dmgr_0000001e_10.11.30_10.27.43_10.txt
¦   ¦   ¦               ¦           ¦           Dmgr_0000001e_10.11.30_10.27.43_2.txt
¦   ¦   ¦               ¦           ¦           Dmgr_0000001e_10.11.30_10.27.43_3.txt
¦   ¦   ¦               ¦           ¦           Dmgr_0000001e_10.11.30_10.27.43_4.txt
¦   ¦   ¦               ¦           ¦           Dmgr_0000001e_10.11.30_10.27.43_5.txt
¦   ¦   ¦               ¦           ¦           Dmgr_0000001e_10.11.30_10.27.43_6.txt
¦   ¦   ¦               ¦           ¦           Dmgr_0000001e_10.11.30_10.27.43_7.txt
¦   ¦   ¦               ¦           ¦           Dmgr_0000001e_10.11.30_10.27.43_8.txt
¦   ¦   ¦               ¦           ¦           Dmgr_0000001e_10.11.30_10.27.43_9.txt
¦   ¦   ¦               ¦           ¦           Dmgr_00000020_10.11.30_09.53.33_0.txt
¦   ¦   ¦               ¦           ¦           Dmgr_00000020_10.11.30_09.53.33_1.txt
¦   ¦   ¦               ¦           ¦           Dmgr_00000020_10.11.30_09.53.33_2.txt
¦   ¦   ¦               ¦           ¦           Dmgr_00000020_10.11.30_09.53.33_3.txt
¦   ¦   ¦               ¦           ¦           Dmgr_00000020_10.11.30_09.53.33_4.txt
¦   ¦   ¦               ¦           ¦           Dmgr_00000020_10.11.30_09.53.33_5.txt
¦   ¦   ¦               ¦           ¦           Dmgr_00000020_10.11.30_09.53.34_0.txt
¦   ¦   ¦               ¦           ¦           Dmgr_00000020_10.11.30_09.53.34_1.txt
¦   ¦   ¦               ¦           ¦           Dmgr_00000020_10.11.30_09.53.34_2.txt
¦   ¦   ¦               ¦           ¦           Dmgr_00000020_10.11.30_09.53.34_3.txt
¦   ¦   ¦               ¦           ¦           Dmgr_00000020_10.11.30_09.53.34_4.txt
¦   ¦   ¦               ¦           ¦           Dmgr_00000020_10.11.30_10.17.12_0.txt
¦   ¦   ¦               ¦           ¦           Dmgr_00000020_10.11.30_10.17.12_1.txt
¦   ¦   ¦               ¦           ¦           Dmgr_00000020_10.11.30_10.17.12_10.txt
¦   ¦   ¦               ¦           ¦           Dmgr_00000020_10.11.30_10.17.12_2.txt
¦   ¦   ¦               ¦           ¦           Dmgr_00000020_10.11.30_10.17.12_3.txt
¦   ¦   ¦               ¦           ¦           Dmgr_00000020_10.11.30_10.17.12_4.txt
¦   ¦   ¦               ¦           ¦           Dmgr_00000020_10.11.30_10.17.12_5.txt
¦   ¦   ¦               ¦           ¦           Dmgr_00000020_10.11.30_10.17.12_6.txt
¦   ¦   ¦               ¦           ¦           Dmgr_00000020_10.11.30_10.17.12_7.txt
¦   ¦   ¦               ¦           ¦           Dmgr_00000020_10.11.30_10.17.12_8.txt
¦   ¦   ¦               ¦           ¦           Dmgr_00000020_10.11.30_10.17.12_9.txt
¦   ¦   ¦               ¦           ¦           Dmgr_00000028_10.11.30_09.39.17_0.txt
¦   ¦   ¦               ¦           ¦           Dmgr_00000028_10.11.30_09.39.17_1.txt
¦   ¦   ¦               ¦           ¦           Dmgr_00000028_10.11.30_09.39.17_2.txt
¦   ¦   ¦               ¦           ¦           Dmgr_00000028_10.11.30_09.39.17_3.txt
¦   ¦   ¦               ¦           ¦           Dmgr_00000028_10.11.30_09.39.17_4.txt
¦   ¦   ¦               ¦           ¦           Dmgr_00000028_10.11.30_09.39.17_5.txt
¦   ¦   ¦               ¦           ¦           Dmgr_00000028_10.11.30_09.39.17_6.txt
¦   ¦   ¦               ¦           ¦           Dmgr_0000002a_10.11.30_10.06.38_0.txt
¦   ¦   ¦               ¦           ¦           Dmgr_0000002a_10.11.30_10.06.38_1.txt
¦   ¦   ¦               ¦           ¦           Dmgr_0000002a_10.11.30_10.06.38_2.txt
¦   ¦   ¦               ¦           ¦           Dmgr_0000002a_10.11.30_10.06.38_3.txt
¦   ¦   ¦               ¦           ¦           Dmgr_0000002a_10.11.30_10.06.38_4.txt
¦   ¦   ¦               ¦           ¦           Dmgr_0000002a_10.11.30_10.06.38_5.txt
¦   ¦   ¦               ¦           ¦           Dmgr_0000002a_10.11.30_10.06.38_6.txt
¦   ¦   ¦               ¦           ¦           Dmgr_00000032_10.11.30_10.21.45_0.txt
¦   ¦   ¦               ¦           ¦           Dmgr_exception.log
¦   ¦   ¦               ¦           ¦           Dmgr_exception_10.11.30_3.58.27.log
¦   ¦   ¦               ¦           ¦
¦   ¦   ¦               ¦           +---properties
¦   ¦   ¦               ¦               ¦   client.policy
¦   ¦   ¦               ¦               ¦   nodeportdef.props
¦   ¦   ¦               ¦               ¦   portdef.props
¦   ¦   ¦               ¦               ¦   sas.client.props
¦   ¦   ¦               ¦               ¦   sas.server.props.P
¦   ¦   ¦               ¦               ¦   sas.stdclient.properties
¦   ¦   ¦               ¦               ¦   sas.tools.properties
¦   ¦   ¦               ¦               ¦   server.policy
¦   ¦   ¦               ¦               ¦   soap.client.props
¦   ¦   ¦               ¦               ¦   ssl.client.props.P
¦   ¦   ¦               ¦               ¦   sslbitsizes.properties
¦   ¦   ¦               ¦               ¦   was.policy
¦   ¦   ¦               ¦               ¦   wsadmin.properties
¦   ¦   ¦               ¦               ¦   wsjaas.conf
¦   ¦   ¦               ¦               ¦   wsjaas_client.conf
¦   ¦   ¦               ¦               ¦
¦   ¦   ¦               ¦               +---version
¦   ¦   ¦               ¦                       profile.version
¦   ¦   ¦               ¦
¦   ¦   ¦               +---properties
¦   ¦   ¦                   ¦   converter.properties
¦   ¦   ¦                   ¦   dfltbndngs.dtd
¦   ¦   ¦                   ¦   dynaedge-cfg.xml
¦   ¦   ¦                   ¦   encoding.properties
¦   ¦   ¦                   ¦   ffdcRun.properties
¦   ¦   ¦                   ¦   ffdcStart.properties
¦   ¦   ¦                   ¦   ffdcStop.properties
¦   ¦   ¦                   ¦   jmx.properties
¦   ¦   ¦                   ¦   profileRegistry.xml
¦   ¦   ¦                   ¦   TraceSettings.properties
¦   ¦   ¦                   ¦   was.license
¦   ¦   ¦                   ¦   wasprofile.properties
¦   ¦   ¦                   ¦
¦   ¦   ¦                   +---fsdb
¦   ¦   ¦                   ¦   ¦   Dmgr.sh
¦   ¦   ¦                   ¦   ¦   Node.sh
¦   ¦   ¦                   ¦   ¦
¦   ¦   ¦                   ¦   +---_was_profile_default
¦   ¦   ¦                   ¦           default.sh
¦   ¦   ¦                   ¦
¦   ¦   ¦                   +---version
¦   ¦   ¦                       ¦   WAS.product
¦   ¦   ¦                       ¦
¦   ¦   ¦                       +---history
¦   ¦   ¦                               6.1.0-WS-WAS-LinuxX64-FP0000021.ptfApplied
¦   ¦   ¦                               6.1.0-WS-WAS-LinuxX64-FP0000021.ptfDriver
¦   ¦   ¦                               6.1.0-WS-WASSDK-LinuxX64-FP0000021.ptfApplied
¦   ¦   ¦                               6.1.0-WS-WASSDK-LinuxX64-FP0000021.ptfDriver
¦   ¦   ¦                               event.history
¦   ¦   ¦                               sdk.FP61021.ptfApplied
¦   ¦   ¦                               sdk.FP61021.ptfDriver
¦   ¦   ¦                               was.embed.common.FP61021.ptfApplied
¦   ¦   ¦                               was.embed.common.FP61021.ptfDriver
¦   ¦   ¦                               was.embed.FP61021.ptfApplied
¦   ¦   ¦                               was.embed.FP61021.ptfDriver
¦   ¦   ¦                               was.itlm.nd.FP61021.ptfApplied
¦   ¦   ¦                               was.itlm.nd.FP61021.ptfDriver
¦   ¦   ¦                               was.license.FP61021.ptfApplied
¦   ¦   ¦                               was.license.FP61021.ptfDriver
¦   ¦   ¦                               was.ndonly.common.FP61021.ptfApplied
¦   ¦   ¦                               was.ndonly.common.FP61021.ptfDriver
¦   ¦   ¦                               was.ndonly.FP61021.ptfApplied
¦   ¦   ¦                               was.ndonly.FP61021.ptfDriver
¦   ¦   ¦                               was.server.common.FP61021.ptfApplied
¦   ¦   ¦                               was.server.common.FP61021.ptfDriver
¦   ¦   ¦                               was.server.FP61021.ptfApplied
¦   ¦   ¦                               was.server.FP61021.ptfDriver
¦   ¦   ¦
¦   ¦   +---tmp
¦   ¦       +---collector
¦   ¦               Collector.log
¦   ¦
¦   +---WAS
¦           filedir
¦           filefull
¦           fileperm
¦
+---META-INF
 MANIFEST.MF

The collector summary option produces version information for the WebSphere Application Server product and the operating system as well as other information. It stores the information in the Collector_Summary.txt file and writes it to the console.

[was61@Server1collector]$ /opt/IBM/WebSphere/AppServer/profiles/Profile61/Dmgr/bin/collector.sh -summary
en_US.UTF-8
2010/11/30 11:42:39 URL is: jar:file:/opt/IBM/WebSphere/AppServer/plugins/com.ibm.ws.runtime_6.1.0.jar!/com/ibm/websphere/rastools/collector/Collector.class

The Collector program should be run as user id root because some of
the commands to be executed require root authority.  However, if you
proceed, much of what Collector does will work just fine.

Press Enter to continue or type "exit" to quit.

Hostname: Server1  Nodename: Server1_Manager
--------------------------------------------------------------------------------
IBM WebSphere Application Server Product Installation Status Report
--------------------------------------------------------------------------------
Report at date and time November 30, 2009 11:42:41 AM GMT
Installation
--------------------------------------------------------------------------------
Product Directory        /opt/IBM/WebSphere/AppServer
Version Directory        /opt/IBM/WebSphere/AppServer/properties/version
DTD Directory            /opt/IBM/WebSphere/AppServer/properties/version/dtd
Log Directory            /opt/IBM/WebSphere/AppServer/logs
Backup Directory         /opt/IBM/WebSphere/AppServer/properties/version/nif/backup
TMP Directory            /tmp
Product List
--------------------------------------------------------------------------------
ND                       installed
Installed Product
--------------------------------------------------------------------------------
Name                     IBM WebSphere Application Server - ND
Version                  6.1.0.31
ID                       ND
Build Level              cf311015.02
Build Date               4/15/10
--------------------------------------------------------------------------------
End Installation Status Report
--------------------------------------------------------------------------------
Java Full Version:
J2RE 1.5.0 IBM J9 2.3 Linux amd64-64 j9vmxa6423ifx-20080811 (JIT enabled)
J9VM - 20080809_21892_LHdSMr
JIT  - 20080620_1845_r8
GC   - 200806_19
Operating System: Linux, 2.6.18-194.8.1.el5

Websphere : Plug-in Workload Management Failover

Posted by Sagar Patil

We have a 2 node clustered websphere 6.x vertical cluster . Number of times we see the system going down and coming back up in less than 5 mins.

Investigation:

Websphere  uses SESSIONID to divert user sessions to relevant JVMs . Plug-in polling interval keeps track of status of JVMs (up/down/hung).  Under situation we had, HTTP plug-in should direct user session to another JVM (JVM2 here) . But I think it didn’t .  To do so, we need to configure parameter “ConnectTimeout”  to force it to look for another server.

“ConnectTimeout” makes plug-in use a non-smoking connect.
Setting ConnectTimeout to a value of zero (default here) is equal to not specifying ConnectTimeout attribute, that is, the plug-in performs a blocking connect and waits until the operating system times out  (For Linux it can take up to 5-10 minutes for the Socket to time-out).

ConnectTimeout

The ConnectTimeout attribute of a Server element enables the HTTP plug-in to perform non-blocking connections with a backend cluster member. Non-blocking connections are beneficial when the HTTP plug-in is unable to contact the destination to determine if the port is available or unavailable for a particular cluster member.

If no ConnectTimeout value is specified, the HTTP plug-in performs a blocking connect in which the HTTP plug-in sits until an operating system TCP timeout occurs (as long as 2 minutes depending on the platform) and allows the HTTP plug-in to mark the cluster member unavailable. A value of 0 causes the HTTP plug-in to perform a blocking connect. A value greater than 0 specifies the number of seconds you want the HTTP plug-in to wait for a successful connection. If a connection does not occur after that time interval, the HTTP plug-in marks the cluster member unavailable and fails over to one of the other cluster members defined in the cluster. 

Caution: In an environment with busy workload or a slow network connection, setting this value too low could make the HTTP plug-in mark a cluster member down falsely. Therefore, caution should be used whenever choosing a value for ConnectTimeout.

Set attribute “ConnectTimeout” to an integer value greater than zero to determine how long plug-in should wait for a response when attempting to connect to a server.  A setting of 15 means that the plug-in waits for 15 seconds to time out than 5-10 minutes thru OS settings.

<Server CloneID="10k66djk2" ConnectTimeout="10" ExtendedHandshake="false" LoadBalanceWeight="1000" MaxConnections="0" Name="Server1_WebSphere_Appserver" WaitForContinue="false">
<Transport Hostname="server1.domain.com" Port="9091" Protocol="http"/>
</Server>

Top of Page

Top menu