SQL Server logs, changing level of logging

Posted by Sagar Patil

To view SQL Server error log from SQL Server Enterprise Manager
– Expand a server group, and then expand a server.
– Expand Management, and then expand SQL Server Logs.
– Click the SQL Server Log to view it. Error log information appears in the details pane

One can also execute “exec xp_readerrorlog”

SQL server logs are generally located at “C:\Program Files\Microsoft SQL Server\MSSQL.1\MSSQL\LOG”.

The log files are rolled over on each sql server instance restart, or when running DBCC ERRORLOG statement. sql server will only retain max 6 old file. This could be changed byselecting configure

How do Add detailed logging

Edit NSService.exe.config File

The default installation folder is C:\Program Files\Microsoft SQL Server\90\NotificationServices\n.n.nnn\bin.
Open the NSservice.exe.config file.

<?xml version=”1.0″ encoding=”UTF-8″?>
<!–
The default logging levels for all components is Warning

Off = 0 < Error = 1 < Warning = 2 < Info = 3 < Verbose = 4

Change the values of the value attribute to change the logging
level.

Setting the logging level enables all log events which are less
than or equal to the log level setting
–>
<configuration>
<system.diagnostics>
<switches>
<add name=”LogAdministrative” value=”2″/>
<add name=”LogService” value=”2″/>
<add name=”LogEventProvider” value=”2″/>
<add name=”LogEventCollector” value=”2″/>
<add name=”LogGenerator” value=”2″/>
<add name=”LogDistributor” value=”2″/>
<add name=”LogVacuumer” value=”2″/>
<add name=”LogOther” value=”2″/>
<add name=”LogPerformanceMonitor” value=”2″/>
</switches>
</system.diagnostics>
</configuration>

Initially, each logging option is set to 2, which turns on logging for error and warning messages only.
To apply the logging changes, save the file and restart the instance of Notification Services.

 
Element name Logging category 
LogAdministrative SQL Server Management Studio and nscontrol utility events
LogService NS$instanceName Microsoft Windows service events
LogEventProvider Event provider events
LogEventCollector EventCollector object events
LogGenerator Generator events
LogDistributor Distributor events
LogVacuumer Vacuumer events
LogOther Performance monitor events
LogPerformanceMonitor Events for all other components, such as the standard content formatter and delivery protocols

Logging Level Values : Logging levels determine which types of events are written to the Application log. You can control the logging level by setting the value attribute to one of the following values.

0 Off
1 Error messages only
2 Error and warning messages
3 Error, warning, and informational messages
4 Verbose logging, which writes all messages to the Application log

SQL Server Error Messages

Posted by Sagar Patil

SQL Server comes with pre-defined error messages that can be raised when a particular condition occurs. Built-in error messages are stored in the sysmessages table of the master database. Depending on the severity level, error messages can be returned to the offending connection or could be recorded in the SQL Server error log. The severity level determines the type and seriousness of the problem that caused the error. The following table summarizes various error severity levels:

Error Severity Level Explanation
0 These are messages informing you of the completion status of a statement you executed, such as: “new role added”. Level 0 also includes informational warning messages such as: “Warning: Null value is eliminated by an aggregate or other SET operation.” Messages of level 0 are returned as information, not errors.
10 Informational message that is usually caused by incorrect information entered by the user. For example: “No rows were updated or deleted.”
11 through 16 These are errors that are caused by users and can be corrected by users. For example:

  • “User name ‘JohnDoe’ not found.”
  • “Cannot create an index on ‘authors21’, because this table does not exist in database ‘pubs’.”
  • “The ROLLBACK TRANSACTION request has no corresponding BEGIN TRANSACTION.”
  • “CREATE UNIQUE INDEX terminated because a duplicate key was found for index ID 1. Most significant primary key is ‘121’.”
17 This severity indicates insufficient resources for performing a requested operation. For example, SQL Server might have run out of locks, as in the following: “Sort failed. Out of space or locks in database ‘pubs’.” Be sure to adjust SQL Server configuration accordingly to avoid such errors in the future.
18 Non-fatal internal error has occurred. This means that SQL Server encountered errors in the internal code, but the connection is maintained. For example: “The server encountered a stack overflow during compile time.” or “Transaction manager has canceled the distributed transaction.” If your users continuously encounter such errors and you cannot resolve the problem you should ensure that you have applied the latest SQL Server service pack. If that does not help, contact Microsoft’s technical support.
19 This severity level indicates lack of resources, but not due to SQL Server configuration. Some of these are fairly harmless, for instance: “The log file for database ‘test’ is full. Back up the transaction log for the database to free up some log space.” This simply means that you need to backup the log or increase the size of the transaction log files. Other errors of severity 19 could be quite serious, for instance: “There is no room to hold the buffer resource lock %S_BUF in SDES %S_SDES. Contact Technical Support.” If you encounter such errors, contact Microsoft’s technical support ASAP. The Transact-SQL batch that caused error with severity 19 will terminate, but the connection will remain open. Error levels with severity 19 or higher are written to the SQL Server error log automatically.
20 Fatal error on the current connection. This means the session that encountered the error will log the error and then will be disconnected from SQL Server. For example: “Row compare failure.” or “Sort cannot be reconciled with transaction log.” Be sure to look up the resolution for such errors at support.microsoft.com – many of these are well documented. Severity level of 20 usually does not mean that database is damaged.
21 An error has occurred which affects all databases on the current instance of SQL Server. For example: “Error writing audit trace. SQL Server is shutting down.” or “Could not open tempdb. Cannot continue.” A severity level of 21 usually does not mean any database is damaged. You might have to review the contents of system tables and the configuration options to resolve errors of this severity.
22 Not encountered very often, this severity level is usually associated with hardware (disk or cache) errors. Level 22 indicates that table integrity is suspect. For example: “Could not locate row in sysobjects for system catalog ‘%.*ls’ in database ‘XYZ’. This system catalog should exist in all databases. Run DBCC CHECKTABLE on sysobjects in this database.” You should run DBCC CHECKTABLE on a particular table or all tables in the database. The safest bet is to execute DBCC CHECKDB to examine the integrity of all tables. Executing DBCC CHECKDB with one of the REPAIR options can usually fix the problem. If the problem is related to index pages, drop and recreate the affected index. You might also have to restore the database from backup.
23 Severity of 23 indicates that the integrity of the entire database is affected and the database will be marked suspect. For example: “Possible schema corruption. Run DBCC CHECKCATALOG.” These types of errors are usually caused by hardware issues. More than likely you will have to restore the database from backup. Run DBCC CHECKDB after restoring to ensure that the database is not corrupt.
24 Severity of 24 usually spells hardware failure; the error will look similar to the following: “I/O error %ls detected during %S_MSG at offset %#016I64x in file ‘%ls’.” You might have to reload the database from backup. Be sure to execute DBCC CHECKDB to check database consistency first. You might also wish to contact your hardware vendor.

SQL server SQLDIAG Utility

Posted by Sagar Patil

SQLDIAG.exe executable can be found in the SQL Server installation directory under the BINN folder. SQLDIAG records the SQL Server configuration, contents of the error logs (current, as well as archived logs), and Windows configuration including registry keys. If SQL Server is running when SQLDIAG is executed, it will record the output of the following routines:

  1. sp_configure
  2. sp_who
  3. sp_lock
  4. sp_helpdb
  5. xp_msver
  6. sp_helpextendedproc
  7. SELECT * FROM sysprocesses
  8. DBCC INPUTBUFFER for all active sessions
  9. SQLDIAG will also find the roots of any blocking issues
  10. Last 100 queries and exceptions

If SQL Server isn’t running, then SQLDIAG won’t collect SQL Server connection information and INPUTBUFFERs.SQLDIAG output will include the following information about Windows:

  1. Operating system report
  2. Hard drive report
  3. Memory report
  4. Processor report
  5. Services report
  6. Program groups report
  7. Startup programs report
  8. Environment variables report
  9. Software environment report
  10. Network connections report
  11. IRQ’s report
  12. Problem devices report

Generating the output of SQLDIAG can be helpful during disaster recovery since it contains the report of Windows / SQL Server configuration. Notethat you must run the SQLDIAG utility directly on the server; you cannot run it on a remote client.The full syntax of SQLDIAG is as follows:

>──sqldiag─┬───────────────────┬─┬───────────────────────────────────┬──>
           ├─ -? ──────────────┤ └─┬──────────────┬─┬──────────────┬─┘
           └─ -I instance_name─┘   └─ -U login_id─┘ ├─ -P password─┤
                                                    └─ -E ─────────┘

>─┬─────────────────┬─┬──────┬─┬──────┬─┬──────┬────────────────────────>
  └─ -O output_file─┘ └─ -X ─┘ └─ -M ─┘ └─ -C ─┘

Parameters are summarized in the following table:


Parameter Explanation
-? Returns SQLDIAG syntax
-I Instance name. If not specified SQLDIAG will attempt connecting to the default instance
-U SQL Server login or Windows login used for connecting
-P Password of the login specified with –U
-E This option advises SQLDIAG to use trusted connections, the password will not be provided. –E is mutually exclusive with –P
-O The name of the output file. Default name is SQLDIAG.txt. The file is stored in the SQL Server installation directory in LOG folder
-X Advises SQLDIAG to exclude error logs from the output. This is useful if the error logs are too large to be included. You can read error logs directly from ERRORLOG files.
-M Advises SQLDIAG to include DBCC STACKDUMP in its output
-C Advises SQLDIAG to include cluster information in the output

For example, the following command generates the SQLDIAG report on the default instance of SQL Server:

sqldiag

The output generated at the command line looks similar to the following:

Connecting to server SERVERNAME
Getting file E:\Program Files\Microsoft SQL Server\MSSQL\log\ERRORLOG
Getting file E:\Program Files\Microsoft SQL Server\MSSQL\log\ERRORLOG.1
Getting file E:\Program Files\Microsoft SQL Server\MSSQL\log\ERRORLOG.2
Getting file E:\Program Files\Microsoft SQL Server\MSSQL\log\ERRORLOG.3
Getting file E:\Program Files\Microsoft SQL Server\MSSQL\log\ERRORLOG.4
Getting file E:\Program Files\Microsoft SQL Server\MSSQL\log\ERRORLOG.5
Getting file E:\Program Files\Microsoft SQL Server\MSSQL\log\ERRORLOG.6
Getting registry information
Getting library version information
Getting configuration information
Getting current user information
Getting lock information
Getting database information
Getting product information
Getting extended procedures information
Getting process information
Getting input buffers
Getting head blockers
Getting machine information. Please wait, this may take a few minutes
Data Stored in E:\Program Files\Microsoft SQL Server\MSSQL\log\SQLdiag.txt

SQL Server | How to create a Read Only User/Role

Posted by Sagar Patil

I have number of SQL server databases and users . I am in a need to create read only access to users who wants to look at data.

  • Create read only role within single database
CREATE ROLE [readOnlyAccess] AUTHORIZATION dbo
GO
GRANT  SELECT ON SCHEMA ::dbo TO readOnlyAccess
  • Create read only role within All databases in an Instance
CREATE ROLE [readOnlyAccess] AUTHORIZATION dbo
GO
exec sp_MSforeachdb 'USE [?]; drop role readOnlyAccess; CREATE ROLE [readOnlyAccess] AUTHORIZATION dbo; GRANT SELECT ON SCHEMA ::dbo TO readOnlyAccess'
  • Create a readonlyuser within single database
USE [master]
GO
CREATE LOGIN [sagarreadonly] WITH PASSWORD=N'sagarreadonly', DEFAULT_DATABASE=[master], CHECK_EXPIRATION=OFF, CHECK_POLICY=OFF
GO
USE [DataEncryptDemo]
GO
CREATE USER [sagarreadonly] FOR LOGIN [sagarreadonly]
GO
USE [DataEncryptDemo]
GO
EXEC sp_addrolemember N'readOnlyAccess', N'sagarreadonly'
GO
  • Create a readonlyuser within ALL databases
USE [master]
GO
CREATE LOGIN [sagarreadonly] WITH PASSWORD=N'sagarreadonly', DEFAULT_DATABASE=[master], CHECK_EXPIRATION=OFF, CHECK_POLICY=OFF
GO
use master
exec sp_MSforeachdb 'IF ''?'' NOT IN (''master'',''model'',''msdb'',''tempdb'' ) begin
USE [?]; CREATE USER [sagarreadonly] FOR LOGIN [sagarreadonly]; end'
go
USE [master]
GO
exec sp_MSforeachdb 'IF ''?'' NOT IN (''master'',''model'',''msdb'',''tempdb'' ) begin
USE [?]; EXEC sp_addrolemember N''readOnlyAccess'', N''sagarreadonly''; end'
GO
USE [master] 
GO
exec sp_MSForEachDb 'USE ? GRANT VIEW DEFINITION TO schemareader'
go

image


image

Above SQL will pass access to database tables but you won’t see any procedures,triggers,functions or TSQL objects. Use following TSQL procedure to grant access on all objects within schema.

USE DataEncryptDemo
GO 
CREATE PROCEDURE usp_ExecGrantViewDefinition 
(@login VARCHAR(30)) 
AS 
/*
Included Object Types are: 
P - Stored Procedure 
V - View 
FN - SQL scalar-function
TR - Trigger 
IF - SQL inlined table-valued function
TF - SQL table-valued function
U - Table (user-defined)
*/ 
SET NOCOUNT ON 

CREATE TABLE #runSQL
(runSQL VARCHAR(2000) NOT NULL) 

--Declare @execSQL varchar(2000), @login varchar(30), @space char (1), @TO char (2) 
DECLARE @execSQL VARCHAR(2000), @space CHAR (1), @TO CHAR (2) 

SET @to = 'TO'
SET @execSQL = 'Grant View Definition ON ' 
SET @login = REPLACE(REPLACE (@login, '[', ''), ']', '')
SET @login = '[' + @login + ']'
SET @space = ' '

INSERT INTO #runSQL 
SELECT @execSQL + schema_name(schema_id) + '.' + [name] + @space + @TO + @space + @login 
FROM sys.all_objects s 
WHERE type IN ('P', 'V', 'FN', 'TR', 'IF', 'TF', 'U') 
AND is_ms_shipped = 0 
ORDER BY s.type, s.name 

SET @execSQL = '' 

Execute_SQL: 
SET ROWCOUNT 1 
SELECT @execSQL = runSQL FROM #runSQL
PRINT @execSQL --Comment out if you don't want to see the output
EXEC (@execSQL)
DELETE FROM #runSQL WHERE runSQL = @execSQL
IF EXISTS (SELECT * FROM #runSQL) 
  GOTO Execute_SQL 
SET ROWCOUNT 0
DROP TABLE #runSQL 
GO
Grant privs to all databases except master,model,msdb,tempdb
exec sp_MSforeachdb 'IF ''?'' NOT IN (''master'',''model'',''msdb'',''tempdb'' ) begin USE [?]; exec usp_ExecGrantViewDefinition @login=''sagarreadonly''; end'
image


image

You should now see TSQL procedures and other objects.

New layer…
New layer…

What patches are applied to my SQL Server

Posted by Sagar Patil

Use

  • select @@VERSION”  OR
  • SELECT SERVERPROPERTY(‘productversion’), SERVERPROPERTY (‘productlevel’), SERVERPROPERTY (‘edition’) ” Or
  • Simply look at the value in the Management Studio Explorer

Now compare it to the list of SQL Server builds to determine which patches are installe

How to use SP_CONFIGURE in SQL Server

Posted by Sagar Patil

sp_configure is a tool to display and change SQL Server settings. Please be aware that changing these settings can dramatically affect your instance.

How to view configured values

One can use SYS.CONFIGURATIONS else sp_configure without parameters to view current values

How to enable listing of all parameters

Run “select * from SYS.CONFIGURATIONS where name like ‘show%advanced%’” to see if show advanced options is already enabled?

image

sp_configure will only list 16 parameters than 68 total for SQL2008R2 with “show advanced options “ disabled. Enable “show advanced options” to get listing of all parameters

sp_configure ‘show advanced options’, 1
GO
reconfigure
GO

image

How to change the sql server configured value

Syntax: sp_configure ‘<<Configuration Name>>’,'<<Configuration Value>>’

sp_configure 'max server memory', 12288
RECONFIGURE
GO

Difference between SYS.CONFIGURATIONS & sp_configure

image

Columns of SYS.CONFIGURATIONS

configuration_id – Internal ID of the configuration setting
name – Config value name
value – Config value
value_in_use – The twin of run_value above
description – Details of a parameter
is_dynamic –  If a value is dynamic or not. 1 = Dynamic, just run reconfigure after changing and it changes “on the fly”. 0 = not dynamic – need to stop and start SQL Server service
is_advanced – Like the above, ever wonder if you have to change the show advanced option to display a value? Well you can find out here. It’s a flag, 1 is yes, 0 is no, like the is_dynamic flag

Running the procedure sp_configure without parameters gives a result set which contains the column run_value. The difference between Config_Value and run_value is that config_value is the value that the configration name is configured, run_value  is the value that the instance is currently using.

image

Columns of SP_CONFIGURE
name – The name of the value to be changed
minimum – The minimum value setting that is allowed
maximum – The maximum value that is allowed
config_value – What value is currently configured?
run_value – What value is currently running?

SQL Server Maintenance Scripts : YourSqlDba & SQL Server Maintenance Solution

Posted by Sagar Patil

If you are looking for a good TSQL packaged scripts which will do usual database maintenance activities then you are on right page. I have detailed 2 such projects which will help you to setup maintenance job in less than an hour.

Please use it at your own risk. I would highly recommend running it on test setups  before adding at prod/useful boxes.

1. YourSqlDba  : T-Sql Database script that automate database maintenance using SQL Agent an DB Mail. Performs optimizations (index, statistics), integritry check, databases backups (complete and tx logs).

What it does…

  • Automate full backups and recurrent log backups.
  • Perform update statistics (spread all of them over a specified period of time, by default a week)
  • Selectively reorganize or rebuild index that show a fragmentation thresold
  • Check database integrity
  • Keep an up-to-date backup of MSDB which record all backup history (at the end of each full or log backup cycle)
  • Clean-up history log (backup, Sql Agent, Sql maintenance)
  • Recycle SQL Server error log every day (keep up to 30 archives)
  • Provides simplified sp utilities to do manual backup, duplicate database, and restore database.
  • Schedule agent task for maintenance
  • Configure database mail for maintenance reporting
  • Send e-mail that regular notify maintenance activity
  • Send exceptional e-mail for notifying problematic maintenance issues
  • Disable immediately databases with integrity problem
  • Disable databases which failed to be backup more than 3 consecutives times (manual backup can reset the failure count)
  • Connect network drives visible to database engine for backup purposes, and make them auto-reconnect at startup.

How it does it ?

  • Everything is stored in a database named YourSQLDba
    • Stored procedures
    • Internal table (logs, and informational tracking info)
  • It uses SQL Server Agent to run maintenance job
  • Two job are created that use the same procedure with different parameters
    • One for daily maintenance (integrity test, update statistics, reorganize or rebuild, full backups)
    • One for log backups
  • Job backups reset log size that grow beyond a given threshold
  • It communicates to operator or Dba or whatever else is responsible (SQL Agent operator) through database mail

How to Install it?

Download script from here

Compile the script on database. You will notice 2 default jobs added as part of a install.

image

Default Maintenance

YourSQLDba automated part is expressed as two tasks in the SQL Server Agent:

  • YourSQLDba_FullBackups_And_Maintenance
  • YourSQLDba_LogBackups.

Each task contains a single step which call YourSQLDba_DoMaint, but with different parameters.

YourSQLDba_LogBackups is quicker to explain, as it deal exclusively with log backups.

  • They are performed continuouly all around the clock, at every 15 minutes (thanls to SQL Server Agent Scheduler). Some may wonder how it avoid problems like running into a concurrent attempt to do log backup at the same time there is an ongoing database backup on the same database. YourSQLDba use a feature introduced in SQL2000 to avoid, this. This is called application locks (See sp_getapplock). A log backup for a given database give up immediately, if it can’t obtain the application lock. YourSQLDba defines for both log and complete maintenance for a given database. However complete maintenance wait at least 5 minutes before giving up waiting for a lock. We suppose that 5 minutes is a reasonable time to wait for a log backup, since log backup done at every 15 minutes doesn’t have too much time to become too large, and hence long to backup.
  • At log backup time, after the log is emptied by the log backup, log file that have grown beyond a certain size are shrunk. This target size is calculated this way (sum of size of primary data file + sum of size of files in default file group + 1/10 sum of the size of files outside default file group). If log size that is greater than 40% of this computation, we assumed that shrunk time has come. Why compute on 1/10 of the file outside of default file group ? Usually special filegroup are used to stored blob, or historical data, or to do table and index partionning. We have a big volume in these filegroups for which only a fraction of the content is usually changed. Log ratio size relatively to these big file need to be smaller, contrary to primary data file of default filegroup.

YourSQLDba_FullBackups_And_Maintenance needs more explanations as it performs more tasks.

  • Log cleanup are performed
    • Sql Server current is recycled (it means archived) and a new log is generated.
    • Logs like SQL Agent backup history are limited to 30 days.
    • YourSQLDba log history is limited to 30 days.
    • Mail items log is limited to 30 days
    • Agent job history is limited to 30 days.
  • By default the procedure YourSQLDba_DoMaint is called with the option to do the following tasks.
    • Check database integrity. If a database is found with any integrity problem, it is put immediately in emergency mode
    • Update distribution statistics. Updates are done using full scan, but process is spread by default (parameter) on seven days.
    • Reorganize or Rebuild index depending on their real level of fragmentation, base on a threshold specified internally into the procedure
    • Perform full database backup
      • Full database backup files older that one day (parameter) are suppressed from disk backup directory
      • Log backup files older that seven day (parameter) are suppressed from disk backup directory
      • A full backup file of the database is created and named this way dbname_[yyyy-mm-dd_hhhmimsss_dw].bak where dbname is the name of the database, yyyy-mm-dd HHhMImSSs_dw a timestamp plus the day name of the week and .Bak extension is the regular extension used for full database backup.
      • A log backup file is created and named about the same as a full backup file except the extension which is .Trn for transaction log backups.
      • Every backup cycle, whether it is full backup or transaction log backup cycle, is followed by a complete backup of MSDB. Msdb keeps tracks of all backups done and makes it easier to do other restores once it is restored since all the backup history become accurate and up-to-date.
      • Backup file name and locations are retained into a table into YourSQLDba. It allows YourSQLDba to reuse the backup log file for a given database, to continue to append other log backups to the same file. It greatly reduce the number of files produced by the backup procedure, by using the same log backup file for all the day.

2.  SQL Server Maintenance Solution by  ola.hallengren.com

The SQL Server Maintenance Solution comprises scripts for running backups, integrity checks, and index and statistics maintenance on all editions of Microsoft SQL Server 2005, SQL Server 2008, SQL Server 2008 R2, and SQL Server 2012. The solution is based on stored procedures, functions, the sqlcmd utility, and SQL Server Agent jobs.

Download MaintenanceSolution.sql. This script creates all the objects and jobs that you need.

Learn more about using the SQL Server Maintenance Solution:

Helpful SQL Scripts

SQL Server Maintenance Solution logs the command executed in table dbo.CommandLog

1. Find the most expensive “SQL server maintenance” job for last one month

SELECT command,starttime, DATEDIFF(MINUTE,starttime,endtime) as duration FROM dbo.CommandLog
WHERE starttime BETWEEN GETDATE()-30 AND GETDATE()
ORDER BY 3 DESC
image

2. Find list of reorg/rebuilt indexes & their fragmentation details

select command,starttime, DATEDIFF(MINUTE,starttime,endtime) as "Duration In Mins", ExtendedInfo.value('(/ExtendedInfo/PageCount)[1]', 'int') as PageCount,
          ExtendedInfo.value('(/ExtendedInfo/Fragmentation)[1]', 'decimal(10,4)') as Fragmentation
from commandlog
where command is not null 
and ExtendedInfo.value('(/ExtendedInfo/PageCount)[1]', 'int') is not null
and ExtendedInfo.value('(/ExtendedInfo/Fragmentation)[1]', 'decimal(10,4)') is not null
ORDER BY 3 DESC
image

3.  Script to shrink all user SQL databases.

DECLARE @db VARCHAR(255)
DECLARE c CURSOR FOR
SELECT name FROM sys.databases WHERE is_read_only=0 AND STATE=0
  AND name NOT IN ('master','model','tempdb','msdb')
OPEN c
FETCH c INTO @db
WHILE @@FETCH_STATUS=0
BEGIN
  EXEC SP_dboption @db,'trunc. log on chkpt.','true' 
  DBCC shrinkdatabase (@db)
  FETCH NEXT FROM c INTO @db
END
CLOSE c
DEALLOCATE c
image

4. Shrink log files for all databases

declare @ssql nvarchar(4000)
set @ssql= '
        if ''?'' not in (''tempdb'',''master'',''model'',''msdb'') begin
        use [?]
        declare @tsql nvarchar(4000) set @tsql = ''''
        declare @iLogFile int
        declare LogFiles cursor for
        select fileid from sysfiles where  status & 0x40 = 0x40
        open LogFiles
        fetch next from LogFiles into @iLogFile
        while @@fetch_status = 0
        begin
          set @tsql = @tsql + ''DBCC SHRINKFILE(''+cast(@iLogFile as varchar(5))+'', 1) ''
          fetch next from LogFiles into @iLogFile
        end
        set @tsql = @tsql + '' BACKUP LOG [?] WITH TRUNCATE_ONLY '' + @tsql
        --print @tsql
        exec(@tsql)
        close LogFiles
        DEALLOCATE LogFiles
        end'

exec sp_msforeachdb @ssql

How to locate SQL server clustered database & it’s properties

Posted by Sagar Patil


1. How to locate if I am connected to a SQL server cluster?

SELECT SERVERPROPERTY(‘IsClustered’)

2. Find name of the Node on which SQL Server Instance is Currently running

SELECT SERVERPROPERTY(‘ComputerNamePhysicalNetBIOS’) AS [CurrentNodeName]
If the server is not cluster, then the above query returns the Host Name of the Server.

3. Find SQL Server Cluster Nodes

a. SELECT * FROM fn_virtualservernodes()
b. SELECT * FROM sys.dm_os_cluster_nodes

4. Find SQL Server Cluster Shared Drives

a. SELECT * FROM fn_servershareddrives()
b. SELECT * FROM sys.dm_io_cluster_shared_drives

Query Performance : Enable execution plan /IO stastics under SQL server

Posted by Sagar Patil

Enable IO and Explain Plan settings using “set options”

Run the SQL and look at “Messages” & “Execution plan” tab to see the relevant output.

SQL Server : How to Enable Intra Query Parallelism

Posted by Sagar Patil

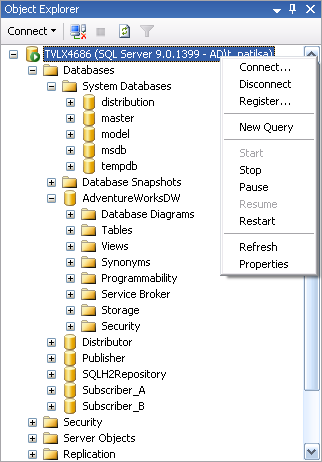
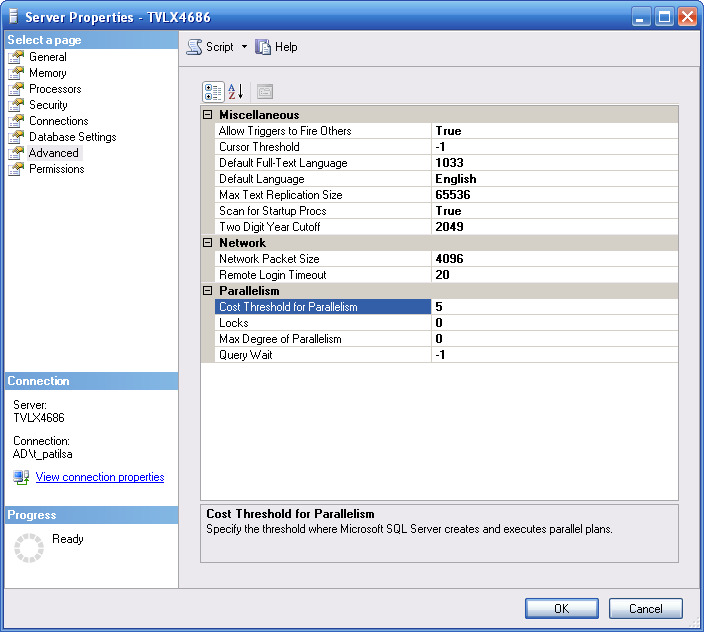
Right click on “server name” and select “properties”

If you have BATCH processing environment , try increasing MAX degree of Parallism to enhance query performance.

SQL server will use Parallism for any SQL whose cost is more than 5

Troubleshooting Bottlenecks : Using SQL Server Profiler & Windows System Monitor Together

Posted by Sagar Patil

Here is a situation – users are complaining about a slow SQL server response.

We want to quantify if that is result of a hard hitting SQL query or this is to do with some application/background jobs running on the server.

Let’s put to practise our skills from http://www.oracledbasupport.co.uk/troubleshooting-bottlenecks-using-sql-server-profiler-part-iv/ & http://www.oracledbasupport.co.uk/troubleshooting-bottlenecks-using-windows-system-monitor-part-i/

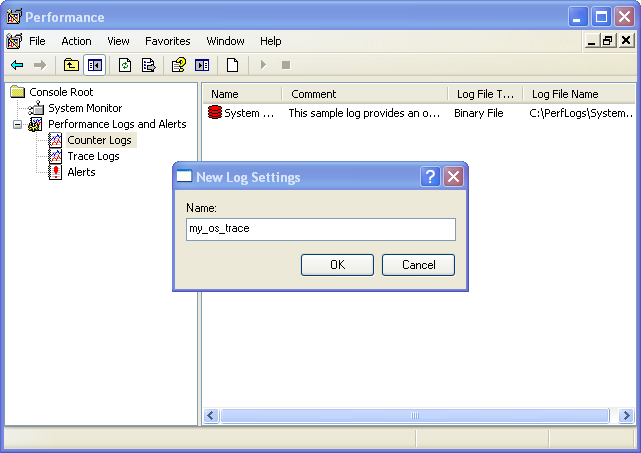
Please initiate a Trace on SQL server before going ahead. Within a SQL server Profiler window click on the top button for “Performancve Monitor” to enable logging.

Read more…

SQL Server Remote Connection Error : An error has occurred while establishing a connection to the server.

Posted by Sagar Patil

This morning I installed a new instance of SQL server and while connecting remotely it sent me an error message.

Error Has Occurred While Establishing A Connection To SQL Server 2005 Which Does Not Allow Local and Remote Connections

ITLE: Connect to Server—————————– Cannot connect to .——————————
ADDITIONAL INFORMATION:
An error has occurred while establishing a connection to the server. When connecting to SQL Server 2005, this failure may be caused by the fact that under the default settings SQL Server does not allow remote connections. (provider: Named Pipes Provider, error: 40 – Could not open a connection to SQL Server) (Microsoft SQL Server, Error: 233)

Solution is here : http://support.microsoft.com/kb/914277

  • Please check firewall and make sure it is disabled else create an exception
  • Enable the SQL Server Browser Service
  • Enable remote connections for each instance of SQL Server 2005 that you want to connect to from a remote computer.

To do this, follow these steps:

1. Click Start, point to Programs, point to Microsoft SQL Server 2005, point to Configuration Tools, and then click SQL Server Surface Area Configuration.

2. On the SQL Server 2005 Surface Area Configuration page, click Surface Area Configuration for Services and Connections.

3. On the Surface Area Configuration for Services and Connections page, expand Database Engine, click Remote Connections, click Local and remote connections, click the appropriate protocol to enable for your environment, and then click Apply.

Note Click OK when you receive the following message:
Changes to Connection Settings will not take effect until you restart the Database Engine service.

4. On the Surface Area Configuration for Services and Connections page, expand Database Engine, click Service, click Stop, wait until the MSSQLSERVER service stops, and then click Start to restart the MSSQLSERVER service.

Maintaining SQL Server High Availability

Posted by Sagar Patil
  • Failover Clustering
  • Log Shipping
  • Database Mirroring

Failover Clustering : Used for entire SQL server Instance , Hardware Solution based on MSCS

Shared disks configured between MSCS cluster and automatic failover Will be achieved if one of the node goes down

Database Mirroring :: High availability for Database, Software solution based on HOT standby (New 2005)

  1. Principle database is applied at Mirror database almost real time.
  2. There is one t one relationship and means there would be only one HOT standby for any database.
  3. The mirrored database is in recovery mode and never available until failed over
  4. A witness box could be used to carry automatic failover when needed
  5. Will only work with FULL recovery Model
  6. Could be configured into 3 different modes- High Availability (Sync operation with Witness server ), High Protection (Sync Operation with NO Witness server ) & High Performance (ASync operation with NO Witness server )

Log Shipping : High availability for Database, Software solution based on WARM standby (Old 2000)

  1. Secondary database is not sync with primary . The primary database doesn’t send the transaction logs directly to the Secondary. The moving of logs is done by the SQL agent using a network share. Primary server has a backup Job which backs up the transaction logs to a network share while Secondary server have Job to apply them at destination.
  2. The warm standby can have one to one else one to many relationship with Primary database.
  3. The Warm standby is always available in read only mode
  4. A monitor server could be used to setup all jobs needed between Primary and Secondary server. We Can omit the Monitor server and push jobs into Primary & secondary if needed.
  5. Supports Manuel Failover only
  6. Can work with FULL else BULK recovery Model
Top of Page

Top menu